Soundmatters SLIMstage Manual: instruction
Class: Audio Accessories
Type:
Manual for Soundmatters SLIMstage Manual

Deutsch
Русск
Français
Italiano
English
Español
soundmatters international, inc.
reno, nevada, USA
worldwide tel
775.981.1460
toll-free (usa)
800.698.SOMA (7662)
fax
775.981.1465
support@soundmatters.com
web
www.soundmatters.com
in europe contact:
Dahl Audio Electronic GmbH
10707 Berlin, Germany
tel
0049 (0) 30 – 88628017
info@dahlaudio.com
©2008 soundmatters international, inc. – 07.08-p1
operation manual
Manuel D’Utilisation
Bedienungshandbuch
Manual de operación
Manuale d’Uso Operativo
Руководство пользователя
Use the SLIMstage
Set-Up Guide/Connection Poster
to connect your new soundmatters system
Verwenden Sie das
SLIMstage Einrichtungs- / Anschlussposter
,
um Ihr neues Soundmatters System
anzuschließen
Utilisez votre
Guide de Mise En Route / Poster de connexion
pour raccorder votre nouveau système
soundmatters SLIMstage.
Use el SLIMstage
Guía de configuración/Póster de conexión
para conectar tu nuevo sistema soundmatters
Usare il Poster SLIMstage
Guida alla Configurazione/
Connessione per connettere
il vostro nuovo sistema soundmatter
Используйте постер
Руководство по установке
SLIMstage для установки и подключения
вашей soundmatters системы
p2
p20
p38
p56
p92
p74

2
3
English
Important Safety Precautions
CAUTION – Risk of electric shock – Do not open
1. Read instructions
– All the safety and operating instructions should be read before the product is operated.
2. Keep these instructions
– The safety and operating instructions should be retained for future reference.
3. Heed all warnings
– All warnings on the product and the Users Guide should be adhered to.
4. Follow all instructions
– All operating and use instructions should be followed.
5. To reduce the risk of fire or electric shock, do not expose this apparatus to rain or moisture
– The product
should not be used near water – for example, near a bathtub, washbowl, kitchen sink, laundry tub, in a wet basement, or
near a swimming pool and the like. The apparatus shall not be exposed to dripping or splashing and that no objects filled
with liquids, such as vases, shall be placed on the apparatus.
6. Clean only with a dry cloth.
7. Do not block any ventilation openings.
Install in accordance with the manufacturer’s instructions. Slots or openings
in the cabinet are provided for ventilation and to ensure reliable operation of the product and to protect it from overheating,
and these openings must not be blocked or covered. Placing the product on a bed, sofa, rug or similar surface should never
block the openings. The product should not be placed in a built-in installation such as a bookcase or rack unless proper
ventilation is provided or the manufacturer’s instructions have been adhered to.
8. Do not install near any heat sources
such as radiators, heat registers, stoves, or other apparatus (including
amplifiers) that produce heat.
9. Do not defeat the safety purpose of the polarized or grounding-type plug.
A polarized plug has two blades with
one wider than the other. A grounding type plug has two blades and a third grounding prong. The wide blade or the third
prong are provided for your safety. If the provided plug does not fit into your outlet, consult an electrician for replacement
of the obsolete outlet.
10. Power cords and power adapters
– Use only the power cords and power adapters supplied by the product
manufacturer.
Never wrap a power cord around the power adapter or other object. Doing so can stress the cord in ways that can cause the
cord to fray or crack. This can present a safety hazard.
Always route power cords so that they will not be walked on, tripped over, or pinched by objects.
Protect the cord and power adapters from liquids. For instance, do not leave the cord or power adapter near sinks, tubs,
toilets, or on floors that are cleaned with liquid cleaners. Liquids can cause a short circuit, particularly if the cord or power
adapter has been stressed by misuse. Liquids can also cause gradual corrosion of the power cord terminals and/or the
connector terminals on the adapter which can eventually result in overheating.
Always ensure that all power cords connectors are securely and completely plugged into receptacles.
Do not use any power adapter that shows corrosion at the ac input pins and/or shows signs of overheating (such as
deformed plastic) at the ac input or anywhere on the power adapter.
Do not use any power cords where the electrical contacts on either end show signs of corrosion or overheating or where the
power cord appears to have been damaged in any way.
11. Only use attachments/accessories specified by the manufacturer.
12. Use only with the cart, stand, tripod, bracket, or table specified by the manufacturer,
or sold with the apparatus. When a cart is used, use caution when moving the cart/apparatus
combination to avoid injury from tip-over. Placing the product in an unstable location such as an
unstable cart, bracket or table, may cause the product to fall, causing serious injury to a child or an
adult, and serious damage to the product.
13. Unplug this apparatus during lightning storms or when unused for long periods of time.
A surge-filter can
also prevent damage and is recommended.
14. Refer all servicing to qualified service personnel.
Servicing is required when the apparatus has been damaged in
any way, such as power-supply cord or plug is damaged, liquid has been spilled or objects have fallen into the apparatus,
the apparatus has been exposed to rain or moisture, does not operate normally, or has been dropped.
15. This product should be operated only from the type of power source indicated on the marketing label.
If
you are not sure of the type of power supply in your home, consult your product dealer or local power company. For products
intended to operate from battery power or other sources, refer to the operating instructions.
16. Overloading
– Do not overload wall outlets, extension cords, or integral convenience receptacles, as this can result
in risk of fire or electric shock.
17. Object and liquid entry
– Never push objects of any kind into this product through openings, as they may touch
dangerous voltage points or short-out parts that could result in a fire or electric shock. Never spill liquid of any kind on
the product. Adjust only those controls that are covered by the operating instructions, as an improper adjustment of other
controls may result in damage and will often require extensive work by a qualified technician to restore this product to its
normal operation.
18. Replacement parts
– When replacement parts are required, be sure the service technician has used replacement
parts specified by the manufacturer or have the same characteristics as the original part. Unauthorized substitutions may
result in fire, electric shock or other hazards.
19. Upon completion of any service or repairs to this product,
ask the service technician to perform safety checks to
determine that the product is in proper operating condition.
20. Do not attempt to service this product yourself,
opening or removing covers may expose you to dangerous
voltage or other hazards. Refer all servicing to qualified service personnel.
21. Wall Bracket Mounting
– Refer to the mounting bracket manufacturer for instructions; confirm that bracket securely
mounted to the SLIMstage and into the wall studs in a manner which will not shake loose during product operation.
WARNING
To reduce the risk of fire or electric shock, do not expose this apparatus to rain or moisture.
4
5
English
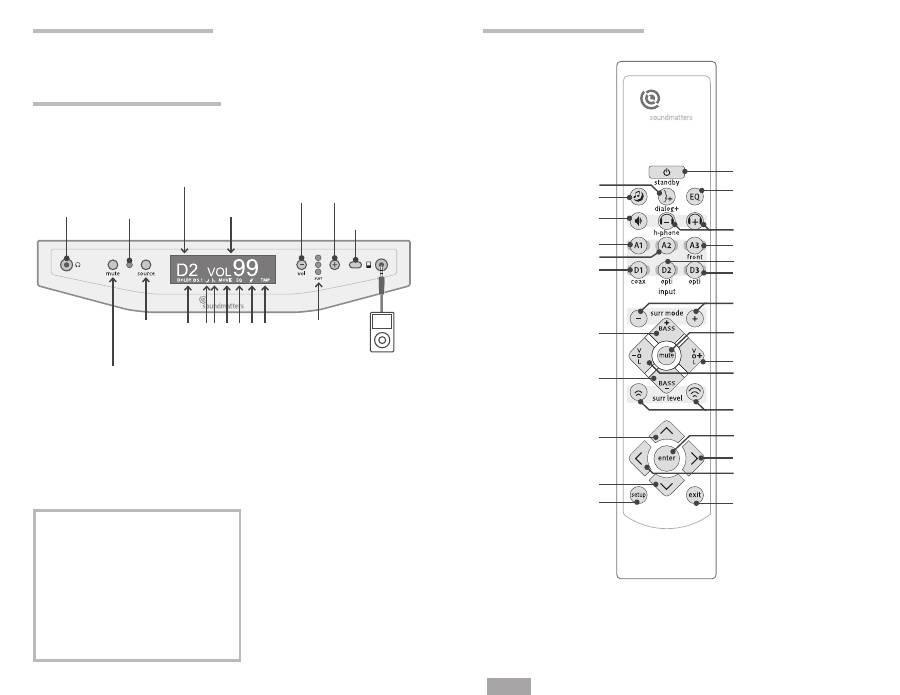
14.
Bass Level Up
(including external sub)
17.
Master Volume Up
5.
Preset EQ On & Off
6.
Headphone Volume Down & Up
16.
Mute
(unmute via any remote or
front panel command)
18.
Master Volume Down
15.
Bass Level Down
(including external sub)
19.
Surround Level Down & Up
(or rear level if set for external rears)
23.
Menu Next/Right
24.
Menu Previous/Left
22.
Set/Enter
20.
Menu Next/Up
21.
Menu Previous/Down
25.
Enter Setup Mode
26.
Exit to Previous Menu
13.
Surround Down & Up
(through 4 positions)
1.
Vocals EQ
(on & off)
2.
Night / Dynamic
Compression
(on & off)
3.
Speakers on & off
(with headphones connected)
7.
Select input: Analog 1
8.
Select input: Analog 2
9.
Select input: Analog 3
(front)
10.
Select input: Digital 1
12.
Select input: Digital 3
11.
Select input: Digital 2
4.
On / Off / Standby Mode
H.
Mute/Unmute
(also unmute via any
remote or front panel
button)
Q.
Surround
Mode
Indicator
3 LED = Movie
2 LED = Live/TV
1 LED = Music
0 LED = Stereo/
Bypass
R.
“iPod”/Analog
Input
(auto-switching
via 1/8” 3.5mm
connector –
overrides all
rear inputs)
B.
Power
Indicator
F.
Master
Volume
Up
(controls
headphone
volume
when
speakers
are off)
E.
Master
Volume
Down
(controls
headphone
volume
when
speakers
are off)
G.
IR Remote
Sensor
I.
Source
Select
(sequence
through
inputs)
C.
Input/Source
D.
Volume
Status
J.
Dolby D2.0, Dolby D5.1,
DTS, PCM, Analog
detected
K.
Night / Dynamic
Compression On
L.
Dialog+ On
M.
STEREO, MUSIC, LIVE,
MOVIE mode
N.
EQ Preset
O.
Speakers Off
(when
using headphones)
P.
Thermal Overload
Protection Warning
J
K L M N O
Connections & Placement
IMPORTANT NOTE:
Prior to using this Operation Manual, please follow the instructions in the
Setup Guide for making all connections and proper positioning of your SLIMstage.
P
Front Control Panel Layout Remote Control Layout
A.
Headphone
EuphonyHD
Surround
Technology
(via 1/8” 3.5mm
connector)
Contents
page
•
Safety . . . . . . . . . . . . . . . . . . . . . . . 2
•
Connections & Placement . . . . . . . . . . 4
•
Front Panel & Remote Control . . . . . . . . 4
-
5
1. Operation. . . . . . . . . . . . . . . . . . . . . 6
2. Adjustments . . . . . . . . . . . . . . . . . . . 6
3. Headphones . . . . . . . . . . . . . . . . . . . 7
4. Advanced . . . . . . . . . . . . . . . . . . . . . 7
5. Setup . . . . . . . . . . . . . . . . . . . . . . . 8
6. FAQ. . . . . . . . . . . . . . . . . . . . . . . . . 14
7. Troubleshooting . . . . . . . . . . . . . . . . 15
8. Specifications . . . . . . . . . . . . . . . . . . 16
9. Warranty/Service . . . . . . . . . . . . . . . . 17
Table of contents
- Important Safety Precautions
- Connections & Placement
- 3. Headphones
- 5. Setup Menus
- 6. Frequently Asked Questions
- 8. Specifications
- Précautions de sécurité importantes
- Connexions et Emplacement
- 3. Casques
- 5. Menus de Configuration
- 6. Foire aux Questions, FAQ
- 8. Spécifications
- 9. Garantie/Service:
- Wichtige Sicherheitsvorkehrungen
- Verbindungen & Platzierung
- 3. Kopfhörer
- 5. Setup-Menüs
- 6. Häufig gestellte Fragen (FAQ)
- 8. Technische Daten
- 9. Garantie / Service
- Precauciones importantes de seguridad
- Conexiones y Colocación
- 3. Audífonos
- 5. Menús de Configuración
- 6. Preguntas más Frecuentes (FAQ)
- 8. Especificaciones
- 9. Garantía/Servicio
- Importanti precauzioni di sicurezza
- Connessioni & Posizionamento
- 3. Cuffia
- 5. Menu di Configurazione
- 6. Domande Frequenti (FAQ)
- 8. Caratteristiche
- 9. Garanzia / Service
- Важные меры безопасности
- Подключение и Расположение
- 1. Управление
- 4. Дополнительные функции
- 6. Часто Задаваемые Вопросы
- 8. Спецификации
- 9. Гарантия и Сервис
