Smeg KIV950RX: Instruction on mounting and use Operation Use Ducting version Model with button panel Filter version Functioning - 5-key electronic model Installation Electrical connection Mounting
Instruction on mounting and use Operation Use Ducting version Model with button panel Filter version Functioning - 5-key electronic model Installation Electrical connection Mounting: Smeg KIV950RX
Table of contents
- Instruction on mounting and use
- Instruction on mounting and use Operation Use Ducting version Model with button panel Filter version Functioning - 5-key electronic model Installation Electrical connection Mounting
- Replacing lamps Maintenance Caution Cleaning Grease filter Charcoal filter (filter version only)
- The symbol on the product, or on the documents
8
Instruction on mounting and use
Consult the designs in the front pages referenced in the text by
weight of the hood. Do not tile, grout or silicone this
alphabet letters. Closely follow the instructions set out in
appliance to the wall. Surface mounting only.
this manual. All responsibility, for any eventual
inconveniences, damages or fires caused by not complying
with the instructions in this manual, is declined.
Operation
Use the high suction speed in cases of concentrated kitchen
Use
vapours. It is recommended that the cooker hood suction is
The hood is designed to be utilized either for suction version at
switched on for 5 minutes prior to cooking and to leave in
external evacuation or filtering version at internal recirculation.
operation during cooking and for another 15 minutes
approximately after terminating cooking.
Ducting version
The hood is equipped with a top air outlet B for discharge of
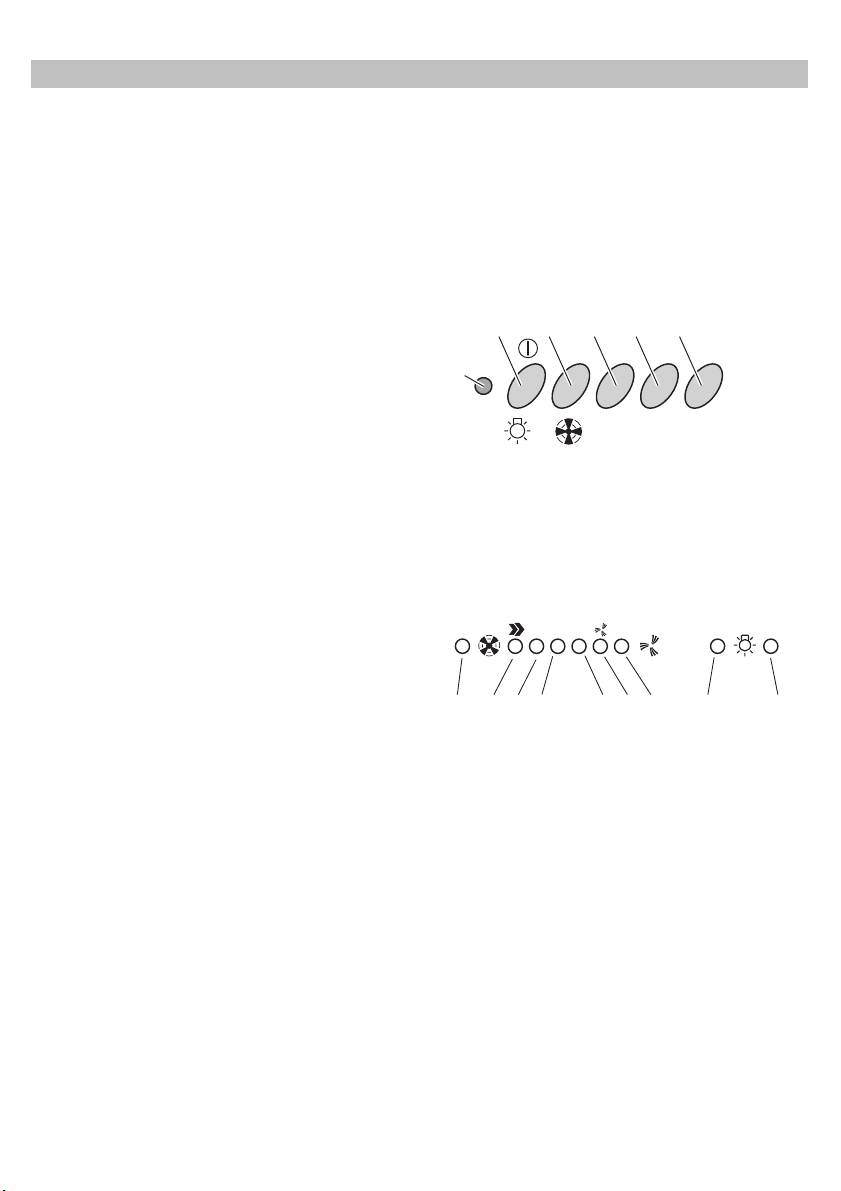
Model with button panel
fumes to the outside (exhaust pipe and pipe fixing clamps not
b. c. d. e. f.
provided). Attention!
O1 2 3
If the hood is supplied with carbon filter, then it must be
a.
removed.
Filter version
Should it not be possible to discharge cooking fumes and
vapour to the outside, the hood can be used in the filter
version, fitting an activated carbon filter and the deflector F on
a. operating gauge.
the support (bracket) G, fumes and vapours are recycled
b. on/off light switch
through the top grille H by means of an exhaust pipe connected
c. off aspiration switch
to the top air outlet B and the connection ring mounted on the
d. minimum power selection aspiration switch
deflector F (exhaust pipe and pipe fixing clamps not provided).
e. medium power selection aspiration switch
Attention!
f. maximum power selection aspiration switch
If the hood is not supplied with carbon filter, then it must
Functioning - 5-key electronic model
be ordered and mounted.
The models with no suction motor only operate in ducting
123OOI
mode, and must be connected to an external suction device
(not supplied).
FC
1234 567 8 9
Installation
The minimum distance between the supporting surface for the
1. Motor OFF button
cooking vessels on the hob and the lowest part of the range
2. ON button and motor speed selection button 1 - 2 - 3 - 1
hood must be not less than 60cm from electric cookers and
- 2 - . . . .
70cm from gas or mixed cookers.If the instructions for
3. Speed 1 LED
installation for the gas hob specify a greater distance, this must
4. Speed 2 LED and metal grease filter saturation LED (in
be adhered to.
this latter case, the LED will flash - See instructions on
grease filter cleaning).
Electrical connection
Once the grease filters have been cleaned, press button
The electrical tension must correspond to the tension noted on
1 for about 3 seconds until you hear the acoustic signal
the label placed inside the cooker hood. Connect the electrical
(beep): the LED 4 will now stop flashing.
plug, where provided, to the an easily accessible outlet in
5. Speed 3 LED and active carbon filter saturation LED (in
conformity with local standards in force. Where an electrical
this latter case, the LED will flash - See instructions on
plug is not provided (for direct connection to electrical network)
active carbon filter replacement).
place a standards approved bipolar switch with an aperture
Once you have replaced the charcoal filter, press button
distance of not less than 3mm (accessible) from the contacts.
1 for about 3 seconds until you hear the acoustic signal
Attention: substituting the supply cable must be carried out by
(beep). LED 5 will now stop flashing.
the authorised technical assistance service.
Warning!
Mounting
The active carbon filter saturation LED is not activated.
Expansion wall plugs are provided to secure the hood to most
In order to activate the active carbon filter saturation
types of walls/ceilings. However, a qualified technician must
indicator, press buttons 2 and 7 simultaneously for 3
verify suitability of the materials in accordance with the type of
seconds. Initially, only LED 4 will flash, then after the 3
wall/ceiling. The wall/ceiling must be strong enough to take the
seconds have passed, LED 5 will also start flashing,
