Peg-Perego Aria Twin: instruction
Class: Automotive Parts
Type:
Manual for Peg-Perego Aria Twin
FI990601I36
Aria Twin
Istruzioni
d
ʼ
uso IT
Instructions for use EN
Notice
d
ʼ
emploi FR
Gebrauchsanleitung
DE
Instrucciones de uso ES
Instruções para uso PT
Gebruiksaanwijzing
NL
Használati
útmutató
HU
Navodila za uporab SL
Инструкции
по
пользованию
RU
Kullanim
klavuzu
TR
ΟΔΗΓΙΕΣ
ΧΡΗΣΕΩΣ
EL
AVOID SERIOUS INJURY FROM FALLING OR SLIDING
OUT. ALWAYS USE COMPLETE 5 POINT SEAT BELT.
WARNING:
1
3
4
5
2
6
A
B
10
7
8
11
12
9
16
17
15
13
14
18
A
B
22
23
24
20
21
19
29 Accessory
30 Accessory
25
26
28
27
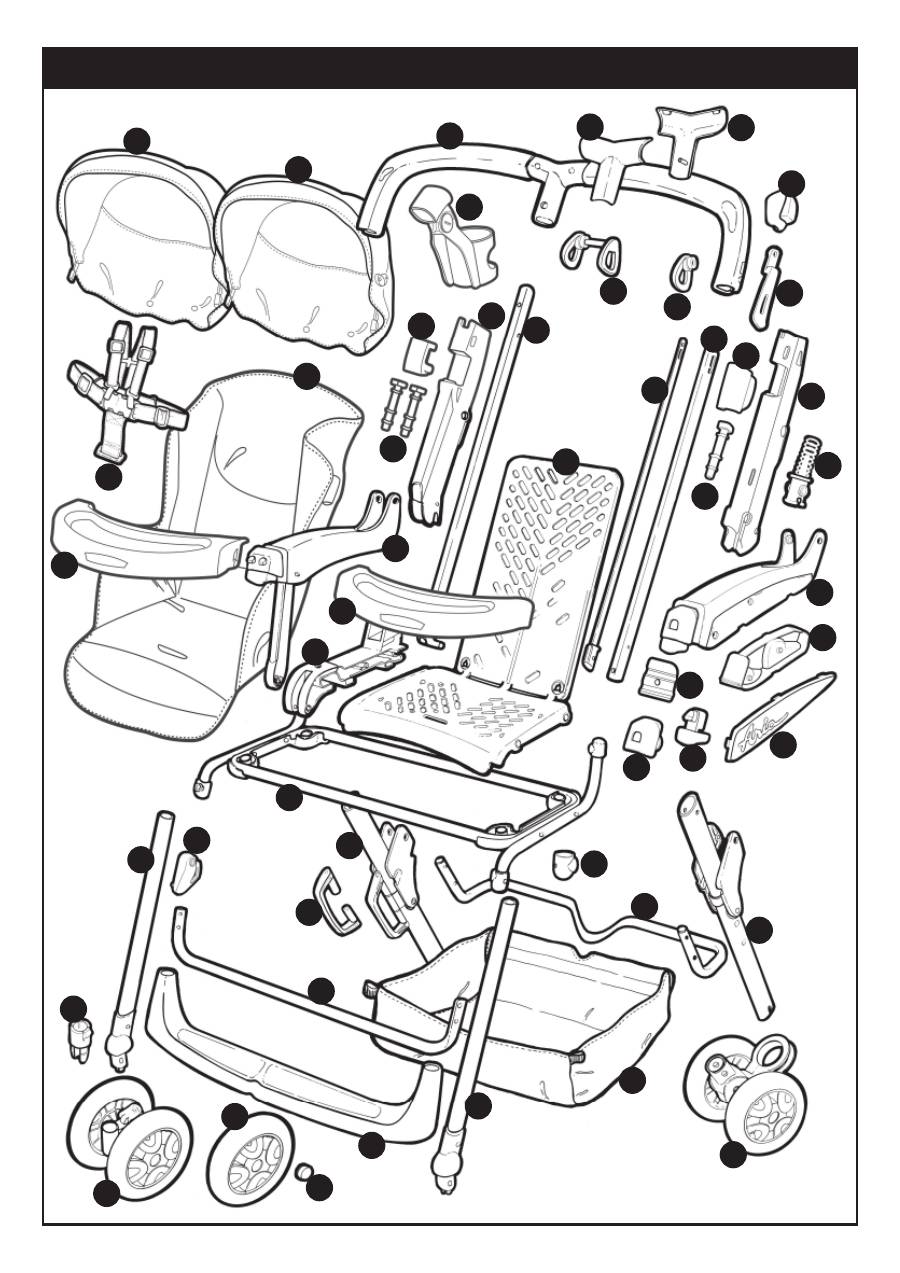
Aria Twin MT
1
2
3
4
5
6
7
8
9
10
11
12
13
14
15
16
17
18
19
20
21
22
22
23
24
25
26
27
28
29
30
31
32
33
34
35
36
37
38
39
40
40
41
42
43
44
45
46
47
48

1
BCATLD•
2
BCATLS•
3
ARPI0261•
4
SPST5239K•
5
SPST5239J•
6
ASPI0039•
7
SPST5149•
8
SPST5119GRS
9
SPST5120•
10
MUCI5P14•
11
BSATLB•
12
ARPI0262•
13
ARPI0278GR
14
ASPI0049•
15
ARPI0325•
16
SPST5474•
17
SPST5475GL
18
ASPI0028
19
ASPI0050GR
20
SPST5632GR
21
SAPI5631GL
22
ASPI0051•
23
SPST5225J•
24
ARPI0263•
25
ARPI0288•
26
SPST5113•
27
SONF0025•
28
SPST5223GR
29
ARPI0264•
30
SPST5236XGL
31
SPST5117KGR
32
SAPI5115•
33
ARPI0265DL65•
34
SPST5198•
35
SPST5111GR
36
ARPI0265SL65•
37
ASPI0052L65GR
38
IRSHAD00•
39
SPST5112•
40
ARPI0266L65•
41
SOTA0146L65
42
SPST5096GL
43
SPST5222•
44
SAPI5095K•
45
SAPI5160GRN
46
SPST4774•
47
SAPI5099•
48
IRTR0011GR
Aria Twin MT
IT• Ricambi disponibili in piú colori da specificare nella richiesta.
EN• Spare parts available in different colours to be specified when ordering.
FR• Pièces de rechange disponibles en plusieurs couleurs à spécifier dans la demande.
DE• Ersatzteile in mehr Farben vorhanden, die in der Anfrage spezifiziert werden müssen.
ES• Repuestos disponibles en otros colores que se especificarán en el pedido.
PT• Peças de reposição disponíveis em cores alternativas a serem especificadas no pedido.
NL• Reserveonderdelen verkrijgbaar in meerdere kleuren, bij bestelling te specificeren.
HU• A tartalék alkatrészek különböz
ő
színekben elérhet
ő
k, melyeket rendeléskor kell kiválasztani.
SL• Rezervni deli so na voljo v ve
č
barvah, ki jih je treba navesti pri naro
č
ilu.
RU•
Запчасти
имеются
различных
цветов
,
необходимый
указать
в
запросе
.
TR• Sipari
ş
te belirtilen de
ğ
i
ş
ik renklerdeki yedek parçalari mevcuttur.
EL•
Ανταλλακτικά
διαθέσιμα
σε
διάψορα
χρώματα
.
Προσδιορίστε
όταν
παραγγείλετε
.
• IMPORTANTE: leggere attentamente le
istruzioni prima dell
ʼ
uso e conservarle per
riutilizzarle in futuro.
• Peg Perego potrà apportare in qualunque
momento modi
fi
che ai modelli descritti in
questa pubblicazione, per ragioni di natura
tecnica o commerciale.
Peg Perego S.p.A. è certi
fi
cata ISO
9001.
La certi
fi
cazione o
ff
re ai clienti e
ai consumatori la garanzia di una
trasparenza e
fi
ducia nel modo di
lavorare dell'impresa.
SERVIZIO ASSISTENZA
Se fortuitamente parti del modello vengono
perse o danneggiate, usare solo pezzi di
ricambio originali Peg Perego. Per eventuali
riparazioni, sostituzioni, informazioni sui
prodotti, la vendita di ricambi originali e
accessori, contatta il Servizio Assistenza Peg-
Perego:
EUROPA: tel.: 0039-039-60.88.213
fax: 0039-039-33.09.992
e-mail: assistenza@pegperego.it,
USA: tel.: 800.671.1701
fax: 260.471.6332
Call us toll free: 1.800.671.1701
CANADA: tel.: 905.839.3371
fax: 905.839.9542
Call us toll free: 1.800.661.5050
www.pegperego.com
La Peg Perego è a disposizione dei suoi
Consumatori per soddisfare al meglio ogni
loro esigenza. Per questo, conoscere il parere
dei ns. Clienti, è per noi estremamente
importante e prezioso. Le saremo quindi
molto grati se, dopo aver utilizzato un ns.
prodotto, vorrà compilare il QUESTIONARIO
SODDISFAZIONE CONSUMATORE che troverà
in internet al seguente indirizzo: “www.
pegperego.com/SSCo.html.it”,
segnalando eventuali osservazioni o
suggerimenti.
ISTRUZIONI D
ʼ
USO
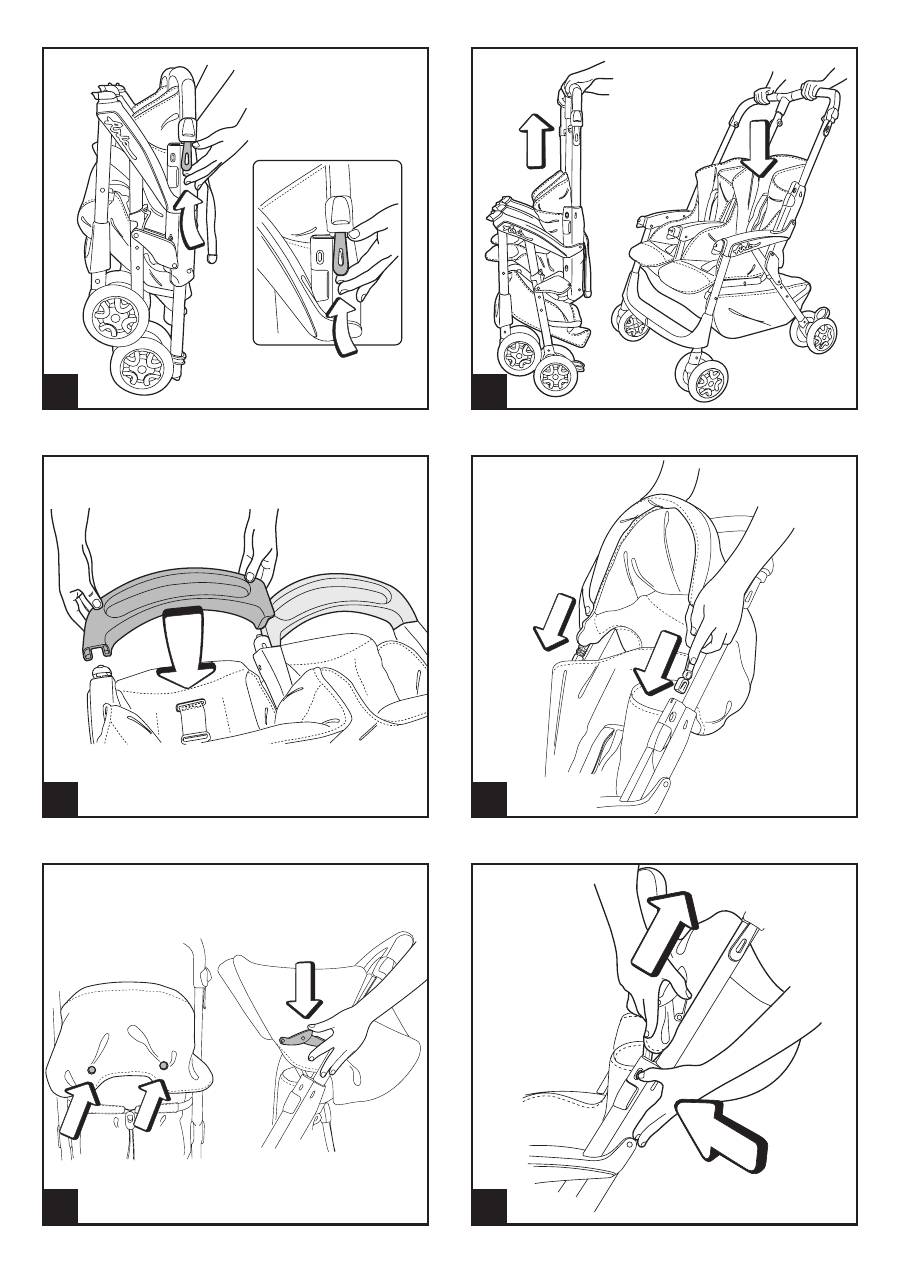
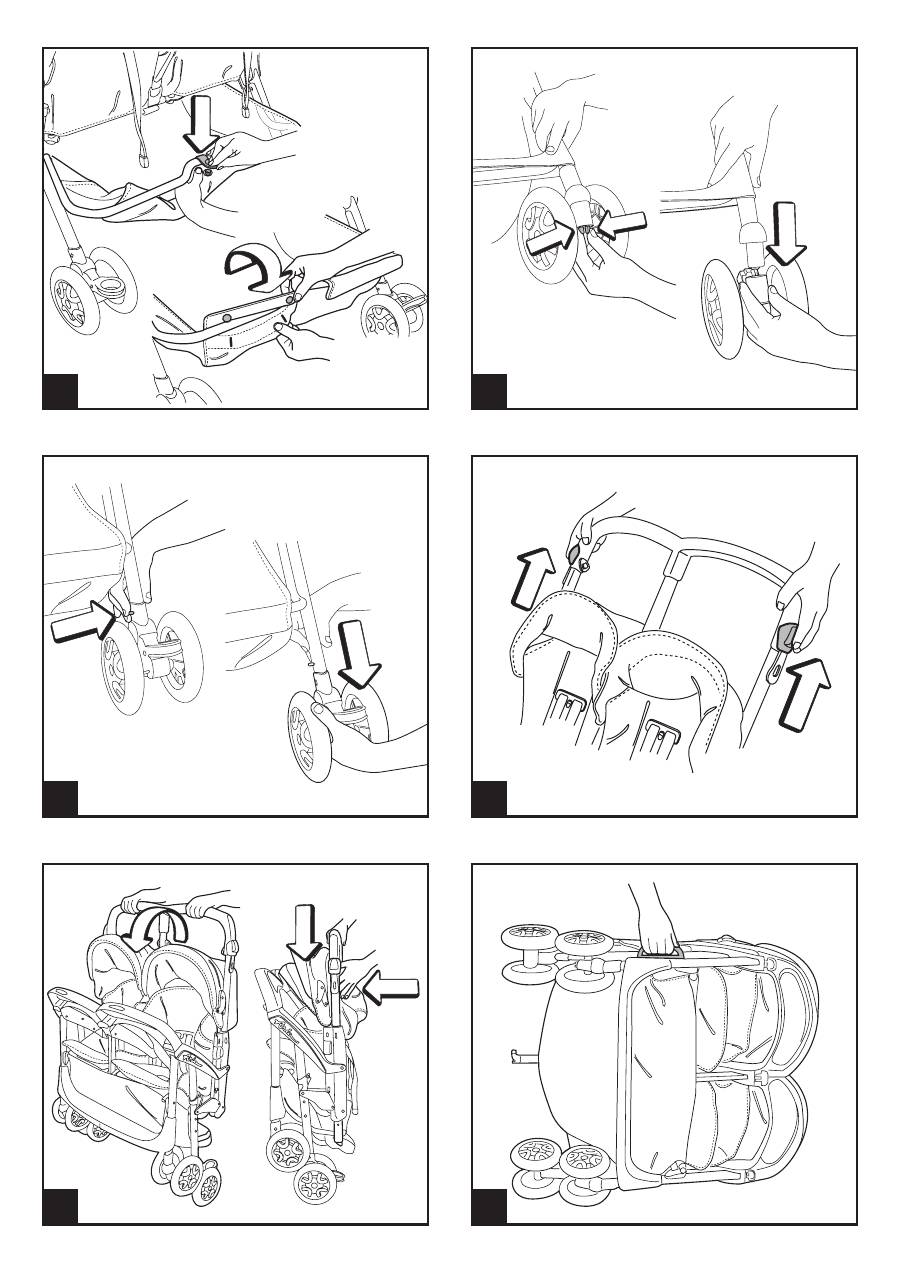
APERTURA
1• Per aprire il passeggino, sganciare
contemporaneamente i due attacchi come
in figura.
2• Alzare con decisione il manubrio verso
l
ʼ
alto e successivamente spingerlo verso il
basso fino allo scatto finale.
ASSEMBLAGGIO PASSEGGINO
3• Agganciare i frontalini come in figura.
CAPOTTINE
4• Le capottine sono indipendenti, é
possibile scegliere se abbassarne
una o entrambe. Prima di applicare le
capottine, verificare l
ʼ
etichetta interna
che contraddistingue la capottina destra
e la capottina sinistra. Inserire gli attacchi
delle capottine nelle apposite sedi.
5• Abbottonare le capottine sul retro degli
schienali. Abbassare i compassi come in
figura.
6• Per togliere le capottine premere i
pulsanti laterali e contemporaneamente
sfilare la capottina verso l
ʼ
alto come in
figura.
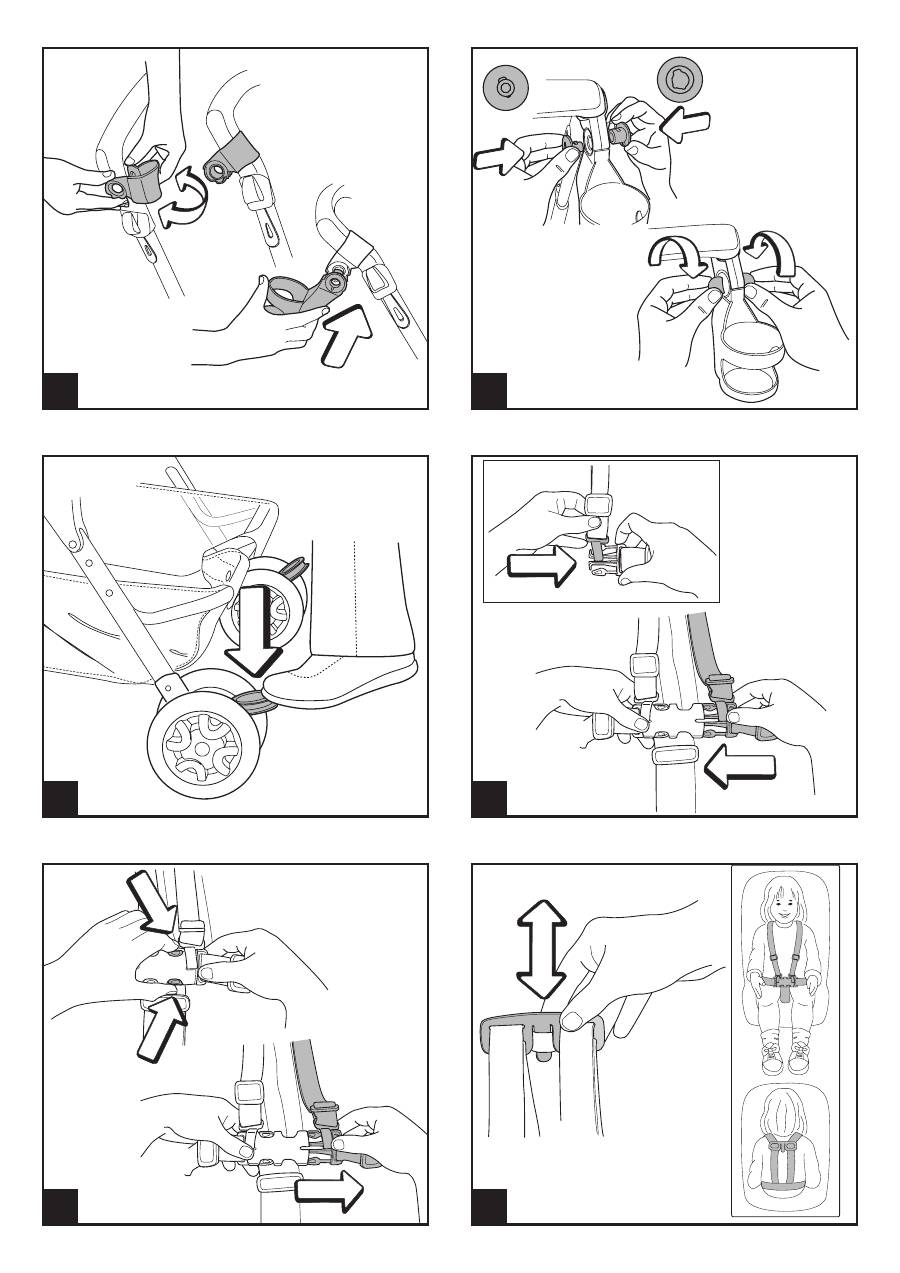
PORTABIBITE
Il portabibite é applicabile al maniglione
solo nel lato destro.
7• Per applicare il portabibite al maniglione,
allargare la fascetta e fissarla come in
figura. Infilare il portabibite nella fascetta
fino al click.
8• Inserire come in figura i due tappi,
facendo attenzione agli incastri. Con
due monete ruotare i tappi per fissare il
portabibite come in figura.
Si consiglia di non inserire nel portabibite
bevande calde e con un peso superiore a
0,5 Kg (1 lbs).
FRENO
9• Per frenare il passeggino, abbassare
col piede le leve posizionate sulle ruote
posteriori. Per sbloccare i freni, alzare le
leve. Da fermi, azionare sempre il freno.
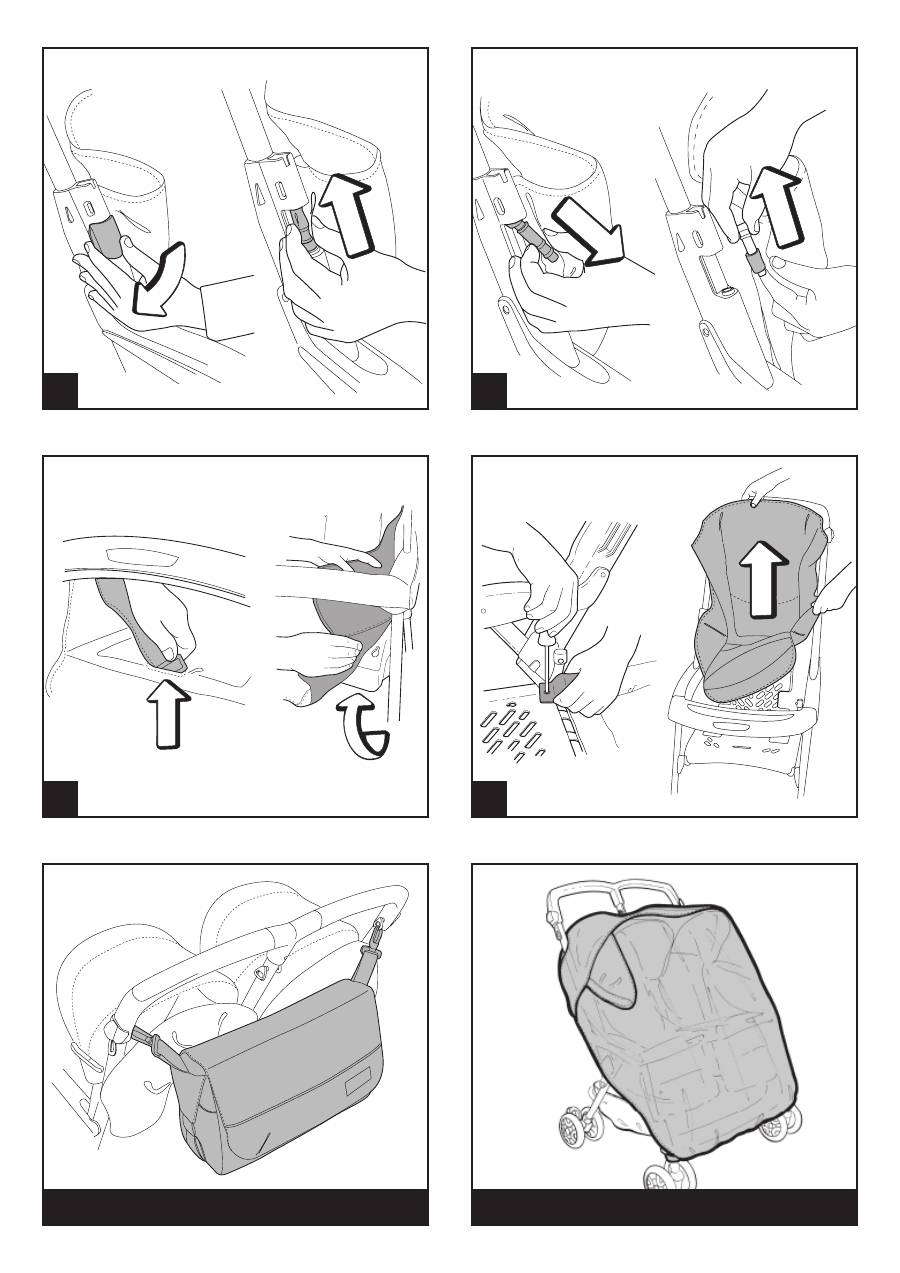
CINTURA DI SICUREZZA
10• A: Assicurarsi che la bretella sia
correttamente inserita spingendo come
in figura. B: Agganciare la cintura agendo
come in figura.
11• Per sganciare la cintura, premere ai lati
della fibbia e contemporaneamente tirare
verso l
ʼ
esterno, il cinturino girovita.
12• La nuova cintura di sicurezza da oggi, é
più facile da indossare grazie al sistema
“attacca e stacca”. Infatti prima di
agganciare la cintura, attacca la fibbietta
allo schienale inserendo la linguetta
nell
ʼ
apposito passante come in figura;
poi quando hai agganciato la cintura al
tuo bambino staccala dallo schienale
per lasciare il tuo bambino più libero
di muoversi. La fibbietta deve rimanere
sotto le spalle del bambino.
REGOLAZIONE SCHIENALE
13• Gli schienali sono indipendenti, é
possibile scegliere se abbassarne uno
o entrambi. Per reclinare lo schienale
IT•ITALIANO
TRASPORTO
24• É possibile trasportare comodamente il
passeggino quando é chiuso, grazie alla
maniglia.
SFODERABILITA
25• Per sfoderare il passeggino, togliere i
coperchietti posti lateralmente e al centro
facendo leva. Spingere verso l
ʼ
alto il
perno e
26• successivamente spingerlo verso
l
ʼ
esterno, sfilare poi il perno dall
ʼ
asola
della sacca.
27• Per sganciare la sacca dalla seduta,
estrarre lo spartigambe agendo da sotto e
sbottonarla come in figura.
28• Svitare il cinturino da entrambi i lati e
sfilare la sacca.
LINEA ACCESSORI
29• Borsa Cambio: Borsa con materassino
per il cambio del bebè, agganciabile al
passeggino.
30• Cover All: Parapioggia copri-tutto in PVC
trasparente per passeggino gemellare
Aria Twin.
PULIZIA E MANUTENZIONE
Il vostro prodotto necessita un minimo di
manutenzione. Le operazioni di pulizia e
manutenzione devono essere effettuate solo
da adulti.
• Si raccomanda di tenere pulite tutte le parti
in movimento e se occorre, lubrificarle con
olio leggero.
• Asciugare le parti in metallo del prodotto
per prevenire la ruggine.
• Periodicamente pulire le parti in plastica
con un panno umido, non usare solventi o
altri prodotti simili.
• Spazzolare le parti in tessuto per
allontanare la polvere.
• Tenere pulite le ruote da polvere e sabbia.
• Proteggere il prodotto da agenti
atmosferici, acqua, pioggia o neve;
l
ʼ
esposizione continua e prolungata al sole
potrebbe causare cambiamenti di colore in
molti materiali.
• Conservare il prodotto in un posto asciutto.
• Per il lavaggio della sacca, seguire le
suguenti indicazioni.
SICUREZZA
ATTENZIONE
• QUESTO PRODOTTO È STATO
CONCEPITO PER BAMBINI CON
abbassare il pulsante del regola-schienale
e contemporaneamente tirarlo in giù.
14• Per alzare lo schienale spingere in sù il
regola-schienale come in
fi
gura.
RUOTE PIROETTANTI
15• Per rendere le ruote anteriori piroettanti,
occorre abbassare la leva, come in figura.
Per renderle fisse, alzare la leva.
FRONTALINI-VASSOIO
I frontalini-vassoio sono indipendenti per
soddisfare le esigenze differenti di ogni
bambino, infatti é possibile aprirne uno
alla volta oppure scegliere di toglierne
uno.
16• É possibile aprire il frontalino-vassoio
solo da un lato per facilitare l
ʼ
entrata
e l
ʼ
uscita del bambino quando è più
grande. Per aprire, premere con una
mano il pulsante e contemporaneamente
con l'altra mano ruotare il frontalino
verso l'alto.
17• Per togliere il frontalino-vassoio,
premere prima il pulsante centrale e
contemporaneamente alzare il frontalino;
poi premere il pulsante laterale e
contemporaneamente estrarre frontalino.
Non appoggiare sul frontalino-vassoio
bevande bollenti perchè potrebbe essere
pericoloso.
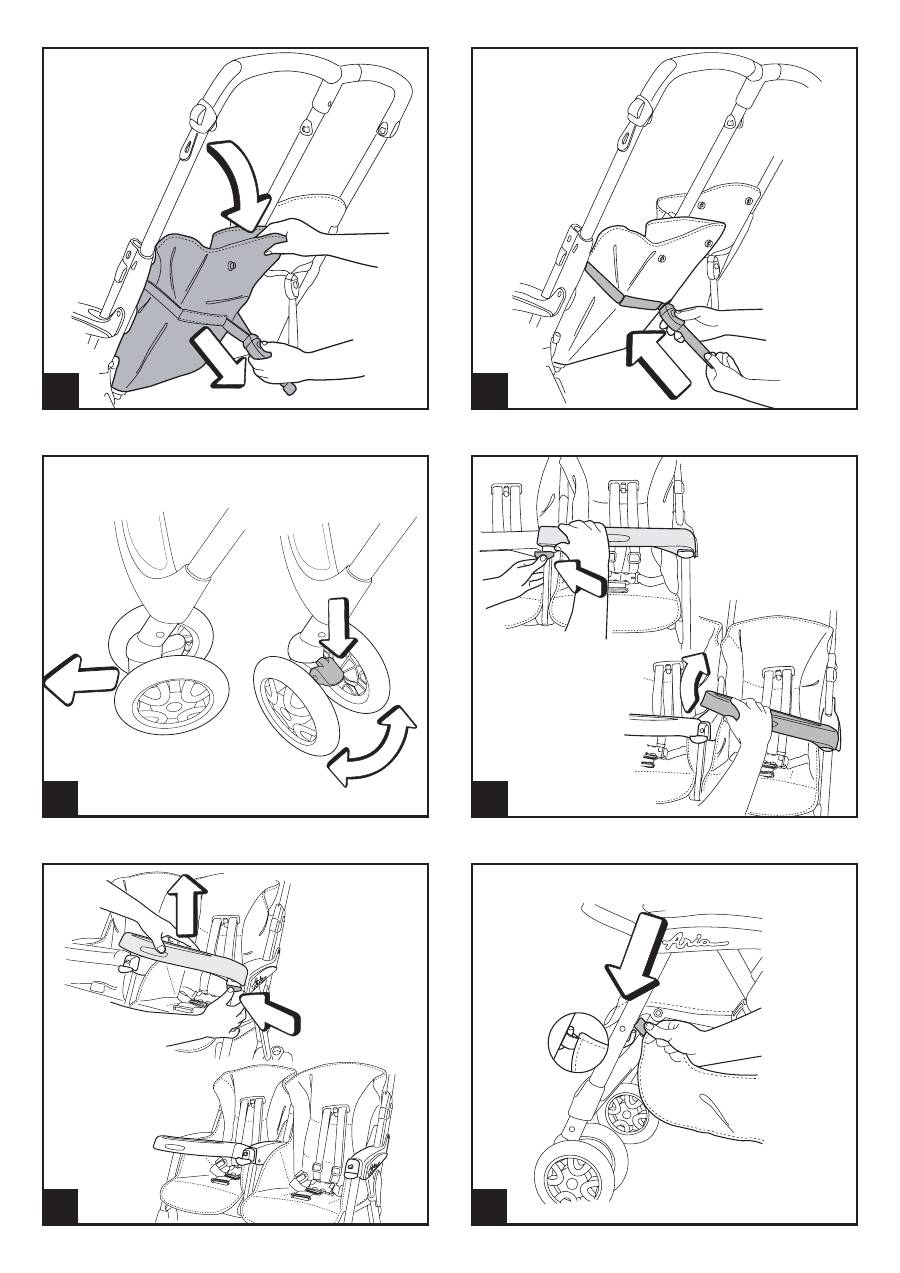
SOSTITUZIONE CESTELLO
18• Nel caso si dovesse sostituire il cestello,
per montare il cestello, agganciarlo
anteriormente ai gancini come in figura.
19• Agganciarlo posteriormente, chiudendo i
bottoni come in figura.
ESTRAZIONE RUOTE
Le ruote del passeggino sono estraibili.
20• Per togliere le ruote anteriori, occorre
rendere le ruote piroettanti, premere le
levette e contemporaneamente spingere
la ruota fino a toglierla come in figura.
21• Per togliere le ruote posteriori, premere
il pulsantino e contemporaneamente
spingere la ruota verso il basso fino a
toglierla come in figura.
CHIUSURA
Prima di chiudere il passeggino, se
sono applicate le capottine, allentare i
compassi.
22• Per chiudere il passeggino, alzare i
pulsanti posti ai lati del manubrio e
ruotare il manubrio in avanti fino al click.
23• Successivamente spingere gli schienale
e le capottine verso il passeggino e
abbassare il manubrio fino a farlo
rientrare nella sua sede. Verificare la
corretta chiusura del passeggino dal
gancio di sicurezza. Il passeggino chiuso
rimane in piedi da solo.

UN PESO MASSIMO DI 20 KG E
UN
ʼ
ALTEZZA MASSIMA DI 110 CM.
IL CESTINO È STATO REALIZZATO
PER SOPPORTARE UN PESO
MASSIMO DI 5 KG. EVENTUALI
PORTABIBITE FORNITI CON QUESTA
UNITÀ SONO CONCEPITI PER
SOPPORTARE UN PESO MASSIMO
SPECIFICATO SUL PORTABIBITE
STESSO. QUALSIASI BORSA O
TASCA FORNITE INSIEME AL
PRODOTTO SONO REALIZZATE PER
SOPPORTARE UN PESO MASSIMO DI
0,2 KG.
• UTILIZZATE SEMPRE LE CINTURE DI
SICUREZZA A 5 PUNTI.
• NON LASCIATE MAI INCUSTODITO
IL VOSTRO BAMBINO.
• POTREBBE ESSERE PERICOLOSO
UTILIZZARE ACCESSORI CHE
NON SIANO APPROVATI DAL
COSTRUTTORE.
• EVITARE DI INTRODURRE LE DITA
NEI MECCANISMI.
• LE OPERAZIONI DI MONTAGGIO
DEVONO ESSERE EFFETTUATE DA
ADULTI.
• NON UTILIZZATE IL PRODOTTO
SE PRESENTA ROTTURE O PEZZI
MANCANTI.
• DA FERMI METTERE SEMPRE I
FRENI.
• NON UTILIZZATE IL PRODOTTO IN
VICINANZA DI SCALE O GRADINI.
• SI RACCOMANDA DI NON ALZARE
IL PASSEGGINO IMPUGNANDOLO
DAL FRONTALINO PERCHÈ
QUESTO NON É PROGETTATO
PER SOPPORTARE CARICHI. IN
CASO DI NECESSITÀ SOLLEVARE
IL PASSEGGINO AFFERRANDOLO
SOTTO I BRACCIOLI.
NORME DI SICUREZZA
Per agganciare la cintura di
sicurezza infilare le bretelline
e inserire le due estremità del
cinturino girovita nella fibbia.
Assicurarsi sempre di aver effetuato
lo scatto di chiusura.
Per sganciare la cintura di sicurezza
premere ai lati della fibbia e
contemporaneamente tirare verso
l
ʼ
esterno il cinturino girovita.
Pacchi e/o accessori possono
rendere instabile il prodotto.
Raccomandiamo di non caricare il
cestello con più di 5 kg.
Fate attenzione al rischio
rappresentato dal fuoco e da altre
significative fonti di calore quali
radiatori elettrici, stufe a gas ecc.
nelle immediate vicinanze del
prodotto.
• IMPORTANT: read the instructions carefully
before use. Save the instructions for future
reference.
• PEG PEREGO reserves the right to make any
necessary changes or improvements to the
products shown at any time without notice.
Peg Perego S.p.A. is an ISO 9001
certi
fi
ed company.
The fact that we are certi
fi
ed
provides a guarantee of our
honesty for our customers, and
fosters trust in the company
ʼ
s way
of working.
CUSTOMER SERVICE
If parts of the model are accidentally lost or
damaged, use only original Peg Perego spare
parts. Contact the Peg Perego Customer
Service for all repair work, replacements,
information about products, and sale of
original spare parts and accessories, at the
following:
EUROPA: tel.: 0039-039-60.88.213
fax: 0039-039-33.09.992
e-mail: assistenza@pegperego.it,
USA: tel.: 800.671.1701
fax: 260.471.6332
Call us toll free: 1.800.671.1701
CANADA: tel.: 905.839.3371
fax: 905.839.9542
Call us toll free: 1.800.661.5050
www.pegperego.com
Peg Perego is at the consumer's service,
meeting every need in the best way possible.
This is why our customers' opinions are so
important and valuable to us. We would be
very grateful if you would kindly fill in the
CUSTOMER SATISFACTION QUESTIONNAIRE
after using one of our products. You will find
the questionnaire on the Internet at "www.
pegperego.com/SSCo.html.en-UK".
Please note any observations or suggestions
you may have on the questionnaire.
INSTRUCTIONS FOR USE
OPENING THE STROLLER
1• To open the stroller, simultaneously
unhook the two catches as shown in the
figure.
2• Firmly lift the handlebar upwards, then
push downwards until it clicks into place.
EN•ENGLISH
SETTING UP THE STROLLER
3• Fasten the front bars as shown in the
figure.
HOODS
4• The hoods are separate. It is not
necessary to lower both hoods at the
same time. Before attaching the hoods,
check the inside label, to see which is the
right-hand and which is the left-hand
hood. Insert the tabs on the hoods into
the special notches.
5• Fasten the hoods to the back of the
backrest, and press down on the side
braces as shown in the figure.
6• To remove the hoods, press the side
buttons while lifting the hoods off, as
shown in the figure.
DRINK-HOLDER
The drink-holder attaches to the right
side of the handlebar only.
7• To attach the drink-holder to the
handlebar, open the band and fasten it as
shown in the figure. Slip the drink-holder
into the band, and click into place.
8• Insert the two caps, as shown in the
figure, taking care to line them up
correctly. Use two coins to turn the caps
that fasten the drink-holders, as shown
in the figure.
Do not place hot drinks in the drink-
holder. Do not place anything heavier
than 0,5 Kg (1 lbs.) in the drink-holder.
BRAKE
9• To brake the stroller, push the levers on
the rear wheels downwards with your
foot. To release the brakes, lift the levers.
Always set the brake when the stroller is
not moving.
SAFETY BELT
10• A: Make sure that the brace is properly
inserted by pushing as shown in the
figure. B: Fasten the belt as shown in the
figure.
11• To unfasten the belt, press on the buckle
sides and pull out the waist strap.
12• The new safety belt is now easier to
fasten thanks to the "snap-open-and-
shut" device. Before fastening the safety
belt, attach the buckle to the backrest
by inserting the tab through the special
holder, as shown in the figure. After
fastening the safety belt on your child,
detach it from the backrest to allow the
child more freedom of movement. The
buckle must remain below the child's
shoulders.
ADJUSTING THE BACKRESTS
13• The backrests are separate; it is not
necessary to lower both of them at the
same time. To lower the backrest, press
the backrest button and pull the backrest
