Pyramida KH 50 Rustico v.2: INSTALLATION OF EXTRACTOR FAN TO THE WALL
INSTALLATION OF EXTRACTOR FAN TO THE WALL: Pyramida KH 50 Rustico v.2
Table of contents
PRODUCT MAINTENANCE
The works on maintenance should be performed on
- Wipe the external surfaces of the cooking hood with the
cooking hood with the purpose of maximal performance and
humid, good squeezed flannel tissue.
effectiveness of its operation during the life time.
- Use special fluids creating the protective film for handling
the surfaces made of stainless steel.
The cooking hood should be discon-
- Do not use the abrasive agents and solvents.
nected from the power network at
- Verify the conditions of the air duct of cooking hood and
works connected to the maintenance
ventilation channel, clean them at necessity!
on cooking hood.
Carbon filters can be purchased in retail
Regularly perform following actions at maintenance:
outlets or authorized service centers.
- Regularly remove all food debris and fat from the lower
surface of the cooking hood and from aluminum fat
filters. An excessive fatness can lead to fire!
BACKLIGHTS REPLACEMENT
In the extractor fan lighting lamps of type Е14 are used,
- press the filter lock and take off the fat filter;
their power is not more that 40 W. Replacement of lamps is
- Unscrew an old lamp from the holder and screw the new
made in the following order:
one;
- Make sure that cooking hood is disconnected from power
- press the filter lock and install the fat filter into the cooking
network before lamps replacement; wait until lamps will
hood.
cool down.
E14 40Вт
33
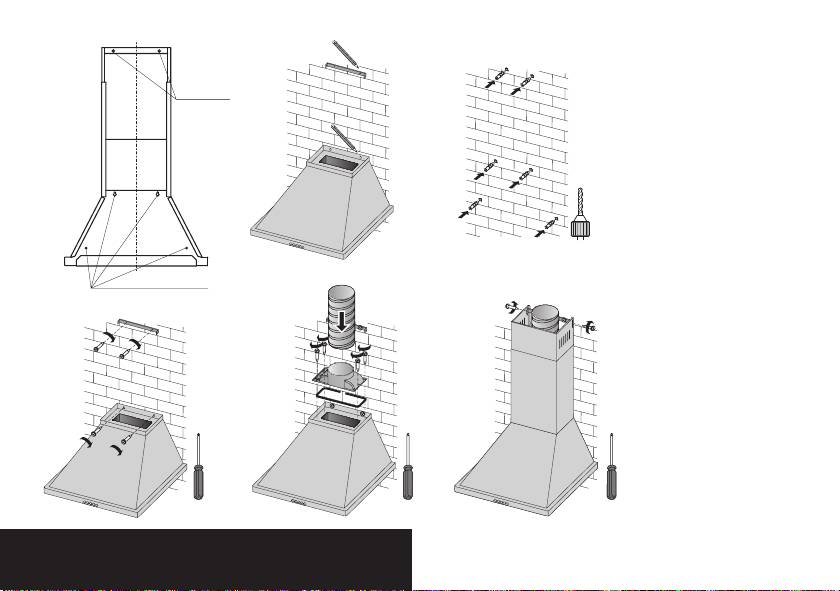
INSTALLATION OF EXTRACTOR FAN TO THE WALL
1. Mount the back surface
of the cooking hood to
Mounting
the wall by the means of
points
the screws with dowels
from the installation kit.
2. Install the adapter of air
duct onto the cooking
hood by the means of
screws with use of seal
from installation kit.
3. Connect the air duct
to the adapter of the
Mounting points
cooking hood. Take out
another end of an air duct
to the air-shaft. Ensure
that chinks are absent in
the connections.
4. Install casings of an air
duct and fix them with
screws from installation
kit.
EN
32
