Morphy Richards Cappuccino Espresso coffee maker: instruction
Class: Coffee Makers and Coffee Machines
Type: Coffee Machine
Manual for Morphy Richards Cappuccino Espresso coffee maker
g
f
d
e
h
p
i
q
s
}
≈
Mister Cappuccino Espresso coffee maker
with heated milk frother
Please read and keep these instructions
Machine à expresso Mister Cappuccino
avec accessoire pour faire mousser le lait
Merci de bien vouloir lire et conserver ces instructions
Mister Cappuccino Espressomaschine
mit beheiztem Milchaufschäumer
Lesen Sie diese Bedienungsanleitung, und heben Sie sie gut auf
Cafetera espresso Mister Cappuccino
con vaporizador para espumar leche
Sírvase leer y guardar estas instrucciones
Mister Cappuccino espresso koffiezetapparaat
met warme melkopschuimer
Lees en bewaar deze gebruiksaanwijzing op een veilige plaats.
Máquina de café Mister Cappuccino Espresso
com acessório para espuma do leite
Leia e guarde estas instruções
Macchina per caffè espresso Mister Cappuccino
con montalatte riscaldato
Leggere e conservare le presenti istruzioni
Kaffemaskinen Mister Cappuccino Espresso
med mælkeopskumningsfunktion
Læs og gem denne vejledning
Mister Cappuccino Espresso-kaffebryggare
med skummare för varm mjölk
Läs och spara dessa instruktioner
Mister Cappuccino Espresso ekspres do kawy
z podgrzewaną nasadką do pianki
Prosimy przeczytać poniższe instrukcje i zachować je do późniejszego wykorzystania
Кофеварка Mister Cappuccino Espresso
со вспенивателем нагретого молока
Внимательно изучите и сохраните данное руководство
2
3
•
The glass jug and the filter holder
get hot while the machine is in use.
Always use with care.
•
Make sure the mains lead does not
touch the hot parts of the machine.
•
Do not wind the mains lead around
the hot appliance or store the
appliance until it has fully cooled
down.
•
Do not remove the filter holder
when the appliance is producing hot
water or coffee. Turn the machine
off and release the steam first by
slowly removing the pressure cap.
Treating scalds
•
Run cold water over the affected
area immediately. Do not stop to
remove clothing, get medical help
quickly.
Other safety considerations
•
Disconnect the coffee maker from
the mains supply when filling,
cleaning or not in use.
•
When unplugging, turn any control
to ‘off’, then remove plug from the
wall outlet.
•
Keep the outside of the coffee
maker area clean and dry at all
times.
•
Do not touch hot surfaces. Always
use handles or knobs.
•
Do not immerse the coffee maker
itself in water and always ensure the
electrical connections are kept dry.
•
Do not operate any appliance with a
damaged cord or plug or after the
appliance malfunctions or has been
damaged in any manner. Ring the
helpline number for advice on
examination and repair.
•
The use of attachments or tools not
recommended or sold by Morphy
Richards may cause fire, electric
shock or injury.
•
Do not use the coffee maker for
anything other than its intended
purpose.
•
Do not leave the product
unattended when brewing.
ELECTRICAL REQUIREMENTS
Check that the voltage on the rating
plate of your appliance corresponds
with your house electricity supply
which must be A.C. (Alternating
current).
If the socket outlets in your home
are not suitable for the plug
supplied with this appliance the
plug should be removed and the
appropriate one fitted.
WARNING : The plug removed
from the mains lead, if severed,
must be destroyed as a plug
with a bared flexible cord is
hazardous if engaged into a live
socket outlet.
Where used, should the fuse in the
13 amp plug require changing, a 13
amp BS1362 fuse must be fitted.
GETTING THE BEST FROM YOUR NEW COFFEE MAKER...
Safety first
Caution must be used when
handling hot water, coffee or steam.
Run water through your
machine before first use
It is important to run water through
your coffee maker in order to rinse
the machine. You can also run water
through to warm your coffee
machine.
Descale as appropriate for the
hardness of the water in your
area
It is important to descale as the
performance of your coffee
maker may be impaired by
limescale and other impurities in the
water supply.
g
IMPORTANT SAFETY INSTRUCTIONS
The use of any electrical appliance
requires the following common
sense safety rules.
Primarily there is danger of injury or
death and secondly the danger of
damage to the appliance. These are
indicated in the text by the following
two conventions:
IMPORTANT: Damage to the
appliance! In addition we offer the
following safety advice.
WARNING: Danger to the
person!
Location
•
Remove all the packaging and
retain for future reference.
•
Ensure the coffee maker is used on
a firm, flat surface.
•
Do not use the coffee maker
outdoors or in a bathroom.
•
Do not place the coffee maker on a
highly polished wooden surface as
damage may occur to the surface.
•
Do not place the coffee maker on or
near hot surfaces such as a hot
plate or radiant rings or near a
naked flame.
•
WARNING: Do not place the
coffee maker onto a metal tray
or metal surface whilst in use.
Mains lead
•
Do not let the mains lead hang over
the edge of the worktop where a
child could reach it.
•
Do not let the lead run across an
open space e.g. between a low
socket and table.
•
Do not let the lead run across a
cooker or other hot area which
might damage the cable.
•
The mains lead should reach from
the socket to the base unit without
straining the connections.
Personal safety
•
Ensure the lid of the glass jug is
securely in place before pouring.
•
Take care to pour hot coffee slowly
and carefully without tipping the
glass jug too fast.
•
Do not fill above the capacity mark
of the water level gauge marked on
the jug.
•
Do not use the glass jug in a
microwave.
•
Milk should not be reheated, only
heat it when required.
•
When heating milk, please use
stainless steel jug provided.
•
Do not fill milk jug above the MAX
mark.
•
Do not touch metal parts until the
unit has cooled.
Children
•
Children do not understand the
dangers associated with operating
electrical appliances. Never allow
children to use this appliance.
•
This appliance is not intended to be
used by young children or infirm
persons unless they have been
adequately supervised by a
responsible person to ensure they
can use the appliance safely.
•
Young children should be
supervised to ensure that they do
not play with the appliance.
Product safety
•
Never use warm or hot water to fill
the water tank.
•
Do not overfill the water tank.
•
Scalding may occur if the pressure
cap is removed during the brewing
cycles, therefore never open or
remove the pressure cap whilst the
machine is switched on. Pressure
cap must be removed slowly before
unlocking the filter holder. This
procedure must be followed even
when the machine is switched off
and cooled.
g
5
Always switch the machine off and
remove the plug from the socket
before filling the water tank. Care
should be taken to ensure that the
correct quantity of water is placed
in the tank, as the machine always
uses all the water.
3
Close the pressure cap tightly by
turning it clockwise.
4
Place the washable metal filter into
the filter holder and add the desired
quantity of coffee to the filter using
the measuring spoon provided.
Special marks on the inside of the
filter show the correct levels for 2, 4
and 6 cups of coffee lightly
compress the coffee down. Remove
excess coffee from the edge of the
filter.
5
Position the filter holder underneath
the water outlet, push it upwards
and turn it to the right into the
locked position to fix it onto your
coffee machine
A
.
Note: Push firmly to the right to lock
into position.
6
Your machine is fitted with a
strength selector which allows you
to make LIGHT to STRONG coffee.
Set the strength selector mid way
between LIGHT and STRONG for
MEDIUM strength coffee.
7
Place your glass jug with the lid on
the drip tray and directly under the
spout of the filter holder, ensuring
that the jug handle is pointing
outwards from the unit.
8
Plug the espresso coffee maker in
at hte wall socket and push the
coffee on/off switch to ‘ON’
position. The orange light will glow
to show th ecoffee maker is
working.
9
The coffee will start to flow from the
filter holder spout after about 2 or 3
minutes. Wait until all the water from
the water tank has flowed into your
glass jug and the green light glows.
10
When the filtering process is
complete switched off the coffee
maker, remove the glass jug from
your coffee maker and pour the
coffee into your cups.
WARNING: The coffee maker and
hot plates are hot and remain hot
for some time after switching off.
11
Unplug machine and allow to cool.
Slowly remove the pressure
cap.
12
To remove the used coffee grounds,
remove the filter holder by turning
the handle to the left until you find
that the filter holder drops down.
Flip the filter retaining clip so that it
retains the filter. Turn the filter
upside down and knock out the
grounds. Flip the retaining clip back
along the handle before the next
use.
Note: Due to the amount of steam
lost through the process, the coffee
produced will be less than the water
put in. This is accounted for in the
amount to put in.
Making a cappuccino
Prepare your machine as described
in the section ‘Making a coffee’.
Use your glass jug for measuring
the correct amount of water
needed.
Frothing milk
It is advised to start heating your
milk at the same time as heating
your coffee or several minutes
before making coffee to ensure milk
is hot.
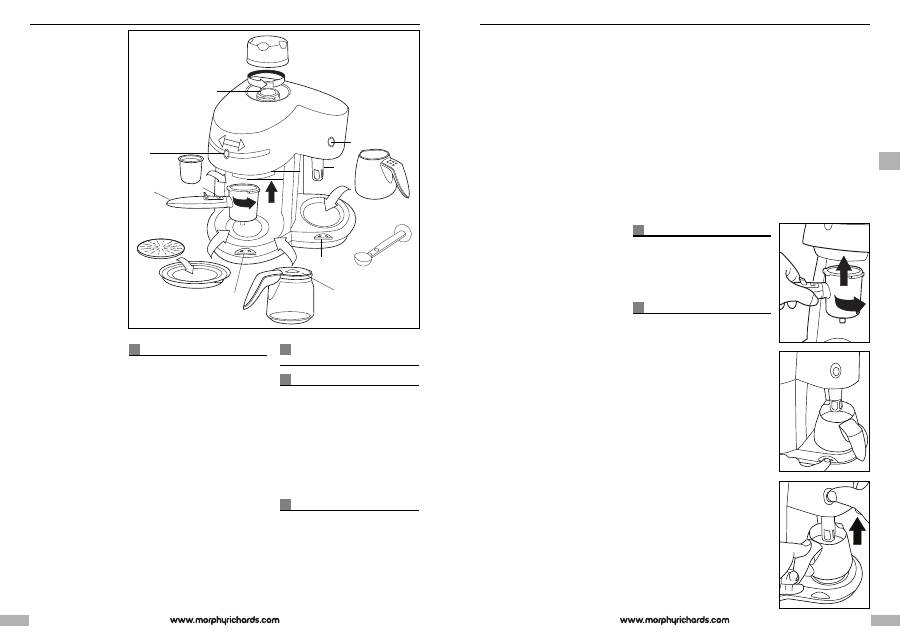
1
Fill the stainless steel milk jug
provided with the required amount
of milk. Do not exceed the
maximum level or add less than the
minimum level.
2
Place the jug on the hot plate and
switch on
B
.
NOTE: You can turn on the hot plate
at the same time as the coffee
on/off switch. It will take
approximately 5-7 minutes for the
milk to heat up to its optimum
frothing temperature.
3
Lift the milk jug up to the milk
frother blade
C
. Raise the milk jug
ensuring that the cowl is just under
the surface of the milk - this will
give the maximum froth. Maintain
the milk jug in this position between
30-60 seconds.
WARNING: Take care as the milk
will be hot.
g
4
Features
⁄
Pressure cap
¤
Water tank
‹
Strength selector
›
Filter
fi
Filter retaining clip
fl
Filter holder
‡
Drip tray metal plate
·
Drip tray
‚
Hot water outlet
„
On/off/switch with power and
ready indicators
‰
Milk frother hot plate on/off
switch with indicator
Â
Glass coffee jug with lid
Ê
Jug lid
Á
Measuring spoon/tamper
Ë
Milk frother jug
È
Milk frother attachment
Í
Milk frother on/off button
Î
Steam exhaust tube
Ï
Milk frother hot plate
OPERATING THE APPLIANCE Before use
Take your coffee maker out of the
box and remove the packaging.
Before using the appliance for the
first time, clean thoroughly by
operating two or three times with
the maximum volume of fresh water
(6 cups) but without using coffee.
Wash the detachable parts of the
machine in warm soapy water.
Making espresso coffee
1
Unscrew the pressure cap by
turning it anti-clockwise.
2
To fill the water tank use your glass
jug to measure the volume of water
required. The jug is marked with the
water levels for 2 cups (minimum), 4
cups and 6 cups (maximum).
⁄
⁄
¤
¤
‹
‹
›
›
fi
fi
fl
fl
‡
‡
·
·
‚
‚
„
„
Â
Â
‰
‰
Ê
Ê
Á
Á
Ë
Ë
È È
Í
Í
Î
Î
Ï
Ï
A
A
B
B
C
C
Table of contents
- Treating scalds
- Making a cappuccino
- Cleaning
- EXCLUSIONS
- ALIMENTATIONÉLECTRIQUE
- Comment faire uncappuccino
- CONSEILS ET ASTUCESNettoyage et entretien
- WICHTIGESICHERHEITSHINWEISE
- Behandlung vonVerbrennungen
- Cappuccino zubereiten
- TIPPS UNDEMPFEHLUNGENReinigung und Wartung
- INSTRUCCIONES DESEGURIDADIMPORTANTES
- Otras consideraciones de seguridad
- Espumado de la leche
- CONSEJOS YRECOMENDACIONESLimpieza y mantenimiento
- BELANGRIJKEVEILIGHEIDS-INSTRUCTIES
- OPTIMAAL GEBRUIK VANUW NIEUWEKOFFIEZETAPPARAAT...
- Reiniging
- TWEE JAAR GARANTIE
- Segurança pessoal
- UTILIZAR O APARELHO Antes de utilizar
- RECEITAS
- A SUA GARANTIA DE DOIS ANOS
- Uso sicurodell’elettrodomestico
- Preparare un cappuccino
- SUGGERIMENTIPulizia e manutenzione
- VIGTIGE SIKKERHEDS-FORSKRIFTER
- Dele
- OPSKRIFTER
- UNDTAGELSER
- Övrigasäkerhetsföreskrifter
- Skumma mjölk
- TRICKS OCH TIPSRengöring och underhåll
- Bezpieczeństwo osób
- Funkcje
- PRZEPISY
- WOJA DWULETNIA GWARANCJA
- Меры безопасности
- Приготовление капучино
- РЕЦЕПТЫ
- СОВЕТЫ ИРЕКОМЕНДАЦИИЧистка и уход
