LG 60PB560V: instruction
Class: Audio and DJ Equipment
Type:
Manual for LG 60PB560V
Drawn
Approved
Signature
Jinkyung.Kim
Jongok.kim
MMM/DD/YYYY
Feb/14/2014
Feb/14/2014
50PB56-ZA
LG
MFL68044902
EE
PB56
(1402-REV00)
:
LGEAK
:
LGEKR
:
LGERS
:
LGEAZ
:
LGEMA
:
LGESY
:
LGEEG
:
LGEMX
:
LGETH
:
LGEIL
:
LGEND
:
LGEVN
:
LGEIN
:
LGERA
:
LGEWR
(Revision number)
2. Printing Specification
3. Origin Notification
Printed in Korea
Printed in Poland
384
:
2nd, 3rd Suffix
Checked
:
Part number
1. Model Description
Feb/14/2014
:
• Cover
:
• Inside
:
• Inside
ENG/HUN/POL/CZE/SLK/ROM/BUL/EST/LIT/LAT/SER/CRO/ALB/BOS/MAC/RUS (16)
:
Brand name
Printing specification
:
Model name
:
Product name
Mira.Woo
Printed in Brazil
:
5. Language
:
6. Number of pages
N
O
T
E
:
1. Trim size (Format)
2. Printing colors
3. Stock (Paper)
:
• Cover
(2) Especially, Don’t use or contain lead(Pb) and cadmium(Cd) in ink.
Perfect binding
Printed in Mexico
Printed in Kazakhstan
:
4. Bindery
148 mm x 210 mm (A5)
1 Color (Black)
1 Color (Black)
Uncoated, wood-free paper 150 g/
㎡
Uncoated, wood-free paper 60 g/
㎡
Printed in Egypt
Printed in India
Printed in Indonesia
Rev. Number
MMM/DD/YYYY
Printed in Russia
Printed in China
Printed in China
Printed in Thailand
Printed in Vietnam
Printed in Poland
4. Changes
Printed in Mexico
Signature
Change Contents
ECO Number
“This part contains Eco-hazardous substances (Pb, Cd, Hg, Cr6+, PBB, PBDE, etc.) within LG standard level,
Details should be followed Eco-SCM management standard[LG(56)-A-2524].
Especially, Part should be followed and controlled the following specification.
(1) Eco-hazardous substances test report should be submitted when Part certification test and First Mass Production.
1
10
9
8
7
6
5
4
3
2
Front
(Eng)
P/No.
A-2
…
…
…
…
A-23
Blank
Front
(Eng)
2
…
…
…
…
21
Blank
Front
(Hun)
2
…
…
…
…
21
Blank
Front
(Pol)
2
…
…
…
…
21
Blank
Front
(Cze)
2
…
…
…
…
21
Blank
Front
(Slk)
2
…
…
…
…
21
Blank
Front
(Rom)
2
…
…
…
…
21
Blank
Front
(Bul)
2
…
…
…
…
21
Blank
Front
(Est)
2
…
…
…
…
21
Blank
Front
(Lit)
2
…
…
…
…
21
Blank
:
Part number
MFL68044902
:
Total pages
384 pages
Pagination sheet
Front
(Lat)
2
…
…
…
…
21
Blank
Front
(Ser)
2
…
…
…
…
21
Blank
Front
(Cro)
2
…
…
…
…
21
Blank
Front
(Alb)
2
…
…
…
…
21
Blank
Front
(Bos)
2
…
…
…
…
21
Blank
Front
(Mac)
2
…
…
…
…
21
Blank
Front
(Rus)
2
…
…
…
…
21
Blank
Back
Cover
B-1
B-2
B-3
B-4
Blank
Blank
Blank
(Eng)
:
Part number
MFL68044902
:
Total pages
384 pages

www.lg.com
PB56**
OWNER’S MANUAL
PLASMA TV
Please read this manual carefully before operating
your set and retain it for future reference.
P/NO : MFL68044902 (1402-REV00)
Printed in Korea
*MFL68044902*
A-2
TABLE OF CONTENTS
A-3 SETTING UP THE TV
A-3 Attaching the stand
A-4 MAKING CONNECTIONS
A-4 Antenna Connection
A-7 Satellite dish Connection
A-8 Euro Scart Connection
A-13 Other connections
LANGUAGE LIST
English
Magyar
Polski
Česky
Slovenčina
Română
Български
Eesti
Lietuvių k.
Latviešu
Srpski
Hrvatski
Shqip
Bosanski
Македонски
Русский
B-1 SPECIFICATIONS
B-3 REGULATORY
TABLE OF CONTENTS
COMMON
LANGUAGE
COMMON
A-3
SETTING UP THE TV
SETTING UP THE TV
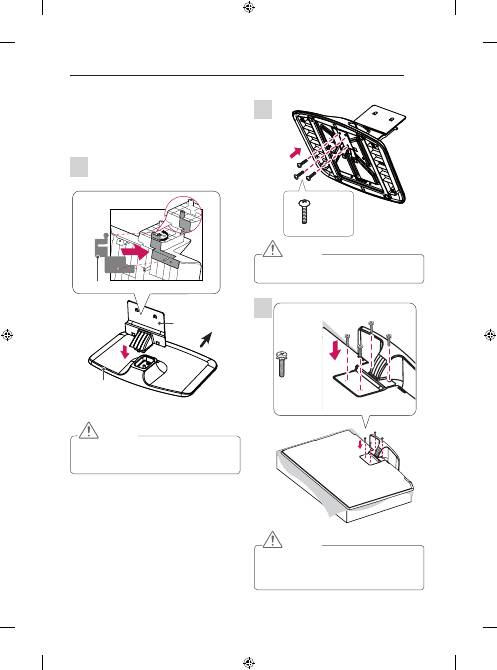
Image shown may differ from your TV.
Attaching the stand
Before assembling, please attach the Stand
Sticker under the Stand Body to reduce the
electromagnetic interference as shown below.
(Depending on model)
Stand Body
Stand Base
Front
Stand Sticker
CAUTION
y
When assembling the stand base and the stand
body, press the stand body until you can hear a
clicking sound in the hook.
2
3 EA
M5 x L25
CAUTION
y
Tighten the screw fully, otherwise the set may
lean or fall.
3
4 EA
M4 x L14
CAUTION
y
When attaching the stand to the TV set, place
the screen facing down on a cushioned table
or flat surface to protect the screen from
scratches.
1
A-4
MAKING CONNECTIONS
MAKING CONNECTIONS
This section on
MAKING CONNECTIONS
mainly uses
diagrams for the PB56** models.
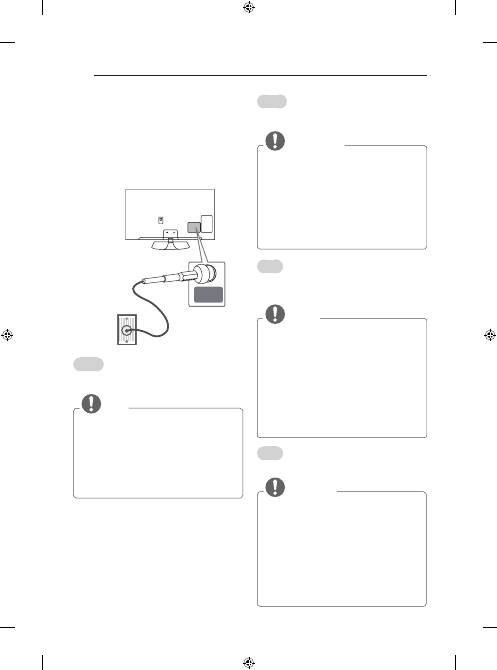
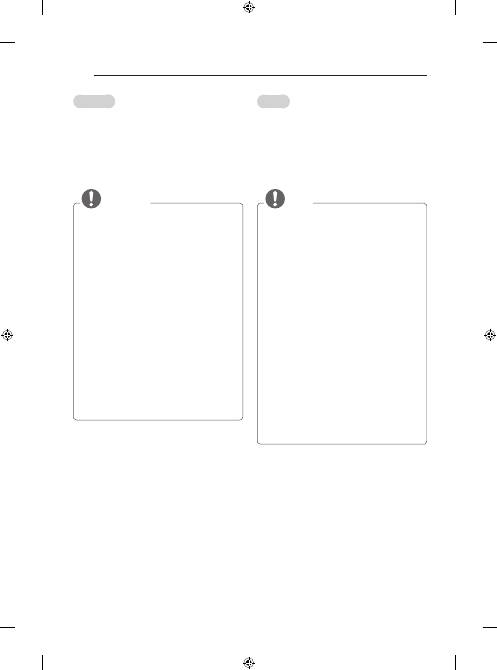
Antenna Connection
ANTENNA/
CABLE IN
Wall Antenna
Socket
English
Connect the TV to a wall antenna socket with an RF
cable (75 Ω).
NOTE
y
Use a signal splitter to use more than 2 TVs.
y
If the image quality is poor, install a signal
amplifier properly to improve the image quality.
y
If the image quality is poor with an antenna
connected, try to realign the antenna in the
correct direction.
y
An antenna cable and converter are not supplied.
y
Supported DTV Audio: MPEG, Dolby Digital,
Dolby Digital Plus, HE-AAC
Magyar
Csatlakoztassa a TV-t egy fali antennaaljzatba egy RF-
kábellel (75 Ω).
MEGJEGYZÉS
y
2-nél több TV használatához használjon
jelelosztót.
y
Nem megfelelő képminőség esetében
alkalmazzon jelerősítőt a minőség javítása
érdekében.
y
Ha a csatlakoztatott antenna használatával a
képminőség gyenge, állítsa be az antennát a
megfelelő irányba.
y
Az antennakábel és az átalakító nem tartozék.
y
Támogatott DTV Audio: MPEG, Dolby Digital,
Dolby Digital Plus, HE-AAC
Polski
Telewizor należy podłączyć do ściennego gniazdka
antenowego za pomocą przewodu antenowego RF
(75 Ω).
UWAGA
y
Aby korzystać z więcej niż dwóch odbiorników
telewizyjnych, należy użyć rozdzielacza
sygnału antenowego.
y
Jeżeli jakość obrazu jest niska, należy
zainstalować odpowiedni wzmacniacz sygnału
w celu jej poprawienia.
y
Jeżeli jakość obrazu jest niska podczas
korzystania z anteny, spróbuj dostosować
kierunek ustawienia anteny.
y
Przewód antenowy i konwerter nie są
dostarczane w zestawie.
y
Obsługa dźwięku telewizji cyfrowej: MPEG,
Dolby Digital, Dolby Digital Plus, HE-AAC
Česky
Připojte televizor k nástěnné zásuvce antény pomocí
kabelu RF (75 Ω).
POZNÁMKA
y
Jestliže budete používat více než 2 televizory,
použijte rozdělovač signálu.
y
Jestliže má obraz špatnou kvalitu, nainstalujte
správným způsobem zesilovač signálu, aby se
kvalita zlepšila.
y
Pokud je kvalita obrazu s připojenou anténou
špatná, zkuste anténu natočit správným
směrem.
y
Kabel antény a převaděč nejsou součástí
dodávky.
y
Podporované DTV Audio: MPEG, Dolby Digital,
Dolby Digital Plus, HE-AAC
(*Not Provided)

A-5
MAKING CONNECTIONS
Slovenčina
Pripojte televízor ku konektoru antény v stene
prostredníctvom kábla RF (75 Ω).
POZNÁMKA
y
Ak chcete používať viac ako 2 monitory, použite
rozdeľovač signálu.
y
Ak je kvalita obrazu slabá, na vylepšenie kvality
obrazu správne pripojte zosilňovač signálu.
y
Ak je pripojená anténa a kvalita obrazu je
nízka, skúste otočiť anténu správnym smerom.
y
Kábel na pripojenie antény a konvertor nie sú
súčasťou dodávky.
y
Podporovaný formát zvuku DTV: MPEG, Dolby
Digital, Dolby Digital Plus, HE-AAC
Română
Conectaţi televizorul la priza unei antene de perete cu
un cablu RF (75 Ω).
NOTĂ
y
Utilizaţi un splitter de semnal pentru a utiliza
mai mult de 2 televizoare.
y
În cazul în care calitatea imaginii este slabă,
instalaţi în mod corect un amplificator de
semnal pentru a îmbunătăţi calitatea imaginii.
y
În cazul în care calitatea imaginii este slabă cu
antena conectată, încercaţi să orientaţi din nou
antena în direcţia corectă.
y
Cablul antenei şi transformatorul nu sunt
furnizate.
y
Format audio DTV acceptat: MPEG, Dolby
Digital, Dolby Digital Plus, HE-AAC
Български
Включете телевизора в стенно гнездо за антена чрез
радиочестотен кабел (75 Ω).
ЗАБЕЛЕЖКА
y
Използвайте сплитер на сигнала, който е
предназначен за повече от 2 телевизора.
y
Ако качеството на изображението е лошо,
монтирайте усилвател на сигнала, за да го
подобрите.
y
Ако качеството на изображението е слабо
със свързана антена, опитайте да настроите
антената отново в правилната посока.
y
Кабелът на антената и преобразувателят не
се предоставят в комплекта.
y
Поддържан DTV звук: MPEG, Dolby Digital,
Dolby Digital Plus, HE-AAC
Eesti
Ühendage teler antenni seinapistmikusse RF-kaabliga
(75 Ω).
MÄRKUS
y
Rohkem kui kahe teleri kasutamiseks kasutage
signaalijaoturit.
y
Kui kujutise kvaliteet on kehv, paigaldage
kujutise kvaliteedi parendamiseks
signaalivõimendi.
y
Kui kujutise kvaliteet on kehv ja antenn on
ühendatud, suunake antenn õigesse suunda.
y
Antennikaablit ega muundurit tarnekomplektis
ei ole.
y
Toetatud DTV audio: MPEG, Dolby Digital,
Dolby Digital Plus, HE-AAC
Lietuvių k.
Prijunkite televizorių prie sieninio antenos lizdo RF
kabeliu (75 Ω).
PASTABA
y
Naudokite signalo skirstytuvą, jei norite naudoti
daugiau nei 2 televizorius.
y
Jei vaizdo kokybė prasta, jai pagerinti tinkamai
sumontuokite signalo stiprintuvą.
y
Jeigu prijungus anteną vaizdo kokybė prasta,
bandykite reguliuodami rasti tinkamą antenos
kryptį.
y
Antenos kabelis ir konverteris nepridedami.
y
Palaikomas DTV garsas: MPEG, Dolby Digital,
Dolby Digital Plus, HE-AAC
Latviešu
Pievienojiet televizoru antenas rozetei sienā, izmantojot
RF kabeli (75 Ω).
PIEZĪME
y
Lai lietotu vairāk nekā divus televizorus,
izmantojiet signāla sadalītāju.
y
Ja attēla kvalitāte ir vāja, attēla kvalitātes
uzlabošanai uzstādiet signāla pastiprinātāju.
y
Ja attēla kvalitāte ir vāja un ir pievienota
antena, mēģiniet koriģēt antenas izvietojumu
pareizā virzienā.
y
Antenas kabelis un pārveidotājs komplektā nav
iekļauti.
y
Atbalstītais DTV audio formāts: MPEG, Dolby
Digital, Dolby Digital Plus, HE-AAC
A-6
MAKING CONNECTIONS
Srpski
Povežite televizor na zidni antenski priključak pomoću
RF kabla (75 Ω).
NAPOMENA
y
Ukoliko imate više od dva televizora, upotrebite
skretnicu antenskog signala.
y
Ako je slika lošeg kvaliteta, instalirajte
pojačavač signala da biste postigli bolji kvalitet
slike.
y
Ako je slika lošeg kvaliteta dok je povezana
antena, usmerite antenu u odgovarajućem
smeru.
y
Antenski kabl i pojačavač se ne isporučuju uz
uređaj.
y
Podržani DTV standardi zvuka: MPEG, Dolby
Digital, Dolby Digital Plus, HE-AAC
Hrvatski
Priključite televizor u zidnu antensku utičnicu pomoću
RF kabela (75 Ω).
NAPOMENA
y
Ako želite koristiti više od 2 televizora,
upotrijebite razdjelnik signala.
y
Ako je kvaliteta slike loša, ugradite pojačalo
signala kako biste postigli bolju kvalitetu slike.
y
Ako je kvaliteta slike slaba iako koristite antenu,
pokušajte je okrenuti u pravom smjeru.
y
Antenski kabel i pretvarač ne isporučuju se s
proizvodom.
y
Podržani DTV zvuk: MPEG, Dolby Digital,
Dolby Digital Plus, HE-AAC
Shqip
Lidheni TV-në me një prizë të antenës në mur me një
kabllo RF (75 Ω).
SHËNIM
y
Përdorni ndarës sinjali për të lidhur më shumë
se 2 televizorë.
y
Nëse cilësia e figurës është e dobët, instaloni
përforcues sinjali për ta përmirësuar.
y
Nëse cilësia e figurës është e dobët me një
antenë të lidhur, mundohuni ta vendosni
antenën në drejtimin e duhur.
y
Kablloja e antenës dhe konvertuesi nuk jepen
me televizorin.
y
Audioja e mbështetur DTV: MPEG, Dolby
Digital, Dolby Digital Plus, HE-AAC
Bosanski
Povežite TV na utičnicu zidne antene RF kablom (75 Ω).
NAPOMENA
y
Ako želite koristiti više od dva TV uređaja,
upotrijebite frekvencijsku skretnicu antenskog
signala.
y
Ako je kvalitet slike loš, instalirajte pojačivač
signala pravilno kako biste poboljšali kvalitet
slike.
y
Ako je kvalitet slike loš i pored povezane
antene, pokušajte ponovo okrenuti antenu u
odgovarajućem smjeru.
y
Kabl antene i pretvarač se ne isporučuju.
y
Podržani DTV zvuk: MPEG, Dolby Digital,
Dolby Digital Plus, HE-AAC
Македонски
Поврзете го телевизорот со ѕиден приклучок за
антена со RF кабел (75 Ω).
ЗАБЕЛЕШКА
y
За користење на повеќе од 2 телевизори
употребете разделник на сигнал.
y
Ако квалитетот на сликата е слаб, правилно
инсталирајте засилувач на сигнал за
подобрување на квалитетот на сликата.
y
Ако квалитетот на сликата е слаб кога е
поврзана антена, обидете се да ја насочите
антената во правилна насока.
y
Кабелот за антената и конвертерот не се
испорачуваат.
y
Поддржано DTV аудио: MPEG, Dolby Digital,
Dolby Digital Plus, HE-AAC
Русский
Подключите телевизионный антенный кабель (75 Ω)
к входному гнезду в ТВ (Antenna/Cable).
ПРИМЕЧАНИЕ
y
Для подключения нескольких телевизоров
используйте антенный разветвитель.
y
Если присутствуют помехи и Вы используете
личную антенну, сориентируйте её в
направлении на ТВ вышку.
y
При плохом качестве изображения
правильно установите усилитель сигнала
(не входит в комплект), чтобы обеспечить
изображение более высокого качества.
y
Антенный кабель, усилитель и разветвитель
в комплект поставки не входят.
y
Поддерживаемый формат цифрового аудио:
MPEG, Dolby Digital, Dolby Digital Plus, HE-
AAC
A-7
MAKING CONNECTIONS
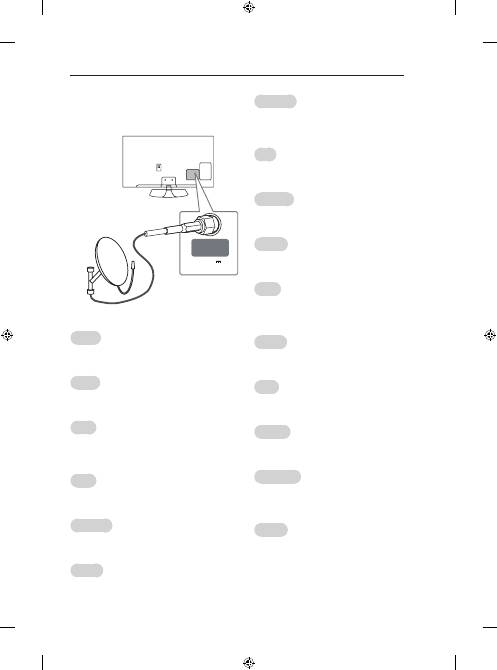
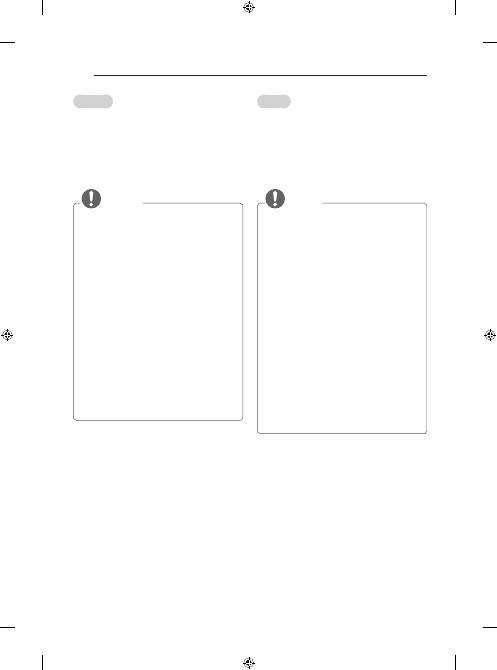
Satellite dish Connection
(Only satellite models)
LNB IN
Satellite
13/18V
700mA Max
Satellite Dish
English
Connect the TV to a satellite dish to a satellite socket
with a satellite RF cable (75 Ω).
Magyar
Csatlakoztassa a TV-készüléket a műholdvevő anten-
nához tartozó aljzathoz RF kábellel (75 Ω).
Polski
Telewizor należy podłączyć do anteny satelitarnej,
umieszczając przewód RF anteny satelitarnej (75 Ω) w
gnieździe anteny satelitarnej telewizora.
Česky
Připojte televizor k satelitní anténě prostřednictvím zá-
suvky pro satelitní příjem a satelitního kabelu RF (75 Ω).
Slovenčina
Pripojte televízor k satelitnej parabolickej anténe cez
konektor satelitu prostredníctvom kábla RF (75 Ω).
Română
Conectaţi televizorul la priza unei antene de perete cu
un cablu RF (75 Ω).
Български
Свържете телевизора със сателитна чиния и вклю-
чете в сателитно гнездо чрез сателитен радиочесто-
тен кабел (75 Ω).
Eesti
Ühendage teler satelliitantenniga satelliidi pistmikusse
RF-kaabliga (75 Ω).
Lietuvių k.
Prijunkite televizoriaus palydovinę anteną prie palydovi-
nio lizdo palydovinės antenos RF kabeliu (75 Ω).
Latviešu
Pievienojiet televizoru satelīta šķīvim satelīta ligzdā,
izmantojot RF kabeli (75 Ω).
Srpski
Povežite televizor sa satelitskom antenom pomoću
priključka za satelitsku antenu i RF kabla za satelitsku
antenu (75 Ω).
Hrvatski
Povežite televizor sa satelitskim tanjurom putem
satelitske utičnice koristeći satelitski RF kabel (75 Ω).
Shqip
Lidheni TV-në me një antenë satelitore, me një prizë
satelitore nëpërmjet një kablloje RF (75 Ω).
Bosanski
Povežite TV na satelitsku antenu i satelitsku utičnicu RF
kablom (75 Ω).
Македонски
Поврзете го телевизорот со сателитска антена преку
приклучокот за сателитска антена со сателитски RF
кабел (75 Ω).
Русский
Подключите кабель от спутниковой тарелки (75 Ω),
или к специальной спутниковой розетке с проходом
по питанию.
(*Not Provided)
A-8
MAKING CONNECTIONS
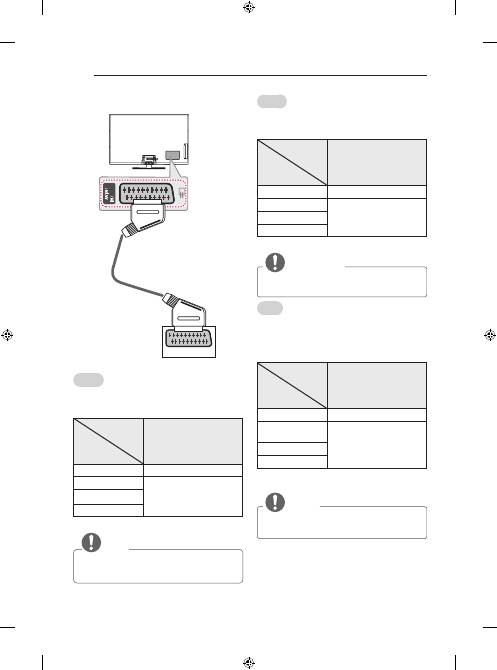
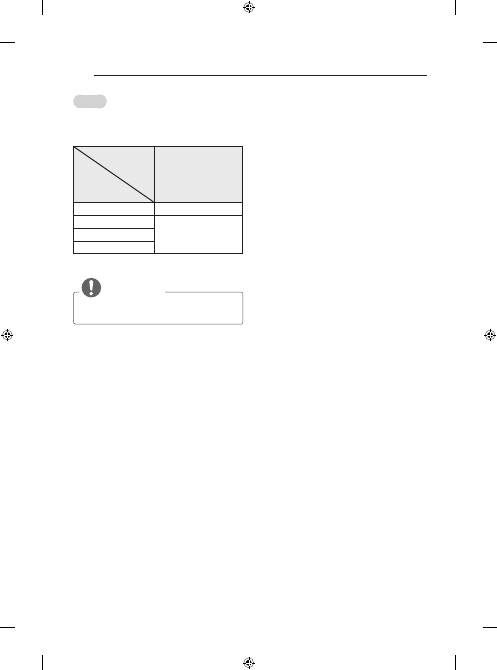
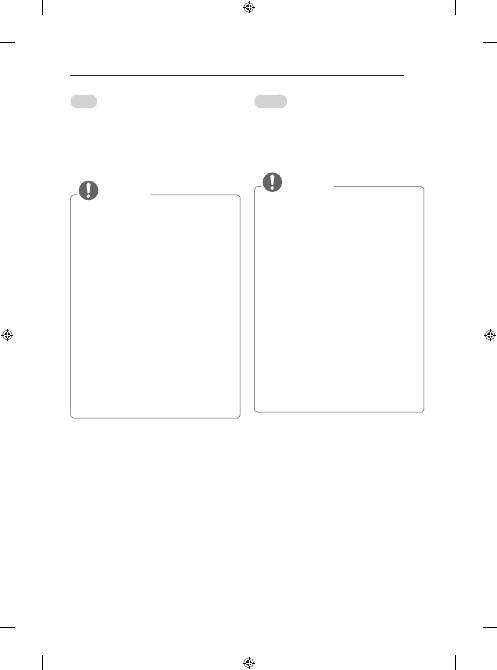
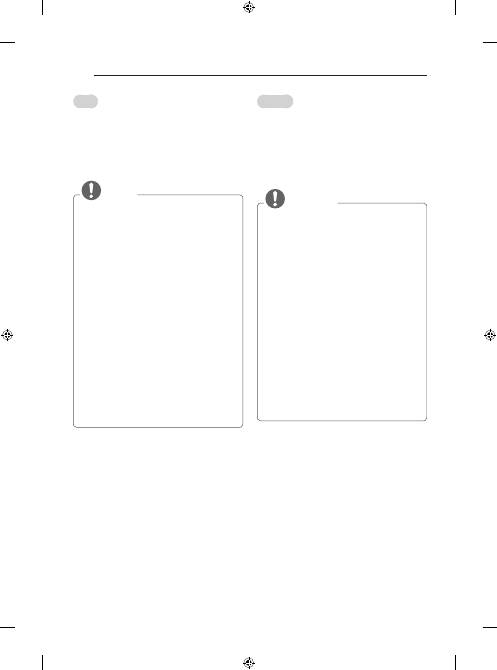
Euro Scart Connection
OUT
AUDIO / VIDEO
(*Not Provided)
English
Transmits the video and audio signals from an external
device to the TV set. Connect the external device and
the TV set with the euro scart cable as shown.
Output
Type
Current
input mode
AV1
(TV Out
1
)
Digital TV
Digital TV
Analogue TV, AV
Analogue TV
Component
HDMI
1 TV Out : Outputs Analogue TV or Digital TV signals.
NOTE
y
Any Euro scart cable used must be signal
shielded.
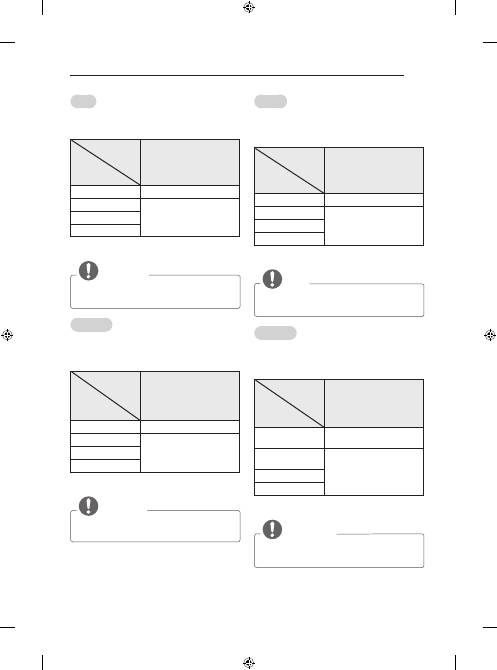
Magyar
Továbbítja a video- és audiojeleket egy külső eszközről
a TV-hez. Az alábbi ábra alapján cstlakoztassa a külső
eszközt a TV-hez az Euro Scart kábel segítségével.
Kimenet típusa
Aktuális
bemeneti mód
AV1
(TV-kimenet
1
)
Digitális TV
Digitális TV
Analóg TV, AV
Analóg TV
Komponens
HDMI
1 TV-kimenet: Analóg vagy digitális TV-jelet közvetít.
MEGJEGYZÉS
y
Csak árnyékolt Scart kábelt szabad használni.
Polski
To połączenie umożliwia przesyłanie sygnałów audio
i wideo z urządzenia zewnętrznego do telewizora.
Urządzenie zewnętrzne i telewizor należy połączyć za
pomocą przewodu Euro Scart w sposób pokazany na
poniższej ilustracji.
Typ sygnału
wyjściowego
Aktualny
sygnał wejściowy
AV1
(Wyjście telewizyjne
1
)
Telewizja cyfrowa
Telewizja cyfrowa
Telewizja
analogowa, AV
Telewizja analogowa
Component
HDMI
1 Wyjście telewizyjne: wysyłanie sygnału telewizji
analogowej lub cyfrowej.
UWAGA
y
Używany przewód Euro Scart musi być
ekranowany.
A-9
MAKING CONNECTIONS
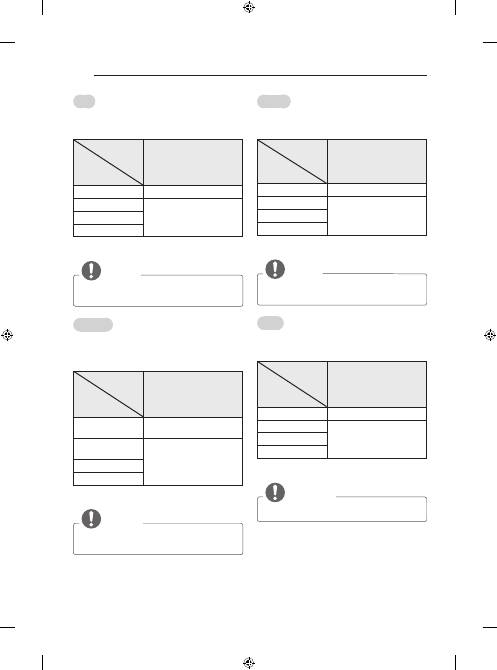
Română
Transmite semnale audio şi video de la un dispozitiv
extern la televizor. Conectaţi dispozitivul extern şi
televizorul cu cablul Euro Scart, aşa cum se arată în
ilustraţia următoare.
Tip de ieşire
Mod
intrare curent
AV1
(Ieşire TV
1
)
Televizor digital
Televizor digital
Televizor analogic, AV
Televizor analogic
Component
HDMI
1 Ieşire TV: transmite semnalul TV analogic sau TV
digital.
NOTĂ
y
Orice cablu Euro scart utilizat trebuie să fie
ecranat faţă de semnal.
Български
Предава видео и аудио сигнали от външно
устройство на телевизора. Свържете външно
устройство с телевизора чрез Euro Scart кабел,
както е показано на следната фигура.
Тип изход
Текущ
входящ
режим
AV1
(TV изход
1
)
Цифрова
телевизия
Цифрова телевизия
Аналогова
телевизия, AV
Аналогова телевизия
Компонент
HDMI
1 TV изход: отвежда сигнали от аналогова или
цифрова телевизия.
ЗАБЕЛЕЖКА
y
Всички използвани Euro scart кабели трябва
да са със защитен сигнал.
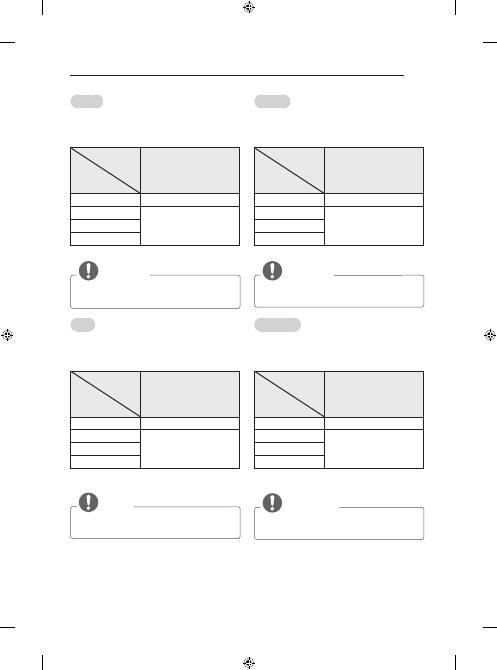
Česky
Přenáší signál videa nebo zvuku z externího zařízení
do televizoru. Spojte externí zařízení a televizor pomocí
kabelu Euro Scart podle následujícího vyobrazení.
Typ výstupu
Aktuální
vstupní režim
AV1
(Výstup TV
1
)
Digitální TV
Digitální TV
Analogová TV, AV
Analogová TV
Komponentní
HDMI
1 Výstup TV: výstup analogových nebo digitálních
televizních signálů.
POZNÁMKA
y
Kabel Euro Scart musí být vybaven stíněním
signálu.
Slovenčina
Slúži na prenos obrazového a zvukového signálu z
externého zariadenia do televízora. Prepojte externé
zariadenie a televízor prostredníctvom kábla Euro Scart
podľa nasledujúceho obrázku.
Typ výstupu
Aktuálny
režim vstupu
AV 1
(TV Out
1
)
Digitálna TV
Digitálna TV
Analógová TV, AV
Analógová TV
Komponent
HDMI
1 TV Out (Výstup televízora): Výstup signálov
analógovej alebo digitálnej TV.
POZNÁMKA
y
Každý kábel Euro Scart musí používať
signálové tienenie.
A-10
MAKING CONNECTIONS
Eesti
Edastab välisseadme video- ja helisignaalid telerisse.
Ühendage välisseadme ja teleri vahele Euro Scart-
kaabel nii, nagu on näidatud alltoodud joonisel.
Väljundi tüüp
Valitud
sisendtüüp
AV1
(Teleriväljund
1
)
Digitaalteler
Digitaalteler
Analoogteler, AV
Analoogteler
Komponent
HDMI
1 Teleriväljund: analoog- või digitaaltelevisiooni
signaalide väljundid.
MÄRKUS
y
Kui soovite kasutada Euro Scart kaablit, peab
see olema varjestatud.
Lietuvių k.
Perduoda vaizdo ir garso signalus iš išorinio įrenginio
į televizorių. Sujunkite išorinį įrenginį su televizo-
riumi „Euro Scart“ kabeliu, kaip tai parodyta šiame
paveikslėlyje.
Išvesties tipas
Dabartinis
įvesties režimas
AV1
(TV išvestis
1
)
Skaitmeninė
televizija
Skaitmeninė televizija
Analoginė televizija,
AV
Analoginė televizija
Komponentas
HDMI
1 TV išvestis: siunčia analoginės arba skaitmeninės
televizijos signalus.
PASTABA
y
Bet kuris „Euro Scart“ kabelis turi būti
ekranuotas signalų kabelis.
Latviešu
Tas pārraida video un audio signālu no ārējās ierīces uz
televizoru. Savienojiet ārējo ierīci un televizoru, izman-
tojot Euro Scart kabeli, kā redzams attēlā.
Izejas veids
Pašreizējais
ievades režīms
AV1
(Televizora izeja
1
)
Digitālā TV
Digitālā TV
Analogā TV, AV
Analogā TV
Komb. sign.
HDMI
1 TV izeja: izejā nodrošina analogos vai digitālos TV
signālus.
PIEZĪME
y
Izmantojot jebkuru Euro scart kabeli,
nepieciešama signāla ekranēšana.
Srpski
Prenos video i audio signala sa spoljašnjeg uređaja do
televizora. Povežite spoljašnji uređaj i televizor pomoću
Euro Scart kabla kao što je prikazano na sledećoj slici.
Tip izlaza
Trenutni
ulazni režim
AV1
(TV izlaz
1
)
Digitalna televizija
Digitalna televizija
Analogna TV, AV
Analogna televizija
Komponentni
HDMI
1 TV izlaz: Prosleđuje analogni TV signal ili digitalni
TV signal.
NAPOMENA
y
Svaki scart kabl mora biti oklopljen.
A-11
MAKING CONNECTIONS
Hrvatski
Digitalni video i audio signal s vanjskog uređaja prenosi
na televizor. Priključite vanjski uređaj na televizor
pomoću Euro Scart kabela kako je prikazano na
sljedećoj slici.
Vrsta izlaza
Trenutačni
način ulaza
AV1
(TV izlaz
1
)
Digitalna TV
Digitalna TV
Analogna TV, AV
Analogna TV
Komponentni
HDMI
1 TV izlaz: prenosi analogne ili digitalne TV signale.
NAPOMENA
y
Svaki Euro Scart kabel koji koristite mora imati
zaštitu signala.
Shqip
Transmeton sinjalet e videos dhe audios nga një pajisje
e jashtme tek TV-ja. Lidhni pajisjen e jashtme dhe
TV-në me kabllot Euro Scart siç tregohet në ilustrimin
më poshtë.
Lloji i daljes
Regjimi
aktual i hyrjes
AV1
(Dalje e TV-së
1
)
TV dixhital
TV dixhital
TV analog, AV
TV analog
Komponenti
HDMI
1 Dalja e TV-së: Nxjerr sinjalet e TV-së analoge ose
TV-së dixhitale.
SHËNIM
y
Kabllot Euro Scart duhet të jenë të mbrojtur nga
sinjalet.
Bosanski
Prenosi video i audio signale sa vanjskog uređaja na
TV uređaj. Povežite vanjski uređaj i TV aparat putem
Euro Scart kabla na način prikazan na sljedećoj
ilustraciji.
Tip izlaza
Trenutni
način ulaza
AV1
(TV izlaz
1
)
Digitalna TV
Digitalna TV
Analogna TV, AV
Analogna TV
Komponenta
HDMI
1 TV izlaz: izlaz analognih TV ili digitalnih TV signala.
NAPOMENA
y
Svaki Euro Scart kabl mora imati zaštitu
signala.
Македонски
Овозможува пренесување на видео и аудио сигнали
од надворешниот уред кон телевизорот. Поврзете
ги надворешниот уред и телевизорот со Euro Scart
кабел како што е прикажано на следната слика.
Тип на излез
Тековен
режим на влез
AV1
(TV излез
1
)
Дигитална TV
Дигитална TV
Аналогна TV, AV
Аналогна TV
Компонентен
HDMI
1 TV излез : На излез дава аналогни TV или
дигитални TV сигнали.
ЗАБЕЛЕШКА
y
Секој Euro scart кабел кој ќе се користи мора да
има оклоп за заштита на сигналот.
A-12
MAKING CONNECTIONS
Русский
Для передачи аналоговых видео- и аудиосигналов
от внешнего устройства на телевизор подключите
внешнее устройство к телевизору с помощью кабеля
СКАРТ, как показано на рисунке.
Тип выхода
Текущий
режим
ввода
AV1
(ТВ-выход
1
)
Цифровое ТВ
Цифровое ТВ
Аналоговое ТВ, AV
Аналоговое ТВ
Компонентный
HDMI
1 ТВ-выход: Вывод аналогового или цифрового
ТВ-сигнала.
ПРИМЕЧАНИЕ
y
Используемый кабель СКАРТ должен иметь
защиту сигнала.
A-13
MAKING CONNECTIONS
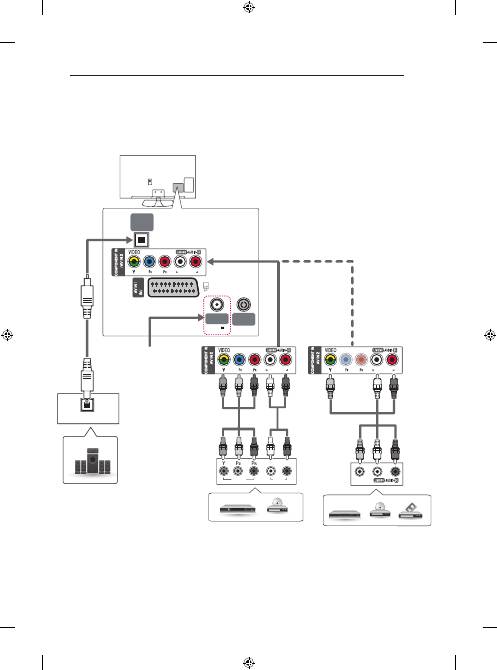
Other Connections
PC-AUDIO IN
PC-AUDIO IN
PC-AUDIO IN
OUT
LNB IN
Satellite
13/18V
700mA Max
ANTENNA/
CABLE IN
OPTICAL
DIGITAL
AUDIO OUT
VIDEO
OPTICAL AUDIO IN
AUDIO
VIDEO
L
R
(Only satellitle models)
Digital Audio System
DVD / Blu-Ray / HD Cable Box
VCR / DVD / Blu-Ray / HD Cable Box
RED
RED
RED
RED
WHITE
WHITE
BLUE
GREEN
BLUE
GREEN
YELLOW
WHITE
RED
RED
WHITE
YELLOW

A-14
MAKING CONNECTIONS
DVI OUT
AUDIO OUT
USB IN
HDMI
IN (MHL/PC)
HDMI
PC-AUDIO IN
Mobile phone
MHL
passive Cable
USB / HDD
DVD / Blu-Ray / PC /
HD Cable Box / HD STB
RED
WHITE
DVD / Blu-Ray / PC / HD Cable Box
A-15
MAKING CONNECTIONS
English
Connect your TV to external devices. For the best
picture and audio quality, Connect the external device
and the TV with the HDMI cable as shown.Some
separate cable is not provided.
Magyar
Csatlakoztasson külső eszközöket TV-jéhez. A legjobb
kép- és hangminőség érdekében a külső eszközöket
HDMI-kábellel csatlakoztassa TV-jéhez. Egyes kábele-
ket külön kell megvásárolni.
Polski
Podłącz urządzenie zewnętrzne do telewizora.Aby
uzyskać jak najlepszą jakość obrazu i dźwięku, podłącz
urządzenie zewnętrzne do telewizora, używając prze-
wodu HDMI, w sposób pokazany na rysunku. Zestaw
nie zawiera dodatkowego przewodu.
Česky
Připojte televizor k externím zařízením. Pro dosažení
nejlepší kvality obrazu a zvuku propojte externí zařízení
a televizor pomocí kabelu HDMI podle nákresu. Samo-
statný kabel není součástí dodávky.
Slovenčina
Pripojte váš televízor k externým zariadeniam. Na zís-
kanie najlepšej kvality obrazu a zvuku pripojte externé
zariadenie a televízor pomocou kábla HDMI podľa zo-
brazenia na obrázku. Samostatný kábel nie je súčasťou
dodávky.
Română
Conectaţi-vă televizorul la dispozitive externe. Pentru
cea mai bună calitate a imaginii şi a sunetului, conectaţi
dispozitivul extern şi televizorul cu cablul HDMI după
cum este indicat. Nu este prevăzut un cablu separat.
Български
Свържете вашия телевизор към външни устройства.
За най-добро качество на картината и звука, свър-
жете външното устройство и телевизора с HDMI
кабела, както е показано. Някои отделни кабели не са
предоставени.
Eesti
Ühendage teler välisseadmetega. Parima pildi- ja
helikvaliteedi tagamiseks ühendage välisseade ja teler
HDMI-kaabliga nii, nagu näidatud. Eraldi kaabel ei ole
kaasas.
Lietuvių k.
Prijunkite televizorių prie išorinių įrenginių. Norėdami
geriausios vaizdo ir garso kokybės, sujunkite išorinį
įrenginį ir televizorių HDMI kabeliu, kaip parodyta. Atski-
ras kabelis nepridedamas.
Latviešu
Pievienojiet savu TV ārējām ierīcēm. Lai iegūtu labāku
attēla un audio kvalitāti, savienojiet ārējo ierīci un TV,
izmantojot HDMI kabeli, kā tas parādīts. Daži atsevišķi
kabeļi nav iekļauti komplektācijā.
Srpski
Povežite spoljni uređaj sa televizorom. Za najbolji
kvalitet slike i zvuka povežite spoljni uređaj sa televizo-
rom pomoću HDMI kabla na način prikazan u nastavku.
Zaseban kabl se ne dobija u kompletu.
Hrvatski
Priključite TV na vanjske uređaje. Za sliku i zvuk
najbolje kvalitete priključite vanjski uređaj i TV putem
HDMI kabela, kako je prikazano. Odvojeni kabel ne
isporučuje se u kompletu.
Shqip
Lidhni televizorin me pajisjet e jashtme. Për cilësinë më
të mirë të figurës dhe të zërit, lidheni pajisjen e jashtme
dhe televizorin me kabllon HDMI siç tregohet. Nuk
ofrohen kabllo veçmas.
Bosanski
Povežite TV na vanjski uređaj. Za najbolji kvalitet slike
i zvuka povežite vanjski uređaj na TV pomoću HDMI
kabla kako je prikazano. Poseban kabl ne isporučuje se
u kompletu.
Македонски
Поврзете го вашиот телевизор со надворешни
уреди. За најдобар квалитет на сликата и звукот,
поврзете ги надворешниот уред и телевизорот со
HDMI кабел како што е прикажано на сликата.
Одделни кабли не се испорачуваат.
Русский
Подключите телевизор к внешнему устройству. Для
получения наилучшего качества изображения и
звука, подключите телевизор к внешнему устройству
HDMI-кабелем, как показано на рисунке. Не все
кабели входят в комплект поставки.

A-16
MAKING CONNECTIONS
English
Connect various external devices to the TV and switch
input modes to select an external device. For more
information of external device’s connection, refer to the
manual provided with each device.
Available external devices are: HD receivers, DVD
players, VCRs, audio systems, USB storage devices,
PC, gaming devices, and other external devices.
NOTE
y
The external device connection may differ from
the model.
y
Connect external devices to the TV regardless
of the order of the TV port.
y
If you record a TV program on a DVD recorder
or VCR, make sure to connect the TV signal
input cable to the TV through a DVD recorder
or VCR. For more information of recording,
refer to the manual provided with the connected
device.
y
Refer to the external equipment’s manual for
operating instructions.
y
If you connect a gaming device to the TV, use
the cable supplied with the gaming device.
y
In PC mode, there may be noise associated
with the resolution, vertical pattern, contrast or
brightness. If noise is present, change the PC
output to another resolution, change the refresh
rate to another rate or adjust the brightness and
contrast on the PICTURE menu until the picture
is clear.
y
In PC mode, some resolution settings may not
work properly depending on the graphics card.
Magyar
Csatlakoztasson különböző külső eszközöket a
TV-készülékhez, és váltson át bemeneti módra
a külső eszköz kiválasztásához. Külső eszköz
csatlakoztatására vonatkozó további tudnivalókat az
egyes eszközök használati útmutatójában talál.
A csatlakoztatható külső eszközök: HD-
vevőkészülékek, DVD-lejátszók, videomagnók,
audiorendszerek, USB-tárolóeszközök, számítógépek,
játékeszközök és egyéb külső eszközök.
MEGJEGYZÉS
y
A külső eszköz csatlakozása függhet a típustól.
y
Csatlakoztassa a külső eszközöket a TV-
készülékhez a TV-port sorrendjétől függetlenül.
y
Ha DVD-felvevőn vagy videomagnón rögzít
egy TV-műsort, győződjön meg róla, hogy a
TV jelbemeneti kábelét a DVD-felvevőn vagy a
videomagnón keresztül csatlakoztatta a TV-hez.
A felvételre vonatkozó további tudnivalókat a
csatlakoztatott eszköz használati útmutatójában
találja meg.
y
A használatra vonatkozó utasítások a külső
berendezés használati útmutatójában
találhatók.
y
Ha játékeszközt csatlakoztat a TV-készülékhez,
használja az adott eszköz saját kábelét.
y
Előfordulhat, hogy PC módban felbontással,
a függőleges mintával, a kontraszttal vagy a
fényerővel kapcsolatos zaj lép fel. Zaj esetén
módosítsa a PC kimenetet más felbontásra,
módosítsa a képfrissítési sebességet más
értékre, vagy állítsa be a fényerőt és a
kontrasztot a KÉP menüben, amíg tiszta nem
lesz a kép.
y
PC-módban előfordulhat, hogy egyes felbontási
beállítások a grafikus kártyától függően nem
működnek megfelelően.
A-17
MAKING CONNECTIONS
Polski
Do telewizora można podłączać różne urządzenia.
Funkcja przełączania trybów sygnału wejściowego
pozwala wybrać konkretne urządzenie zewnętrzne,
które będzie używane w danym momencie. Więcej
informacji o podłączaniu urządzeń zewnętrznych
można znaleźć w ich instrukcjach obsługi.
Telewizor współpracuje między innymi z następującymi
urządzeniami zewnętrznymi: odbiorniki sygnału HD,
odtwarzacze DVD, magnetowidy, systemy audio,
urządzenia pamięci masowej USB, komputery, konsole
do gier.
UWAGA
y
Sposób podłączania urządzenia zewnętrznego
może się różnić w zależności od modelu.
y
Urządzenia zewnętrzne można podłączać
do dowolnego odpowiedniego gniazda w
telewizorze.
y
W przypadku nagrywania programu
telewizyjnego przy użyciu nagrywarki DVD
lub magnetowidu wejściowy przewód sygnału
telewizyjnego należy podłączyć do telewizora
za pośrednictwem tego urządzenia. Więcej
informacji o nagrywaniu znajdziesz w instrukcji
podłączonego urządzenia.
y
Informacje na temat obsługi urządzenia
zewnętrznego można znaleźć w jego instrukcji
obsługi.
y
Konsolę do gier należy podłączyć do telewizora
za pomocą przewodu dołączonego do konsoli.
y
W trybie PC mogą pojawiać się zakłócenia
przy niektórych rozdzielczościach, pionowych
wzorach lub ustawieniach kontrastu i jasności.
Należy wówczas spróbować ustawić dla trybu
PC inną rozdzielczość, zmienić częstotliwość
odświeżania obrazu lub wyregulować w menu
OBRAZ jasność i kontrast, aż obraz stanie się
czysty.
y
W trybie PC niektóre ustawienia rozdzielczości
mogą nie działać poprawnie w zależności od
karty graficznej.
Česky
K televizoru lze připojit různá externí zařízení
a přepínáním režimů vstupů volit určité externí zařízení.
Další informace o připojování externích zařízení najdete
v návodu konkrétního zařízení.
Dostupná externí zařízení jsou: přijímače HD,
přehrávače DVD, videorekordéry, audio systémy,
záznamová zařízení USB, počítače, herní zařízení
a další externí zařízení.
POZNÁMKA
y
Připojení externích zařízení se může u různých
modelů lišit.
y
Externí zařízení lze připojovat k televizoru bez
ohledu na pořadí televizního portu.
y
Když nahráváte televizní pořad do rekordéru
DVD nebo videorekordéru, připojte vstupní
kabel televizního signálu k televizoru
prostřednictvím rekordéru DVD nebo
videorekordéru. Další informace o nahrávání
najdete v návodu k připojenému zařízení.
y
Pokyny k používání externího zařízení
naleznete v příslušném návodu k použití.
y
Když k televizoru připojujete herní zařízení,
použijte kabel dodaný společně s herním
zařízením.
y
V režimu PC může vznikat šum v souvislosti
s rozlišením, svislým vzorem, kontrastem nebo
jasem. Pokud vzniká šum, změňte vstup PC
na jiné rozlišení, změňte obnovovací frekvenci
na jinou hodnotu nebo upravte jas a kontrast
v nabídce OBRAZ, dokud se obraz nevyjasní.
y
V režimu PC nemusí některá nastavení rozlišení
fungovat správně v závislosti na grafické kartě.
A-18
MAKING CONNECTIONS
Slovenčina
K televízoru môžete pripájať rôzne externé zariadenia
a prepínaním režimov vstupu vybrať príslušné externé
zariadenie. Viac informácií o pripájaní externého
zariadenia nájdete v príručke dodanej s príslušným
zariadením.
Dostupné externé zariadenia sú: HD prijímače, DVD
prehrávače, videorekordéry, zvukové systémy, úložné
zariadenia USB, počítač, herné zariadenia a iné
externé zariadenia.
POZNÁMKA
y
Pripojenie externého zariadenia sa môže líšiť
podľa príslušného modelu.
y
Externé zariadenia pripájajte k televízoru bez
ohľadu na poradie TV portu.
y
Ak zaznamenávate televízny program na DVD
rekordér alebo videorekordér, pripojte televízny
vstupný signálový kábel k televízoru cez DVD
rekordér alebo videorekordér. Viac informácií o
zaznamenávaní nájdete v príručke dodanej s
pripojeným zariadením.
y
Postupujte podľa pokynov v príručke k
externému zariadeniu.
y
Ak pripájate k televízoru herné zariadenie,
použite kábel dodaný s herným zariadením.
y
V režime PC sa môže s rozlíšením, vertikálnym
vzorom, kontrastom alebo jasom spájať šum.
Ak je prítomný šum, zmeňte výstup z PC na
iné rozlíšenie, zmeňte obnovovací kmitočet
na iný kmitočet, prípadne nastavujte v ponuke
OBRAZ jas a kontrast, až kým nedosiahnete
čistý obraz.
y
V režime PC sa v závislosti od grafickej karty
môže stať, že určité nastavenia rozlíšenia
nemusia pracovať správne.
Română
Conectaţi diferite dispozitive externe la televizor şi
comutaţi modurile de intrare pentru a selecta un
dispozitiv extern. Pentru mai multe informaţii privind
conectarea dispozitivului extern, consultaţi manualul
furnizat cu fiecare dispozitiv.
Dispozitivele externe disponibile sunt: receptoare
HD, playere DVD, VCR-uri, sisteme audio, dispozitive
de stocare USB, PC, dispozitive pentru jocuri şi alte
dispozitive externe.
NOTĂ
y
Conectarea dispozitivului extern poate diferi de
model.
y
Conectaţi dispozitivele externe la televizor,
indiferent de ordinea portului televizorului.
y
Dacă înregistraţi un program TV pe un
dispozitiv de înregistrare DVD-uri sau pe un
VCR, asiguraţi conectarea cablului de intrare
pentru semnalul TV la televizor printr-un
dispozitiv de înregistrare DVD-uri sau printr-
un VCR. Pentru mai multe informaţii privind
înregistrarea, consultaţi manualul furnizat cu
dispozitivul conectat.
y
Consultaţi manualul echipamentului extern
pentru instrucţiuni de funcţionare.
y
În cazul în care conectaţi un dispozitiv pentru
jocuri la televizor, utilizaţi cablul furnizat cu
dispozitivul pentru jocuri.
y
În modul PC, este posibil să existe interferenţă
legată de rezoluţie, model vertical, contrast
sau luminozitate. Dacă există interferenţă,
schimbaţi modul PC la altă rezoluţie, schimbaţi
rata de reîmprospătare sau reglaţi luminozitatea
şi contrastul din meniul IMAGINE până când
imaginea este clară.
y
În modul PC, este posibil ca unele setări ale
rezoluţiei să nu opereze corect, în funcţie de
placa video.

A-19
MAKING CONNECTIONS
Български
Свържете различни външни устройства с
телевизора и превключвате режимите за входния
сигнал, за да изберете съответното външно
устройство. За допълнителна информация относно
свързването на външни устройства, разгледайте
ръководството на съответното устройство.
Наличните външни устройства са: HD приемници,
DVD плейъри, VCR, аудиосистеми, USB устройства
за съхранение, компютри, устройства за игри и
други външни устройства.
ЗАБЕЛЕЖКА
y
Свързването на външното устройство може
да е различно в зависимост от модела.
y
Свържете външните устройства с
телевизора, независимо от реда на
подреждане на телевизионните портове.
y
Ако записвате телевизионна програма с DVD
рекордер или VCR, непременно включете
входния кабел за сигнала от телевизора в
самия телевизор чрез DVD рекордер или
VCR. За подробности относно записването
направете справка в ръководството на
потребителя на свързаното устройство.
y
За да се запознаете с инструкциите за
работа, разгледайте ръководството за
използване на външното оборудване.
y
Ако включвате устройство за игри
в телевизора, използвайте кабела,
предоставен с това устройство.
y
В режим на работа с компютър е
възможно да се появи шум, произтичащ
от резолюцията, вертикалния шаблон,
контраста или яркостта. Ако доловите шум,
променете режима компютър на вариант с
друга резолюция, настройте различна норма
на опресняване или регулирайте яркостта
и контраста от меню PICTURE, докато
картината се изчисти.
y
В режим на компютър някои настройки
на разделителната способност може да
не работят правилно в зависимост от
графичната карта.
Eesti
Ühendage teleriga erinevad välisseadmed ning lülitage
sisendrežiimid valima välisseadmeid. Lisateavet
väliseadmete ühendamise kohta leiate vastava seadme
kasutusjuhendist.
Kasutatavad välisseadmed on järgmised: HD
vastuvõtjad, DVD-mängijad, videokassettmakid,
audiosüsteemid, USB-mäluseadmed, arvuti,
mänguseadmed ja muud välisseadmed.
MÄRKUS
y
Välisseadmete ühendamine võib sõltuvalt
mudelist erineda.
y
Ühendage välisseadmed teleriga TV-portide
järjekorrast sõltumatult.
y
Kui salvestate telesaate DVD-le või
videokassetile, veenduge, et ühendate
telesignaali sisendkaabli teleriga DVD-salvesti
või videokassettmaki kaudu. Lisateavet
salvestamise kohta leiate ühendatud seadme
kasutusjuhendist.
y
Juhiseid vt välisseadme kasutusjuhendist.
y
Mänguseadme ühendamisel teleriga kasutage
mänguseadme ühenduskaablit.
y
Arvutirežiimis võib esineda eraldusvõime,
vertikaalmustri, kontrasti või heledusega seotud
müra. Müra olemasolul muutke arvutiväljundi
eraldusvõimet, värskendussagedust või
reguleerige heledust ja kontrasti menüüs PILT,
kuni jääte kvaliteediga rahule.
y
Kõik eraldusvõime sätted ei pruugi arvutirežiimis
sõltuvalt graafikakaardist korralikult töötada.
A-20
MAKING CONNECTIONS
Lietuvių k.
Prijunkite įvairius išorinius įrenginius prie televizoriaus
ir perjunkite įvesties režimus, kad pasirinktumėte išorinį
įrenginį. Daugiau informacijos apie išorinių įrenginių
prijungimą rasite su kiekvienu įrenginiu pateiktame
vadove.
Gali būti naudojami išoriniai įrenginiai: HD imtuvai,
DVD leistuvai, vaizdo leistuvai, garso sistemos, USB
atmintinės, kompiuteriai, žaidimų įranga ir kiti išoriniai
įrenginiai.
PASTABA
y
Išorinio įrenginio prijungimas gali skirtis, tai
priklauso nuo modelio.
y
Prijunkite išorinius įrenginius prie televizoriaus
nepaisydami televizoriaus jungties tvarkos.
y
Jei DVD arba vaizdo įrašymo įrenginiu įrašote
televizijos programą, įsitikinkite, kad prijungėte
televizoriaus signalo įvesties kabelį prie
televizoriaus per DVD arba vaizdo įrašymo
įrenginį. Daugiau informacijos rasite su
prijungtu įrenginiu pateiktame vadove.
y
Išorinio įrenginio naudojimo instrukcijas rasite
vadove.
y
Jei prie televizoriaus jungiate žaidimų įrangą,
naudokite su ja pateiktą kabelį.
y
Kompiuterio režimu gali atsirasti skiriamosios
gebos, vertikalaus vaizdo, kontrasto ar
šviesumo trikdžių. Jei yra trikdžių, nustatykite
kompiuterio išvestį į kitą skiriamąją gebą,
pakeiskite atnaujinimo dažnį arba VAIZDO
meniu reguliuokite šviesumą ir kontrastą, kol
vaizdas taps ryškus.
y
Kompiuterio režimu kai kurie raiškos nustatymai
gali tinkamai neveikti atsižvelgiant į vaizdo
plokštę.
Latviešu
Pievienojiet televizoram dažādas ārējās ierīces un
pārslēdziet ievades signāla režīmus, lai atlasītu
ārējo ierīci. Lai uzzinātu vairāk par ārējās ierīces
pievienošanu, skatiet katras ierīces komplektācijā
iekļauto rokasgrāmatu.
Pievienojamās ārējās ierīces ir šādas: HD uztvērēji,
DVD atskaņotāji, videomagnetofoni, audiosistēmas,
USB atmiņas ierīces, dators, spēļu ierīces un citas
ārējās ierīces.
PIEZĪME
y
Ārējās ierīces savienojums var atšķirties
atkarībā no modeļa.
y
Pievienojiet ārējās ierīces televizoram
neatkarīgi no televizora portu secības.
y
Ja ierakstāt televīzijas pārraidi, izmantojot DVD
rakstītāju vai videomagnetofonu, pārbaudiet,
vai televīzijas signāla ievades kabeli pievienojāt
televizoram, izmantojot DVD rakstītāju vai
videomagnetofonu. Lai uzzinātu vairāk, skatiet
pievienotās ierīces komplektācijā iekļauto
rokasgrāmatu.
y
Ārējās aparatūras lietošanas norādījumus
skatiet tās attiecīgajā rokasgrāmatā.
y
Lai pievienotu televizoram spēļu ierīci,
izmantojiet spēļu ierīces komplektācijā iekļauto
kabeli.
y
Datora režīmā var rasties trokšņi, ko izraisa
izšķirtspēja, vertikālā attēla struktūra, kontrasts
vai spilgtums. Ja troksnis nezūd, mainiet datora
režīmu uz citu izšķirtspēju, mainiet atsvaidzes
intensitāti vai izvēlnē PICTURE (Attēls)
pielāgojiet spilgtumu un kontrastu, līdz attēls ir
skaidrs.
y
Datora režīmā daži izšķirtspējas iestatījumi,
iespējams, nedarbosies pareizi. Tas ir atkarīgs
no grafiskās kartes.
A-21
MAKING CONNECTIONS
Srpski
Povežite različite spoljne uređaje sa televizorom i
aktivirajte odgovarajući ulazni režim da biste izabrali
željeni spoljni uređaj. Da biste dobili više informacija o
povezivanju spoljnih uređaja, pogledajte priručnik koji
se isporučuje sa svakim uređajem.
Podržani su sledeći spoljni uređaji: HD risiveri, DVD
plejeri, videorikorderi, audio sistemi, USB memorije,
računar, igračke konzole i drugi spoljni uređaji.
NAPOMENA
y
Povezivanje spoljnih uređaja može se
razlikovati u zavisnosti od modela.
y
Povežite spoljne uređaje sa televizorom bez
obzira na redosled TV priključaka.
y
Pre snimanja TV programa na DVD rikorderu
ili videorikorderu proverite da li je ulazni kabl
TV signala povezan na televizor preko DVD
rikordera ili videorikordera. Da biste dobili više
informacija o snimanju, pogledajte priručnik koji
se isporučuje sa svakim uređajem.
y
Uputstvo za upotrebu potražite u priručniku
spoljnog uređaja.
y
Ako povezujete igračku konzolu sa televizorom,
koristite kabl koji se isporučuje uz igračku
konzolu.
y
U PC režimu može se pojaviti šum koji potiče
od rezolucije, vertikalnog šablona, kontrasta
ili osvetljenosti. Ako se javi šum, promenite
rezoluciju signala na računaru, promenite
brzinu osvežavanja ili podesite osvetljenost
i kontrast u meniju SLIKA sve dok slika ne
postane jasna.
y
U zavisnosti od grafičke kartice, pojedine
postavke rezolucije možda neće ispravno raditi
u PC režimu.
Hrvatski
Za odabir vanjskog uređaja priključite vanjske uređaje
na televizor i promijenite načine ulaza. Dodatne
informacije o priključivanju vanjskog uređaja potražite u
priručniku svakog uređaja.
Dostupni vanjski uređaji su: HD prijemnici, DVD uređaji,
videorekorderi, USB memorije, računala, uređaji za igru
i drugi vanjski uređaji.
NAPOMENA
y
Priključak vanjskog uređaja može se razlikovati
ovisno o modelu.
y
Priključite vanjske uređaje na televizor bez
obzira na redoslijed priključaka na televizoru.
y
Ako snimate televizijski program pomoću DVD
snimača ili videorekordera, kabel za ulazni
televizijski signal obavezno uključite u televizor
preko DVD snimača ili videorekordera. Dodatne
informacije o snimanju potražite u priručniku
priključenog uređaja.
y
Upute za rukovanje potražite u priručniku
vanjskog uređaja..
y
Ako na televizor priključujete igraću konzolu,
koristite kabel koji ste dobili s igraćom
konzolom.
y
U PC načinu rada može doći do šuma koji je
povezan s razlučivošću, okomitim uzorkom,
kontrastom ili svjetlinom. Ako postoji šum,
promijenite izlaznu razlučivost računala,
promijenite stopu osvježavanja ekrana ili
podesite svjetlinu i kontrast slike u izbornik
SLIKA kako biste postigli jasnu sliku.
y
U PC načinu rada neke postavke razlučivosti
možda neće pravilno funkcionirati, ovisno o
grafičkoj kartici.
A-22
MAKING CONNECTIONS
Shqip
Lidhni disa pajisje të jashtme në TV dhe vendosni
regjimet e hyrjes për të zgjedhur një pajisje të jashtme.
Për më shumë informacione për lidhjen e pajisjes së
jashtme, referojuni manualit të ofruar për çdo pajisje.
Pajisjet e jashtme të mundshme janë: marrësit HD,
lexuesit DVD, VCR-të, sistemet audio, pajisjet e ruajtjes
USB, PC, pajisjet e lojërave dhe pajisje të tjera të
jashtme.
SHËNIM
y
Lidhja e pajisjes së jashtme mund të ndryshojë
sipas modelit.
y
Lidhini pajisjet e jashtme me TV-në, pavarësisht
renditjes së portës së TV-së.
y
Nëse regjistroni një program televiziv në
një regjistrues DVD ose VCR, sigurohuni të
lidhni kabllon e hyrjes së sinjalit të TV-së në
TV nëpërmjet një regjistruesi DVD ose VCR.
Për më shumë informacione për regjistrimin,
referojuni manualit të ofruar me pajisjen e
lidhur.
y
Referojuni manualit të pajisjes së jashtme për
udhëzimet e përdorimit.
y
Nëse lidhni një pajisje lojërash në TV, përdorni
kabllon që ofrohet me pajisjen e lojërave.
y
Në regjimin PC, mund të ketë zhurmë që lidhet
me rezolucionin, modelin vertikal, kontrastin
dhe shkëlqimin. Nëse vihet re zhurmë,
ndryshojeni daljen e PC-së në një rezolucion
tjetër, ndryshoni shpejtësinë e rifreskimit në
një shpejtësi tjetër ose rregulloni shkëlqimin
dhe kontrastin në menynë FIGURA derisa të
qartësohet figura.
y
Në regjimin PC, disa cilësime të rezolucionit
mund të mos funksionojnë siç duhet, në varësi
të kartë grafike.
Bosanski
Povežite različite vanjske uređaje sa TV-om i mijenjajte
ulazne načine rada kako biste odabrali vanjski
uređaj. Za više informacija o povezivanju sa vanjskim
uređajima pogledajte priručnike isporučene sa svakim
tim uređajem.
Dostupni vanjski uređaji su: HD prijemnici, DVD uređaj
za reproduciranje, videorekorderi, zvučni sistemi, USB
uređaji za pohranjivanje, računari, uređaji za igre, te
drugi vanjski uređaji.
NAPOMENA
y
Povezivanje vanjskih uređaja može se
razlikovati od modela do modela.
y
Povezujte vanjske uređaje na TV bez obzira na
redoslijed TV priključka.
y
Ako snimate neki TV program na DVD
rekorderu ili videorekorderu, pazite da povežete
ulazni kabl TV signala na TV uređaj preko DVD
rekordera ili videorekordera. Za više informacija
o snimanju pogledajte priručnik isporučen s
povezanim uređajem.
y
Informacije o rukovanju vanjskim uređajem
potražite u njegovom priručniku za korištenje.
y
Ako povezujete uređaj za igre sa TV-om,
koristite kabl isporučen sa uređajem za igre.
y
U PC načinu rada mogu se pojaviti smetnje
povezane sa rezolucijom, vertikalnim uzorkom,
kontrastom ili svjetlinom. Ako ima smetnji,
promijenite PC izlaz na drugu rezoluciju,
promijenite brzinu osvježavanja ili podešavajte
svjetlinu i kontrast na izborniku SLIKA dok slika
ne bude jasna.
y
Moguće je da neke postavke rezolucije neće
funkcionirati pravilno u PC načinu ovisno o
datoj grafičkoj kartici.
A-23
MAKING CONNECTIONS
Русский
Подключите к телевизору различные внешние
устройства и переключайте режимы источников
для выбора внешнего устройства. Для получения
дополнительной информации о подключении
внешнего устройства см. руководства пользователя
каждого устройства.
Допустимо подключение следующих внешних
устройств: ресиверов HD, DVD-проигрывателей,
видеомагнитофонов, аудиосистем, устройств
хранения данных USB, ПК, игровых приставок и
других внешних устройств.
ПРИМЕЧАНИЕ
y
Процесс подключения внешнего устройства
отличается в зависимости от модели.
y
Подключите внешние устройства независимо
от порядка расположения разъемов
телевизора.
y
При записи телевизионной передачи с
помощью устройства записи DVD или
видеомагнитофона проверьте, что входной
телевизионный сигнал поступает на вход
телевизора через устройство записи DVD
или видеомагнитофон. Для получения
дополнительной информации о записи см.
руководство пользователя подключенного
устройства.
y
Инструкции по эксплуатации см. в
документации внешнего устройства.
y
При подключении к телевизору игровой
приставки используйте кабель, который
поставляется в комплекте игровой приставки.
y
В режиме PC (ПК) может наблюдаться шум,
из-за выбранного разрешения, частоты
вертикальной развертки, контрастности или
яркости. При возникновении помех выберите для
выхода PC (ПК) другое разрешение, измените
частоту обновления или отрегулируйте яркость
и контрастность в меню PICTURE (ЭКРАН) так,
чтобы изображение стало четким.
y
В режиме PC (ПК) некоторые настройки
разрешения экрана могут не работать
должным образом в зависимости от
видеоплаты.
Македонски
Поврзувајте различни надворешни уреди со
телевизорот и менувајте ги режимите за влезен
сигнал за да изберете надворешен уред. За повеќе
информации околу поврзувањето на надворешен
уред, погледнете во упатството испорачано со секој
од уредите.
Достапни надворешни уреди се: HD ресивери,
DVD плеери, VCR, аудио системи, USB уреди за
складирање, PC, уреди за игри и други надворешни
уреди.
ЗАБЕЛЕШКА
y
Поврзувањето со надворешниот уред може
да се разликува во зависност од моделот.
y
Надворешните уреди поврзувајте ги со
телевизорот без оглед на редоследот на TV
приклучокот.
y
Ако снимате TV програма на DVD рекордер
или VCR, кабелот за влезен сигнал во
телевизорот поврзете го преку DVD
рекордерот или VCR уредот. За повеќе
информации околу снимањето, погледнете
во упатството испорачано со секој од
поврзаните уреди.
y
Упатства за ракување побарајте во
прирачникот за надворешната опрема.
y
Ако сакате да поврзете уред за игри со
телевизорот, користете го кабелот испорачан
со уредот за игри.
y
Во PC режим, може да има шум поврзан
со резолуцијата, вертикалната шема,
контрастот или осветленоста. Ако е
присутен шум, сменете го PC излезот на
друга резолуција, сменете ја стапката
на обновување со друга стапка, или
прилагодувајте ги осветленоста и контрастот
во менито СЛИКА додека сликата не биде
јасна.
y
Во PC режим, некои поставувања за
резолуцијата може да не функционираат
правилно во зависност од графичката
картичка.

www.lg.com
OWNER’S MANUAL
PLASMA TV
Please read this manual carefully before operating
your set and retain it for future reference.
2
ENGLISH
LICENSES / OPEN SOURCE SOFTWARE NOTICE
LICENSES
Supported licenses may differ by model. For more information about licenses, visit
www.lg.com
.
Manufactured under license from Dolby Laboratories. “ Dolby” and the double-D symbol
are trademarks of Dolby Laboratories.
The terms HDMI and HDMI High-Definition Multimedia Interface, and the HDMI logo are
trademarks or registered trademarks of HDMI Licensing LLC in the United States and
other countries.
ABOUT DIVX VIDEO: DivX
®
is a digital video format created by DivX, LLC, a subsidiary of
Rovi Corporation. This is an official DivX Certified
®
device that has passed rigorous testing
to verify that it plays DivX video. Visit divx.com for more information and software tools to
convert your files into DivX videos.
ABOUT DIVX VIDEO-ON-DEMAND: This DivX Certified
®
device must be registered in
order to play purchased DivX Video-on-Demand (VOD) movies.
To obtain your registration code, locate the DivX VOD section in your device setup menu.
Go to vod.divx.com for more information on how to complete your registration.
“DivX Certified
®
to play DivX
®
video up to HD 1080p, including premium content.”
“DivX
®
, DivX Certified
®
and associated logos are trademarks of Rovi Corporation or its
subsidiaries and are used under license.”
“Covered by one or more of the following U.S. patents :
7,295,673; 7,460,668; 7,515,710; 7,519,274”
OPEN SOURCE SOFTWARE NOTICE
To obtain the source code under GPL, LGPL, MPL and other open source licenses, that is contained in this product,
please visit
http://opensource.lge.com
.
In addition to the source code, all referred license terms, warranty disclaimers and copyright notices are available for
download.
LG Electronics will also provide open source code to you on CD-ROM for a charge covering the cost of performing
such distribution (such as the cost of media, shipping and handling) upon email request to opensource@lge.com.
This offer is valid for three (3) years from the date on which you purchased the product.
3
ENGLISH
SAFETY INSTRUCTIONS
SAFETY INSTRUCTIONS
Please read these safety precautions carefully before using the product.
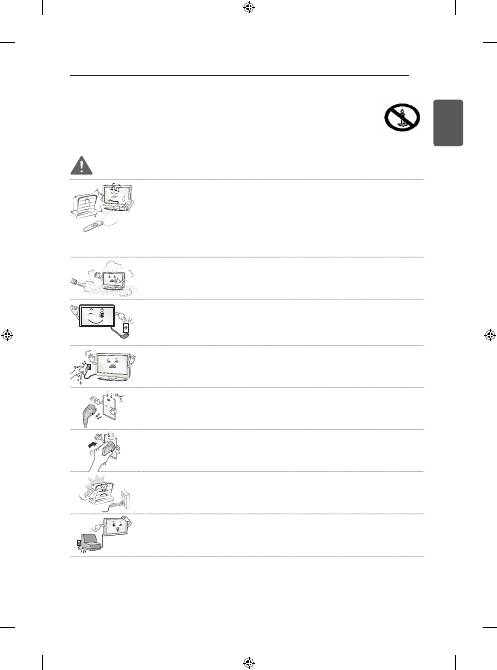
WARNING
y
y
Do not place the TV and/or remote control in the following environments:
y
- A location exposed to direct sunlight
y
- An area with high humidity such as a bathroom
y
- Near any heat source such as stoves and other devices that produce heat
y
- Near kitchen counters or humidifiers where they can easily be exposed to steam
or oil
y
- An area exposed to rain or wind
y
- Near containers of water such as vases
Otherwise, this may result in fire, electric shock, malfunction or product deformation.
y
y
Do not place the product where it might be exposed to dust.
This may cause a fire hazard.
y
y
Mains Plug is the TV connecting/disconnecting device to AC mains electric supply.
This plug must remain readily attached and operable when TV is in use.
y
y
Do not touch the power plug with wet hands. Additionally, if the cord pin is wet or
covered with dust, dry the power plug completely or wipe dust off.
You may be electrocuted due to excess moisture.
y
y
Make sure to connect Mains cable to compliant AC mains socket with Grounded
earth pin. (Except for devices which are not grounded on earth.)
Otherwise possibility you may be electrocuted or injured.
y
y
Insert power cable plug completely into wall socket otherwise if not secured
completely into socket, fire ignition may break out.
y
y
Ensure the power cord does not come into contact with hot objects such as a heater.
This may cause a fire or an electric shock hazard.
y
y
Do not place a heavy object, or the product itself, on power cables.
Otherwise, this may result in fire or electric shock.
4
ENGLISH
SAFETY INSTRUCTIONS
y
y
Bend antenna cable between inside and outside building to prevent rain from flowing
in.
This may cause water damaged inside the Product and could give an electric shock.
y
y
When mounting TV onto wall make sure to neatly install and isolate cabling from rear
of TV as to not create possibility of electric shock/fire hazard.
y
y
Do not plug too many electrical devices into a single multiple electrical outlet.
Otherwise, this may result in fire due to over-heating.
y
y
Do not drop the product or let it fall over when connecting external devices.
Otherwise, this may result in injury or damage to the product.
Desiccant
y
y
Keep the anti-moisture packing material or vinyl packing out of the reach of children.
Anti-moisture material is harmful if swallowed. If swallowed by mistake, force the
patient to vomit and visit the nearest hospital. Additionally, vinyl packing can cause
suffocation. Keep it out of the reach of children.
y
y
Do not let your children climb or cling onto the TV.
Otherwise, the TV may fall over, which may cause serious injury.
y
y
Dispose of used batteries carefully to ensure that a small child does not consume
them.
Please seek Doctor- Medical Attention immediately if child consumes batteries.
y
y
Do not insert any metal objects/conductors (like a metal chopstick/cutlery/
screwdriver) between power cable plug and input Wall Socket while it is connected
to the input terminal on the wall. Additionally, do not touch the power cable right after
plugging into the wall input terminal.
You may be electrocuted.
(Depending on model)
y
y
Do not put or store inflammable substances near the product.
There is a danger of combustion/explosion or fire due to careless handling of the
inflammable substances.
y
y
Do not drop metallic objects such as coins, hair pins, chopsticks or wire into the
product, or inflammable objects such as paper and matches. Children must pay
particular attention.
Electrical shock, fire or injury can occur. If a foreign object is dropped into the
product, unplug the power cord and contact the service centre.
y
y
Do not spray water on the product or scrub with an inflammable substance (thinner
or benzene). Fire or electric shock accident can occur.
5
ENGLISH
SAFETY INSTRUCTIONS
y
y
Do not allow any impact, shock or any objects to fall into the unit, and do not drop
anything onto the screen.
You may be injured or the product can be damaged.
y
y
Never touch this product or antenna during a thunder or lighting storm.
You may be electrocuted.
y
y
Never touch the wall outlet when there is leakage of gas, open the windows and
ventilate.
It may cause a fire or a burn by a spark.
y
y
Do not disassemble, repair or modify the product at your own discretion.
Fire or electric shock accident can occur.
Contact the service centre for check, calibration or repair.
y
y
If any of the following occur, unplug the product immediately and contact your local
service centre.
y
- The product has been impacted by shock
y
- The product has been damaged
y
- Foreign objects have entered the product
y
- The product produced smoke or a strange smell
This may result in fire or electric shock.
y
y
Unplug the TV from AC mains wall socket if you do not intend to use the TV for a
long period of time.
Accumulated dust can cause fire hazard and insulation deterioration can cause
electric leakage/shock/fire.
y
y
Apparatus shall not be exposed to dripping or splashing and no objects filled with
liquids, such as vases, shall be placed on the apparatus.
y
y
Do not install this product on a wall if it could be exposed to oil or oil mist.
This may damage the product and cause it to fall.
CAUTION
y
y
Install the product where no radio wave occurs.
y
y
There should be enough distance between an outside antenna and power lines to
keep the former from touching the latter even when the antenna falls.
This may cause an electric shock.
6
ENGLISH
SAFETY INSTRUCTIONS
y
y
Do not install the product on places such as unstable shelves or inclined surfaces.
Also avoid places where there is vibration or where the product cannot be fully
supported.
Otherwise, the product may fall or flip over, which may cause injury or damage to the
product.
y
y
If you install the TV on a stand, you need to take actions to prevent the product from
overturning. Otherwise, the product may fall over, which may cause injury.
y
y
If you intend to mount the product to a wall, attach VESA standard mounting interface (optional parts) to
the back of the product. When you install the set to use the wall mounting bracket (optional parts), fix it
carefully so as not to drop.
y
y
Only use the attachments / accessories specified by the manufacturer.
y
y
When installing the antenna, consult with a qualified service technician. If not
installed by a qualified technician, this may create a fire hazard or an electric shock
hazard.
y
y
We recommend that you maintain a distance of at least 2 to 7 times the diagonal
screen size when watching TV.
If you watch TV for a long period of time, this may cause blurred vision.
y
y
Only use the specified type of battery.
This could cause damage to the remote control.
y
y
Do not mix new batteries with old batteries.
This may cause the batteries to overheat and leak.
y
y
Batteries should not be exposed to excessive heat. For example, keep away from direct sunlight, open
fireplace and electric heaters .
y
y
Do not place non-rechargeable batteries in charging device.
y
y
Make sure there are no objects between the remote control and its sensor.
y
y
Signal from Remote Control can be interrupted due to external/internal lighting eg
Sunlight, fluorescent lighting.
If this occurs turn off lighting or darken viewing area.
y
y
When connecting external devices such as video game consoles, make sure the
connecting cables are long enough.
Otherwise, the product may fall over, which may cause injury or damage the product.
y
y
Do not turn the product On/Off by plugging-in or unplugging the power plug to the
wall outlet. (Do not use the power plug for switch.)
It may cause mechanical failure or could give an electric shock.
7
ENGLISH
SAFETY INSTRUCTIONS
y
y
Please follow the installation instructions below to prevent the product from
overheating.
y
- The distance between the product and the wall should be more than 10 cm.
y
- Do not install the product in a place with no ventilation (e.g., on a bookshelf or in a
cupboard).
y
- Do not install the product on a carpet or cushion.
y
- Make sure the air vent is not blocked by a tablecloth or curtain.
Otherwise, this may result in fire.
y
y
Take care not to touch the ventilation openings when watching the TV for long
periods as the ventilation openings may become hot. This does not affect the
operation or performance of the product.
y
y
Periodically examine the cord of your appliance, and if its appearance indicates damage or deterioration,
unplug it, discontinue use of the appliance, and have the cord replaced with an exact replacement part by
an authorized servicer.
y
y
Prevent dust collecting on the power plug pins or outlet.
This may cause a fire hazard.
y
y
Protect the power cord from physical or mechanical abuse, such as being twisted,
kinked, pinched, closed in a door, or walked upon. Pay particular attention to plugs,
wall outlets, and the point where the cord exits the appliance.
y
y
Do not press strongly upon the panel with a hand or sharp object such as nail, pencil
or pen, or make a scratch on it, as it may cause damage to screen.
y
y
Avoid touching the screen or holding your finger(s) against it for long periods of time.
Doing so may produce some temporary or permanent distortion/damage to screen.
y
y
When cleaning the product and its components, unplug the power first and wipe it
with a soft cloth. Applying excessive force may cause scratches or discolouration.
Do not spray with water or wipe with a wet cloth. Never use glass cleaner, car or
industrial shiner, abrasives or wax, benzene, alcohol etc., which can damage the
product and its panel.
Otherwise, this may result in fire, electric shock or product damage (deformation,
corrosion or breakage).
y
y
As long as this unit is connected to the AC wall outlet, it is not disconnected from the AC power source
even if you turn off this unit by SWITCH.
y
y
When unplugging the cable, grab the plug and unplug it, by pulling at the plug. Don’t
pull at the cord to unplug the power cord from the power board, as this could be
hazardous.
y
y
When moving the product, make sure you turn the power off first. Then, unplug the
power cables, antenna cables and all connecting cables.
The TV set or power cord may be damaged, which may create a fire hazard or cause
electric shock.
8
ENGLISH
SAFETY INSTRUCTIONS
y
y
When moving or unpacking the product, work in pairs because the product is heavy.
Otherwise, this may result in injury.
y
y
Contact the service centre once a year to clean the internal parts of the product.
Accumulated dust can cause mechanical failure.
y
y
Refer all servicing to qualified service personnel. Servicing is required when the
apparatus has been damaged in any way, such as power supply cord or plug is
damaged, liquid has been spilled or objects have fallen into the apparatus, the
apparatus has been exposed to rain or moisture, does not operate normally, or has
been dropped.
y
y
If the product feels cold to the touch, there may be a small “flicker” when it is turned
on. This is normal, there is nothing wrong with product.
y
y
The panel is a high technology display product with resolution of two million to six
million pixels. You may see tiny black dots and/or brightly coloured dots (red, blue
or green) at a size of 1 ppm on the panel. This does not indicate a malfunction and
does not affect the performance and reliability of the product.
This phenomenon also occurs in third-party products and is not subject to exchange
or refund.
y
y
You may find different brightness and colour of the panel depending on your viewing
position(left/right/top/down).
This phenomenon occurs due to the characteristic of the panel. It is not related with
the product performance, and it is not malfunction.
y
y
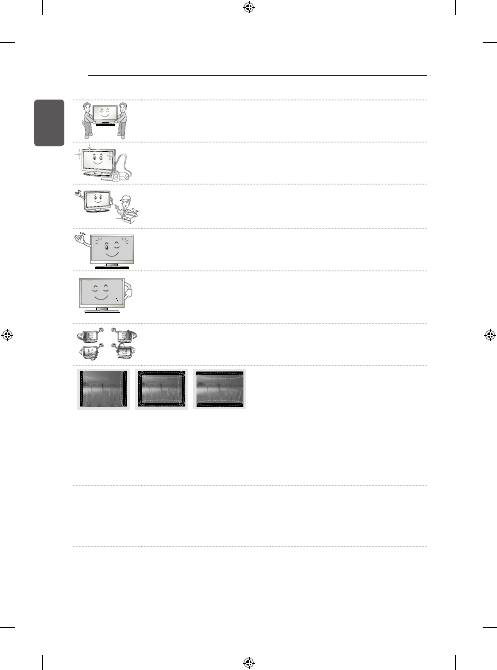
Displaying a still image (e.g., broadcasting channel logo, on-screen menu, scene from a video game) for
a prolonged time may cause damage to the screen, resulting in retention of the image, which is known as
image sticking. The warranty does not cover the product for image sticking.
Avoid displaying a fixed image on your television’s screen for a prolonged period (2 or more hours for LCD,
1 or more hours for Plasma).
Also, if you watch the TV at a ratio of 4:3 for a long time, image sticking may occur on the borders of the
panel.
This phenomenon also occurs in third-party products and is not subject to exchange or refund.
y
y
Generated Sound
“Cracking” noise: A cracking noise that occurs when watching or turning off the TV is generated by plastic
thermal contraction due to tempera-ture and humidity. This noise is common for products where thermal
deformation is required. Electrical circuit humming/panel buzzing: A low level noise is generated from
a high-speed switching circuit, which supplies a large amount of current to operate a product. It varies
depending on the product.
This generated sound does not affect the performance and reliability of the product.
9
ENGLISH
ASSEMBLING AND PREPARING
NOTE
y
Image shown may differ from your TV.
y
Your TV’s OSD (On Screen Display) may differ slightly from that shown in this manual.
y
The available menus and options may differ from the input source or product model that you are using.
y
New features may be added to this TV in the future.
y
The TV can be placed in standby mode in order to reduce the power consumption. And the TV should be
turned off if it will not be watched for some time, as this will reduce energy consumption.
y
The energy consumed during use can be significantly reduced if the level of brightness of the picture is
reduced, and this will reduce the overall running cost.
ASSEMBLING AND PREPARING
Unpacking
Check your product box for the following items. If there are any missing accessories, contact the local dealer where
you purchased your product. The illustrations in this manual may differ from the actual product and item.
CAUTION
y
Do not use any unapproved items to ensure the safety and product life span.
y
Any damage or injuries caused by using unapproved items are not covered by the warranty.
y
Some models have a thin film attached on to the screen and this must not be removed.
Remote Control,
Batteries (AAA)
Owner’s manual
Power Cord
Stand Screws
3 EA, M5 x L25
Stand Screws
4 EA, M4 x L14
Stand Body / Stand
Base
Ferrite core
(Depending on model)
Stand Sticker
(Depending on model)
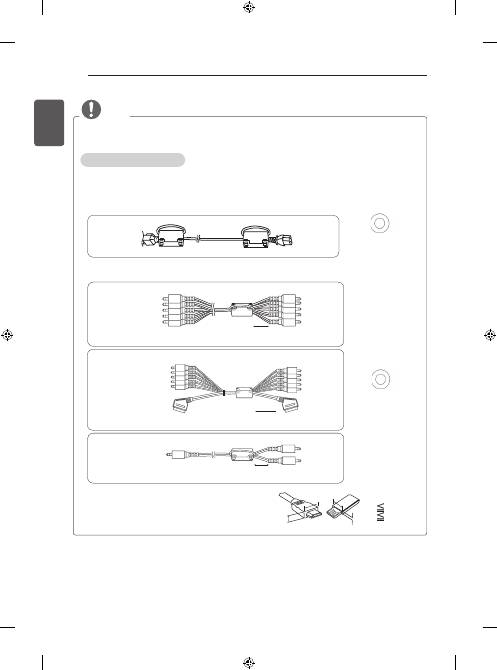
10
ENGLISH
ASSEMBLING AND PREPARING
NOTE
1 Use the ferrite core to reduce the electromagnetic interference in the power cable.
Wind the power cable on the ferrite core once.
2 Use the ferrite core to reduce the electromagnetic interference in the cable.
Place the ferrite core close to the TV.
-
If there are two ferrite cores, follow as shown in Figures 1.
-
If there are three ferrite cores, follow as shown in Figures 1 and 2.
y
y
For an optimal connection, HDMI cables and USB devices
should have bezels less than 10 mm thick and 18 mm
width. Use an extension cable that supports USB 2.0 if the
USB cable or USB memory stick does not fit into your TV’s
USB port.
A
B
B
A
*A
10 mm
*B
18 mm
y
y
The items supplied with your product may vary depending on the model.
y
y
Product specifications or contents of this manual may be changed without prior notice due to upgrade of
product functions.
How to use the ferrite core
[to an External device]
[Figure 2-1]
[to the TV]
10 mm(+ / - 5 mm)
Wind the component Y, Pb, Pr, L, R cable on the ferrite core once.
(Black)
[Cross Section of
Ferrite Core]
[to an External device]
[Figure 2-2]
[to the TV]
10 mm(+ / - 5 mm)
Gather and bind the component Y, Pb, Pr, L, R and scart cable with the ferrite core.
10 mm(+ / - 5 mm)
[to an External device]
[Figure 2-3]
[to the TV]
Wind the PC audio cable on the ferrite core once.
[to a wall plug]
[to the TV]
[Figure 1]
Place the ferrite core close to the TV and a wall plug.
[Cross Section of
Ferrite Core]
(Black)
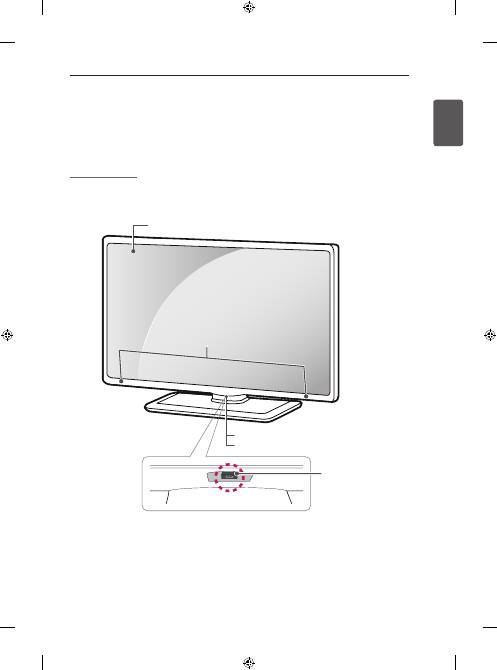
11
ENGLISH
ASSEMBLING AND PREPARING
Separate purchase
Separate purchase items can be changed or modified for quality improvement without any notification.
Contact your dealer to buy these items.
These devices only work with certain models.
The model name or design may be changed depending on the upgrade of product functions, manufacturer’s
circumstances or policies.
LG Audio Device
Parts and buttons
Screen
Power Indicator
Remote Control Sensor
Joystick Button
(* This button is located
below the TV screen.)
Speakers
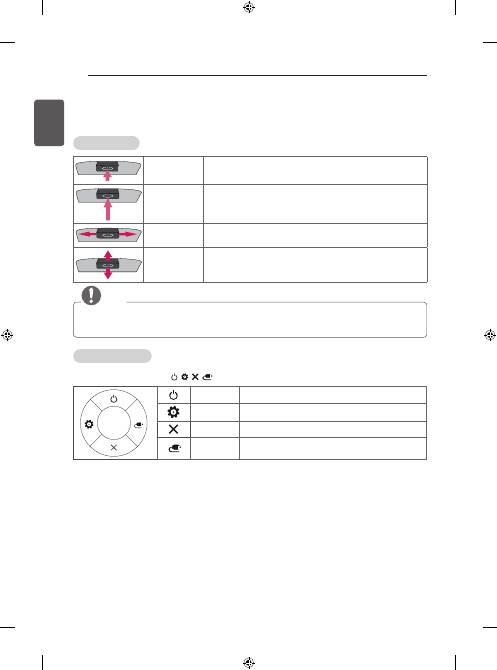
12
ENGLISH
ASSEMBLING AND PREPARING
Using the joystick button
You can operate the TV by pressing the button or moving the joystick left, right, up, or down.
Basic Functions
Power On
When the TV is turned off, place your finger on the joystick button and
press it once and release it.
Power Off
When the TV is turned on, place your finger on the joystick button and
press it once for a few seconds and release it.
(However, if the Menu button is on the screen, pressing and holding the
joystick button will let you exit the Menu.)
Volume Control
If you place your finger over the joystick button and move it left or right,
you can adjust the volume level you want.
Programmes
Control
If you place your finger over the joystick button and move it up or down,
you can scrolls through the saved programmes what you want.
NOTE
y
When your finger over the joystick button and push it to the up, down, left or right, be careful not to press
the joystick button. If you press the joystick button first, you can not adjust the volume level and saved
programmes.
Adjusting the Menu
When the TV is turned on, press the joystick button one time.
You can adjust the Menu items ( , , ,
) moving the joystick button up, down, left or right.
TV Off
Turns the power off.
Settings
Accesses the main menu.
Close
Clears on-screen displays and returns to TV viewing.
Input List
Changes the input source.
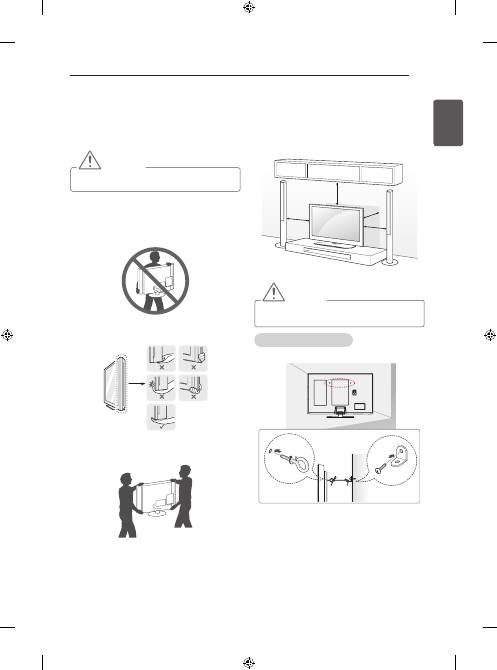
13
ENGLISH
ASSEMBLING AND PREPARING
Lifting and moving the TV
Please note the following advice to prevent the TV from
being scratched or damaged and for safe transportation
regardless of its type and size.
CAUTION
y
Avoid touching the screen at all times, as this
may result in damage to the screen.
y
It is recommended to move the TV in the box or
packing material that the TV originally came in.
y
Before moving or lifting the TV, disconnect the
power cord and all cables.
y
When holding the TV, the screen should face away
from you to avoid damage.
y
Hold the top and bottom of the TV frame firmly.
Make sure not to hold the transparent part,
speaker, or speaker grill area.
y
When transporting a large TV, there should be at
least 2 people.
y
When transporting the TV by hand, hold the TV as
shown in the following illustration.
y
When transporting the TV, do not expose the TV to
jolts or excessive vibration.
y
When transporting the TV, keep the TV upright, never
turn the TV on its side or tilt towards the left or right.
y
Do not apply excessive pressure to cause flexing/
bending of frame chassis as it may damage screen.
Mounting on a table
1 Lift and tilt the TV into its upright position on a table.
- Leave a 10 cm (minimum) space from the
wall for proper ventilation.
10 cm
10 cm
10 cm
10 cm
2 Connect the power cord to a wall outlet.
CAUTION
y
Do not place the TV near or on sources of heat,
as this may result in fire or other damage.
Securing the TV to a wall
(This feature is not available for all models.)
1 Insert and tighten the eye-bolts, or TV brackets and
bolts on the back of the TV.
- If there are bolts inserted at the eye-bolts
position, remove the bolts first.
2 Mount the wall brackets with the bolts to the wall.
Match the location of the wall bracket and the eye-
bolts on the rear of the TV.
3 Connect the eye-bolts and wall brackets tightly with a
sturdy rope.
Make sure to keep the rope horizontal with the flat
surface.
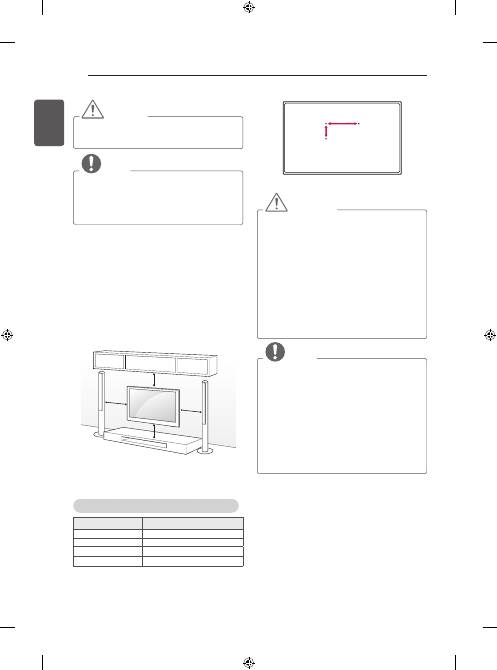
14
ENGLISH
ASSEMBLING AND PREPARING
CAUTION
y
Make sure that children do not climb on or hang
on the TV.
NOTE
y
Use a platform or cabinet that is strong and
large enough to support the TV securely.
y
Brackets, bolts and ropes are not provided. You
can obtain additional accessories from your
local dealer.
Mounting on a wall
Attach an optional wall mount bracket at the rear of the
TV carefully and install the wall mount bracket on a
solid wall perpendicular to the floor. When you attach
the TV to other building materials, please contact
qualified personnel.
LG recommends that wall mounting be performed by a
qualified professional installer.
10 cm
10 cm
10 cm
10 cm
Make sure to use screws and wall mount bracket that
meet the VESA standard. Standard dimensions for the
wall mount kits are described in the following table.
Separate purchase(Wall Mounting Bracket)
Model
50/60PB56**
VESA (A x B)
400 x 400
Standard screw
M6
Number of screws
4
Wall mount bracket
PSW420BX
A
B
CAUTION
y
Disconnect the power first, and then move or
install the TV. Otherwise electric shock may
occur.
y
If you install the TV on a ceiling or slanted wall,
it may fall and result in severe injury.
Use an authorised LG wall mount and contact
the local dealer or qualified personnel.
y
Do not over tighten the screws as this may
cause damage to the TV and void your
warranty.
y
Use the screws and wall mounts that meet the
VESA standard. Any damages or injuries by
misuse or using an improper accessory are not
covered by the warranty.
NOTE
y
Use the screws that are listed on the VESA
standard screw specifications.
y
The wall mount kit includes an installation
manual and necessary parts.
y
The wall mount bracket is not provided. You
can obtain additional accessories from your
local dealer.
y
The length of screws may differ depending on
the wall mount. Make sure to use the proper
length.
y
For more information, refer to the manual
supplied with the wall mount.
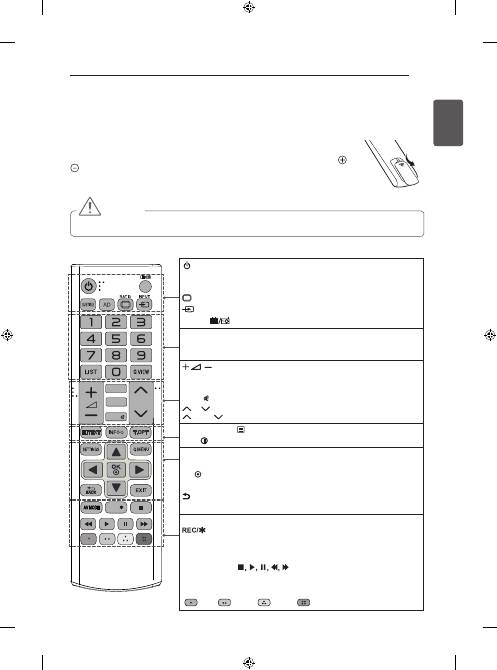
15
ENGLISH
REMOTE CONTROL
RATIO
INPUT
TV/
RAD
1
.,;@
2
abc
3
def
4
ghi
5
jkl
6
mno
7
pqrs
8
tuv
0
9
wxyz
[
LIST
Q.VIEW
FAV
MUTE
P
P
A
G
E
EXIT
OK
SETTINGS
INFO
GUIDE
REC
MY APPS
LIVE TV
SUBTITLE
MUTE
FAV
P
PAGE
REC/
REMOTE CONTROL
The descriptions in this manual are based on the buttons on the remote control.
Please read this manual carefully and use the TV correctly.
To replace batteries, open the battery cover, replace batteries (1.5 V AAA) matching the and
ends to the label inside the compartment, and close the battery cover.
To remove the batteries, perform the installation actions in reverse.
CAUTION
y
Do not mix old and new batteries, as this may damage the remote control.
Make sure to point the remote control toward the remote control sensor on the TV.
(POWER)
Turns the TV on or off.
SUBTITLE
Recalls your preferred subtitle in digital mode.
AD
By pressing the AD button, audio descriptions function will be enabled.
RATIO
Resizes an image.
INPUT
Changes the input source.
TV/RAD
Selects Radio, TV and DTV programme.
Number buttons
Enters numbers.
LIST
Accesses the saved programme list.
Q.VIEW
Returns to the previously viewed programme.
Adjusts the volume level.
FAV
Accesses your favourite programme list.
GUIDE
Shows programme guide.
MUTE
Mutes all sounds.
P
Scrolls through the saved programmes.
PAGE
Moves to the previous or next screen.
Teletext buttons( TEXT / T.OPT)
These buttons are used for teletext.
INFO
Views the information of the current programme and screen.
SETTINGS
Accesses the main menus.
Q. MENU
Accesses the quick menus.
OK
Selects menus or options and confirms your input.
Navigation buttons
(up/down/left/right) Scrolls through menus or options.
BACK
Returns to the previous level.
EXIT
Clears all on-screen displays and returns to TV viewing.
AV MODE
Selects an AV mode.
Starts to record and display record menu. (only Time Machine
Ready
supported model)
ꕘ
(FREEZE)
Freezes the current frame while using the TV, AV, Component, or
HDMI input source.
Control buttons
(
) Controls the MY MEDIA menus, Time
Machine
Ready
control or the SIMPLINK compatible devices
(USB, SIMPLINK or Time Machine
Ready
).
Colour buttons
These access special functions in some menus.
(
: Red,
: Green,
: Yellow,
: Blue)
16
ENGLISH
SETTINGS
SETTINGS
Automatically Setting Up Programme
SETTINGS SETUP Auto Tuning
Automatically tunes the programmes.
y
If Input Source is not connected properly,
programme registration may not work.
y
Auto Tuning
only finds programmes that are
currently broadcasting.
y
If
Lock System
is turned on, a pop-up window will
appear asking for password.
To adjust picture with Picture Wizard
SETTINGS PICTURE Picture Wizard III
[Depending on model]
Calibrates and adjusts for optimum picture quality using
the remote control and the Picture Wizard without
expensive pattern devices or help from a specialist.
To select Picture Mode
SETTINGS
PICTURE
Picture Mode
Select the picture mode optimized for the viewing
environment or the programme.
y
Vivid
: Heightens contrast, brightness and
sharpness to display vivid images.
y
Standard
: Displays images in standard levels of
contrast, brightness and sharpness.
y
Eco/APS
: [Depending on model]
The Energy Saver feature changes settings on the
TV to reduce power consumption.
y
Cinema/Game
: Displays the optimum picture for
movie, game.
y
Sports
: Optimizes the video image for high and
dynamic actions by emphasizing primary colours
such as white, grass, or sky blue.
y
Expert 1, 2
: Menu for adjusting picture quality
that allows experts and amateurs to enjoy the best
TV viewing. This is the adjustment menu provided
for ISF-certified picture tuning professionals. (ISF
logo can only be used on ISF-certified TVs.)
ISFccc: Imaging Science Foundation Certified
Calibration Control
y
Depending on input signal, available range of
picture modes may differ.
y
Expert mode is for picture tuning professionals
to control and fine-tune using a specific image. For
normal images, the effects may not be dramatic.
y
The ISF function is only available on some models.
To set advanced control
SETTINGS PICTURE Picture Mode
Advanced Control / Expert Control
Calibrates the screen for each picture mode; or adjusts
picture settings for a special screen. First select a
Picture Mode
of your choice.
y
Dynamic Contrast
: Adjusts the contrast to the
optimal level according to the brightness of the
image.
y
Dynamic Colour
: Adjusts colours to make the
image appear in more natural colours.
y
Skin Colour
: Sets Skin colour spectrum separately
to implement the skin colour as defined by the user.
y
Sky Colour
: Sky colour is set separately.
y
Grass Colour
: Natural colour spectrum (meadows,
hills, etc.) can be separately set.
y
Gamma
: Sets the gradation curve according to the
output of picture signal in relation to the input signal.
y
Colour Gamut
: Selects the range of colours that
can be expressed.
y
Edge Enhancer
: Shows clearer and distinctive yet
natural edges of the video.
y
Expert Pattern
: [Depending on model]
Patterns used for expert adjustment.
y
Colour Filter
: Filters a specific colour spectrum in
RGB colours to fine-tune colour saturation and hue
accurately.
y
Colour Temperature
: Adjusts the overall tone of
the screen as desired. In Expert mode, detailed fine-
tuning can be set via Gamma method, etc.
y
Colour Management System
: This is a system
that experts use when they adjust colour with a
test pattern. They can select from six colour areas
(Red / Green / Blue / Cyan / Magenta / Yellow)
without affecting other colours. For normal images,
adjustments may not result in noticeable colour
changes.
y
Depending on input signal or other picture settings,
the range of detailed items for adjustment may
differ.
17
ENGLISH
SETTINGS
To set additional picture options
SETTINGS PICTURE Picture Mode
Picture Option
[Depending on model]
Adjusts detailed setting for images.
y
Noise Reduction
: Eliminates noise in the picture.
y
MPEG Noise Reduction
: Eliminates noise
generated while creating digital picture signals.
y
Black Level
: Adjusts the brightness and contrast of
the screen to suit the black level of the input picture
by using the blackness (black level) of the screen.
y
Real Cinema
: Optimizes the screen for movie viewing.
y
Motion Eye Care / SUPER Energy Saving
:
[Depending on model]
Saves power consumption by adjusting the
brightness corresponding to the movement of the
image on the screen.
y
Depending on input signal or other picture settings,
the range of detailed items for adjustment may
differ.
To use TruMotion
SETTINGS PICTURE TruMotion
[Depending on model]
Corrects images to display smoother motion sequences.
y
Smooth
: De-judder/De-blur working on higher
range in auto mode.
y
Clear
: De-judder/De-blur working on middle range
in auto mode.
y
User
: De-judder / De-blur can be set manually.
De-judder : This function adjusts juddering of the
screen.
De-blur : This function adjusts and eliminates
blurring of the screen.
Auto means Juddering and blurring range that depend
on input video status is controlled by TruMotion mode.
To use Energy Saving feature
SETTINGS PICTURE Energy Saving
Reduces power consumption by adjusting screen
brightness.
y
Auto
: [Depending on model]
The TV sensor detects the ambient lighting and
automatically adjusts the screen brightness.
y
Off
: Turns off the Energy Saving mode.
y
Minimum / Medium / Maximum
: Applies the pre-
set Energy Saving mode.
y
Screen Off
: Screen is turned off and only sound is
played. Press any button except Power button on
the remote control to turn the screen back on.
To use TV speaker
SETTINGS AUDIO Sound Out TV Speaker
[Depending on model]
Sound is output through the TV speaker.
To use External Speaker
SETTINGS AUDIO Sound Out
E
xternal Speaker (Optical)
[Depending on model]
Sound is output through the speaker connected to the
optical port.
y
SimpLink is supported.
To use Digital Sound Out
SETTINGS AUDIO Sound Out
External Speaker (Optical) Digital Sound Out
[Depending on model]
Sets up Digital Sound Out.
Item
Audio Input
Digital Audio
Ouput
Auto
MPEG
Dolby Digital
Dolby Digital Plus
HE-AAC
PCM
Dolby Digital
Dolby Digital
Dolby Digital
PCM
All
PCM
18
ENGLISH
SETTINGS
y
If a third-party device with the HDMI-CEC function
is also used, the SIMPLINK device may not work
normally.
y
[Depending on model]
If you select or play media from a the device with a
home theatre function, the
HT Speaker(Speaker)
is
automatically connected.
Be sure to connect with an optical cable (sold
separately) to use the
HT Speaker(Speaker)
function.
SIMPLINK function description
y
Direct Play
: Plays the multimedia device on the TV
instantly.
y
Select multimedia device
: Selects the desired
device via the SIMPLINK menu to control it from the
TV screen instantly.
y
Disc playback
: Manages the multimedia device
with the TV remote control.
y
Power off all devices
: When you power off the TV,
all connected devices are turned off.
y
Sync Power on
: When the equipment with
SIMPLINK function connected HDMI terminal starts
to play, the TV will automatically turn on.
y
Speaker
: [Depending on model]
Select speaker either on the home theatre unit or
the TV.
To set password
SETTINGS
LOCK
Set Password
Sets or changes the TV password.
The initial password is set to ‘0000’.
When France is selected for Country, password is not
‘0000’ but ‘1234’.
When France is selected for Country, password cannot
be set to ‘0000’.
To return Factory Reset
SETTINGS
OPTION
Factory Reset
All stored information is deleted and TV settings are
reset.
The TV turns itself off and back on, and all settings are
reset.
y
When
Lock System
is in place, a pop-up window
appears and asks for password.
y
Do not turn off the power during initialization.
To connect and use LG audio device
SETTINGS AUDIO
Sound Out
LG Sound Sync (Optical)
[Depending on model]
Connect LG audio device with the
logo to the
optical digital audio output port. LG audio device allows
you to enjoy rich powerful sound easily.
To use Headphone
SETTINGS AUDIO Sound Out Headphone
[Depending on model]
Sound is output through the headphone connected to
the earphone/headphone port.
To synchronize audio and video
SETTINGS AUDIO AV Sync. Adjust
[Depending on model]
Synchronizes video and audio directly when they do
not match.
y
If you set
AV Sync. Adjust
to
ON
, you can adjust
the sound output (TV speakers or SPDIF) to the
screen image.
To use SIMPLINK
[Depending on model]
SIMPLINK is a feature that enables you to control and
manage various multimedia devices conveniently via
the SIMPLINK menu.
1 Connect the TV’s
HDMI IN
terminal and the
SIMPLINK device’s HDMI output terminal using an
HDMI cable.
y
[Depending on model]
For home theatre units with a SIMPLINK function,
connect HDMI terminals as above, and use an
optical cable to connect Optical Digital Audio
Out from the TV to Optical Digital Audio In of the
SIMPLINK device.
2 Select
INPUT(OPTION)
SIMPLINK
.
SIMPLINK menu window appears.
3 In SIMPLINK Setting window, set SIMPLINK
function to
ON
.
4 In SIMPLINK menu window, selects the device you
want to control.
y
This function is only compatible with devices with
the SIMPLINK logo.
y
To use the SIMPLINK function, you need to use
a high-speed HDMI
®
cable (with CEC (Consumer
Electronics Control) feature added). High-speed
HDMI
®
cables have the No. 13 pin connected for
information exchange between devices.
y
If you switch to another input, the SIMPLINK device
will stop.
19
ENGLISH
SETTINGS
To remove the USB device
Q.MENU
USB Device
Select a USB storage device that you want to remove.
When you see a message that the USB device has
been removed, separate the device from the TV.
y
Once a USB device has been selected for removal,
it can no longer be read. Remove the USB storage
device and then re-connect it.
Using a USB storage device - warning
y
If the USB storage device has a built-in auto
recognition program or uses its own driver, it may
not work.
y
Some USB storage devices may not work or may
work incorrectly.
y
Use only USB storage devices formatted with the
Windows FAT32 or NTFS File System.
y
For external USB HDDs, it is recommended that
you use devices with a rated voltage of less than 5
V and a rated current of less than 500 mA.
y
It is recommended that you use USB memory sticks
of 32 GB or less and USB HDDs of 1 TB or less.
y
If a USB HDD with power-saving function does not
work properly, turn the power off and on. For more
information, refer to the user manual of the USB
HDD.
y
Data in the USB storage device can be damaged, so
be sure to back up important files to other devices.
Data maintenance is the user’s responsibility and
the manufacturer is not responsible for data loss.
My Media supporting file
y
Maximum data transfer rate : 20 Mbps (Mega bit per
second)
y
External supported subtitle formats : *.srt (SubRip),
*.smi (SAMI), *.sub (SubViewer, MicroDVD,
DVDsubtitleSystem, SubIdx(Vobsub)), *.ass/*.
ssa (SubStation Alpha), *.txt (TMplayer), *.psb
(PowerDivX)
y
Internal supported subtitle formats: XSUB (Supports
internal subtitles generated from DivX6)
Supported Video Formats
y
Maximum: 1920 x 1080 @ 30p (only Motion JPEG
640 x 480 @ 30p)
y
.asf, .wmv
[Video] MPEG-2, MPEG-4 Part2, DivX3.11, DivX4,
DivX5, DivX6, XViD, H.264/AVC, VC1(WMV3,
WVC1), MP43
[Audio] WMA Standard, WMA9(Pro), MP3, AAC,
AC3, MP3, 3D WMV Single Stream.
y
divx, .avi
[Video] MPEG-2, MPEG-4 Part2, DivX3.11, DivX4,
DivX5, DivX6, XViD, H.264/AVC
[Audio] HE-AAC, LPCM, ADPCM, MPEG- 1 Layer
I, MPEG-1 Layer II, Dolby Digital, MPEG-1 Layer III
(MP3), *DTS
y
.ts, .trp, .tp, .mts, .m2ts
[Video] H.264/AVC, MPEG-2, AVS, VC1
[Audio] MPEG-1 Layer I, MPEG-1 Layer II, MPEG-
1 Layer III (MP3), Dolby Digital, Dolby Digital Plus,
AAC, HE-AAC, *DTS
y
.vob
[Video] MPEG-1, MPEG-2
[Audio] Dolby Digital, MPEG-1 Layer I, MPEG- 1
Layer II, DVD-LPCM
y
mp4, .m4v, .mov
[Video] MPEG-2, MPEG-4 Part2, DivX3.11, DivX4,
DivX5, DivX6, XVID, H.264/AVC
[Audio] AAC, MPEG-1 Layer III (MP3), *DTS
y
.mkv
[Video] MPEG-2, MPEG-4 Part2, DivX3.11, DivX4,
DivX5, DivX6, XVID, H.264/AVC
[Audio] HE-AAC, Dolby Digital, MPEG-1 Layer III
(MP3), *DTS, LPCM
y
motion JPEG
[Video] MJPEG
[Audio] LPCM, ADPCM
y
.mpg, .mpeg, .mpe
[Video] MPEG-1, MPEG-2
[Audio] MPEG-1 Layer I, MPEG-1 Layer II, Dolby
Digital, LPCM
y
dat
[Video] MPEG-1, MPEG-2
[Audio] MP2
y
flv
[Video] Sorenson H.263, H.264/AVC
[Audio] MP3, AAC, HE-AAC
y
*rm, *rmvb
[Video] RV30, RV40
[Audio] Dolby Digital, AAC, HE-AAC, RA6(Cook)
y
3gp, 3gp2
[Video] H.264/AVC, MPEG-4 Part2
[Audio] AAC, AMR(NB/WB)
y
*DTS / *rm / *rmvb : Depending on model
20
ENGLISH
SETTINGS / TO SEE WEB MANUAL / EXTERNAL CONTROL DEVICE SETUP
TO SEE WEB MANUAL
To obtain detailed User Guide information,please visit
www.lg.com
.
EXTERNAL CONTROL
DEVICE SETUP
To obtain the external control device setup information,
please visit
www.lg.com.
Supported Audio Formats
y
File type : mp3
[Bit rate] 32 Kbps - 320 Kbps
[Sample freq.] 16 kHz - 48 kHz
[Support] MPEG1, MPEG2, Layer2, Layer3
y
File Type : AAC
[Bit rate] Free Format
[Sample freq.] 8 kHz ~ 48 kHz
[Support] ADIF, ADTS
y
File Type : M4A
[Bit rate] Free Format
[Sample freq.] 8 kHz ~ 48 kHz
[Support] MPEG-4
y
File Type : WMA
[Bit rate] 128 Kbps ~ 320 Kbps
[Sample freq.] 8 kHz ~ 48 kHz
[Support] WMA7, WMA8, WMA9 Standard
y
File Type : WMA
[Bit rate] ~ 768 Kbps
[Channel / Sample freq.]
M0 : up to 2 Channel @ 48 kHz
(Except LBR mode),
M1 : up to 5.1 Channel @ 48 kHz,
M2 : up to 5.1 Channel @ 96 kHz
[Support] WMA 10 Pro
y
File Type : OGG
[Bit rate] Free Format
[Sample freq.] 8kHz ~ 48 kHz
[Support] OGG Vorvis
Supported Photo Formats
y
Category : 2D (jpeg, jpg, jpe)
[Available file type] SOF0: Baseline,
SOF1: Extend Sequential,
SOF2: Progressive
[Photo size] Minimum: 64 x 64,
Maximum: Normal Type: 15360 (W) x 8640
(H), Progressive Type: 1920 (W) x 1440 (H)
y
Category : BMP
[Photo size] Minimum : 64 x 64,
Maximum : 9600 x 6400
y
Category : PNG
[Available file type] Interlace, Non-Interlace
[Photo size] Minimum : 64 x 64, Maximum : Interlace
: 1200 x 800, Non-Interlace : 9600 x 6400
y
BMP and PNG format files may be slower to display
than JPEG.
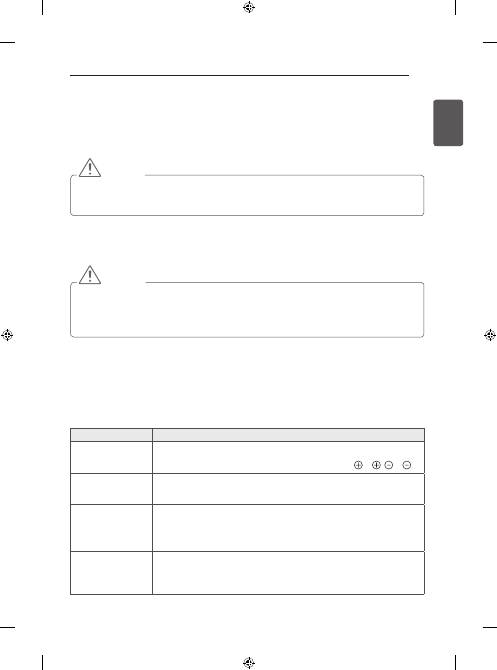
21
ENGLISH
MAINTENANCE / TROUBLESHOOTING
MAINTENANCE
Cleaning your TV
Clean your TV regularly to keep the best performance and to extend the product lifespan.
CAUTION
y
Make sure to turn the power off and disconnect the power cord and all other cables first.
y
When the TV is left unattended and unused for a long time, disconnect the power cord from the wall outlet
to prevent possible damage from lightning or power surges.
Screen, frame, cabinet and stand
y
To remove dust or light dirt, wipe the surface with a dry, clean, and soft cloth.
y
To remove major dirt, wipe the surface with a soft cloth dampened in clean water or a diluted mild detergent.
Then wipe immediately with a dry cloth.
CAUTION
y
Avoid touching the screen at all times, as this may result in damage to the screen.
y
Do not push, rub, or hit the screen surface with your fingernail or a sharp object, as this may result in scratches
and image distortions.
y
Do not use any chemicals as this may damage the product.
y
Do not spray liquid onto the surface. If water enters the TV, it may result in fire, electric shock, or malfunction.
Power cord
Remove the accumulated dust or dirt on the power cord regularly.
TROUBLESHOOTING
Problem
Solution
Cannot control the TV
with the remote control.
y
Check the remote control sensor on the product and try again.
y
Check if there is any obstacle between the product and the remote control.
y
Check if the batteries are still working and properly installed ( to , to ).
No image display and
no sound is produced.
y
Check if the product is turned on.
y
Check if the power cord is connected to a wall outlet.
y
Check if there is a problem in the wall outlet by connecting other products.
The TV turns off
suddenly.
y
Check the power control settings. The power supply may be interrupted.
y
Check if the
Automatic Standby
(Depending on model) /
Sleep Timer
/
Off Time
feature is activated in the
TIME
settings.
y
If there is no signal while the TV is on, the TV will turn off automatically after 15
minutes of inactivity.
When connecting to
the PC (HDMI/DVI),
‘No signal’ or ‘Invalid
Format’ is displayed.
y
Turn the TV off/on using the remote control.
y
Reconnect the HDMI cable.
y
Restart the PC with the TV on.

