Canon LEGRIA HF M56 – page 2
Manual for Canon LEGRIA HF M56
Table of contents
- Table of Contents Trademark Acknowledgements
- Getting Started Introduction to Wi-Fi
- Wi-Fi connection Wi-Fi connection Wi-Fi connection
- About the camcorder's Wi-Fi standard Connecting to a Wi-Fi Network (Wi-Fi Protected Setup) General requirements
- Operating modes: 2 Set up a new connection point.
- 3 WPS button setup: Press and hold the WPS button on your 4 Within 2 minutes, touch [OK] on the camcorder's screen. 5 Touch [Automatic] to automatically obtain an IP address. 6 Select whether to test the settings. 7 Save the settings of the connection point.
- Requirements for Wi-Fi Functions Transferring Files to a Computer or FTP Server General requirements
- Uploading Recordings to YouTube and Facebook General requirements Uploading Videos Using an iOS Device
- Wireless Playback on a DLNA-Compatible Device General requirements
- Glossary Access Point Ad hoc mode DLNA FTP server Infrastructure mode IP Address WPS
- Troubleshooting List of Messages Multiple access points detected. Try the operation again. Unable to complete WPS. Unable to complete WPS. Try the operation again.
- Wi-Fi connection terminated Wireless communication is not working correctly

Getting Started
This manual covers how to connect your camcorder to a wireless
router, or access point. To learn more about advanced Wi-Fi functions
and to see more detailed procedures, refer to the full-version Instruc-
tion Manual (PDF file). In this guide, the ; mark indicates the
name of the section in the Instruction Manual to which you should refer.
Use the table of contents or the PDF's search feature to help find the
section.
To install the full-version Instruction Manual, see Installing the Cam-
corder's Instruction Manual (PDF file) in the supplied Quick Guide.
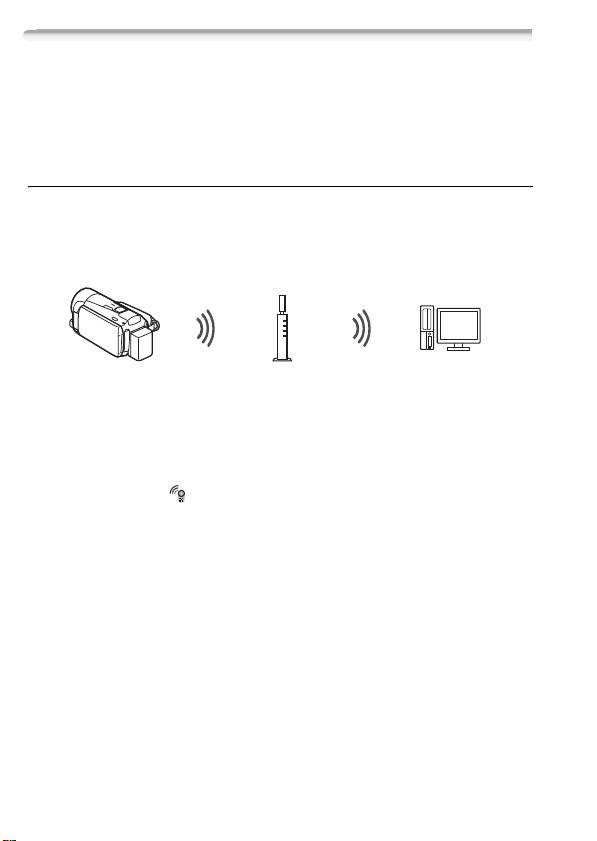
Introduction to Wi-Fi
The camcorder's Wi-Fi functions allow you to send files wirelessly,
which means that you will not need to fuss with cables. You can wire-
lessly connect the camcorder to a Wi-Fi network (wireless LAN) using
an access point. This type of connection is commonly referred to as
infrastructure mode. You can also connect the camcorder directly to
an iOS device* without using an access point. This type of connection
is commonly referred to as ad hoc mode. This guide covers how to set
up a connection for infrastructure mode. Refer to Glossary (A 11) for
a definition of the frequently used terms in this text.
The following illustrates the convenient uses of each type of Wi-Fi con-
nection.
* "iOS device" is used in this text to collectively refer to Wi-Fi-enabled iOS devices.
3
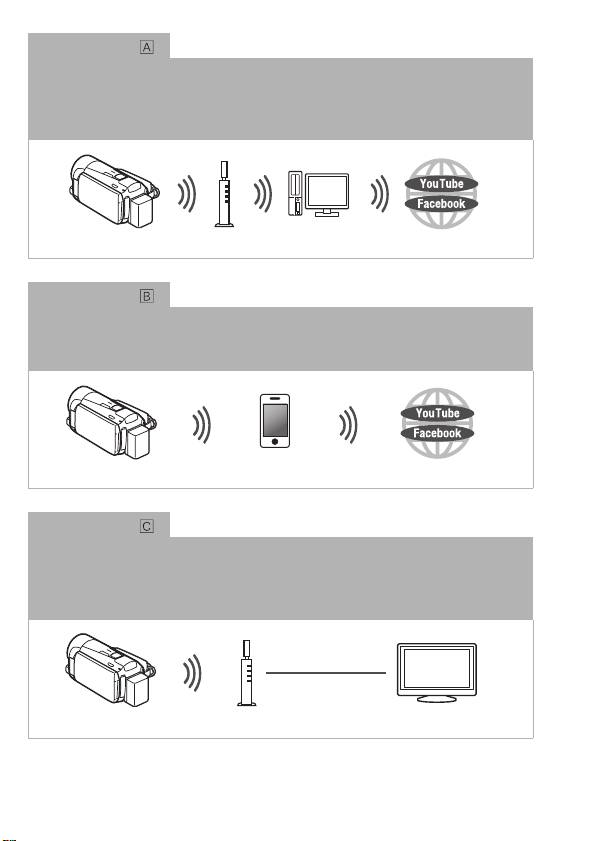
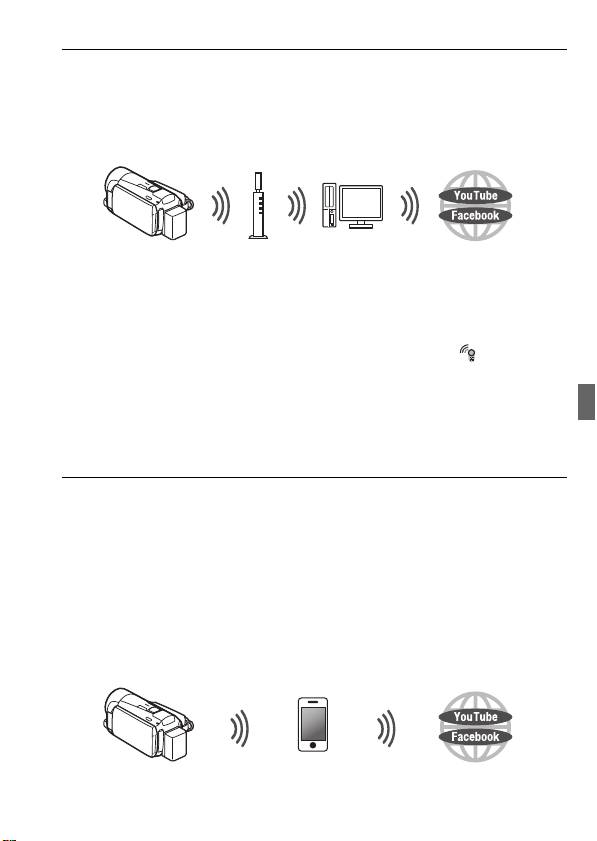
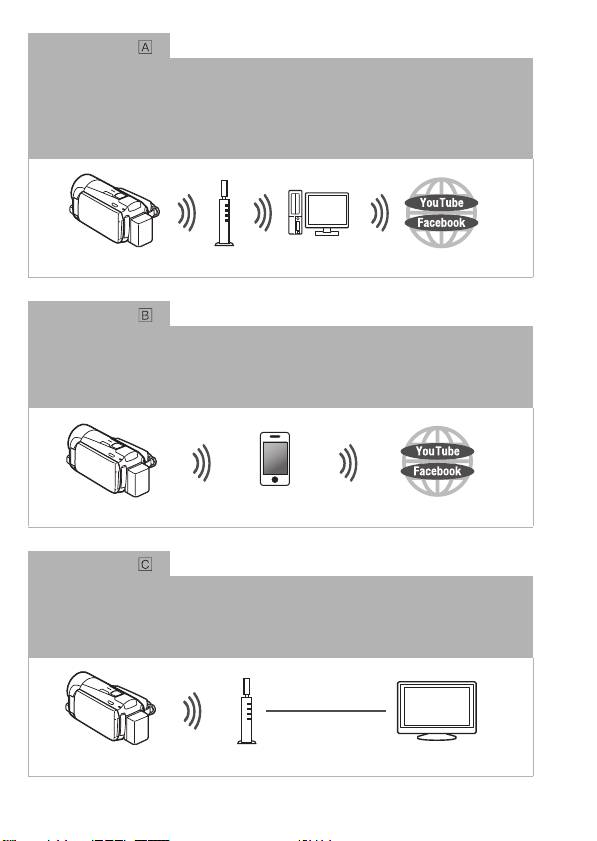
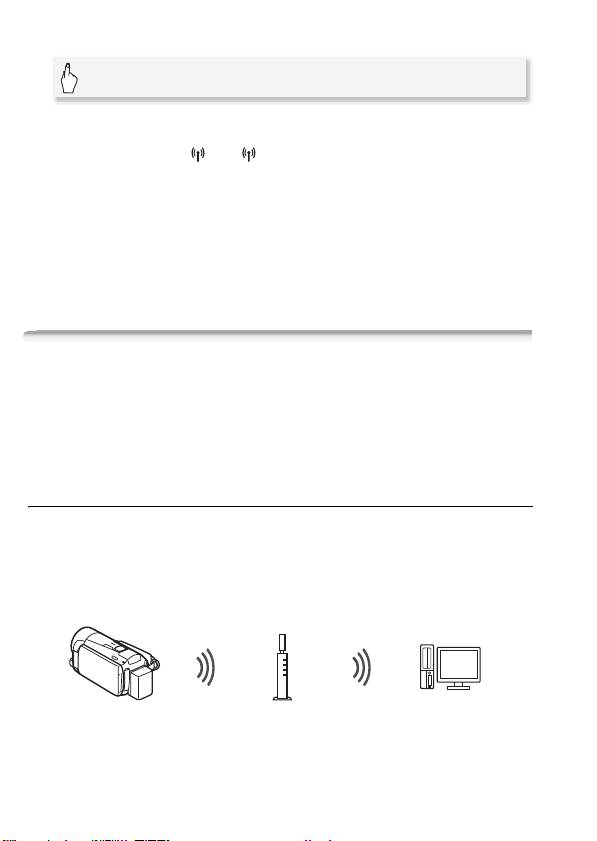
Wi-Fi connection
Infrastructure mode
Connect the camcorder to an access point on a Wi-Fi network (explained in this guide).
Use this connection if you plan to save your recordings on a computer or FTP server
(
; Transferring Files to a Computer or FTP Server) and then upload videos to
YouTube and Facebook (
; Uploading Recordings to YouTube and Facebook).
Access point
Computer
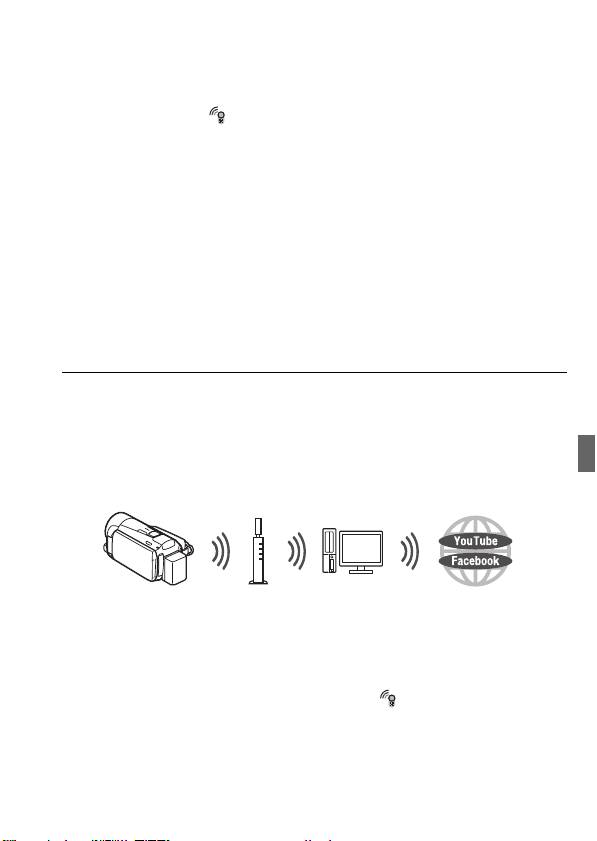
Wi-Fi connection
Ad hoc mode
Connect the camcorder to an iOS device (; Uploading Videos Using an iOS
Device). Use this connection type if you plan to upload videos to YouTube and Facebook
on the go (
; Uploading Recordings to YouTube and Facebook).
iOS device
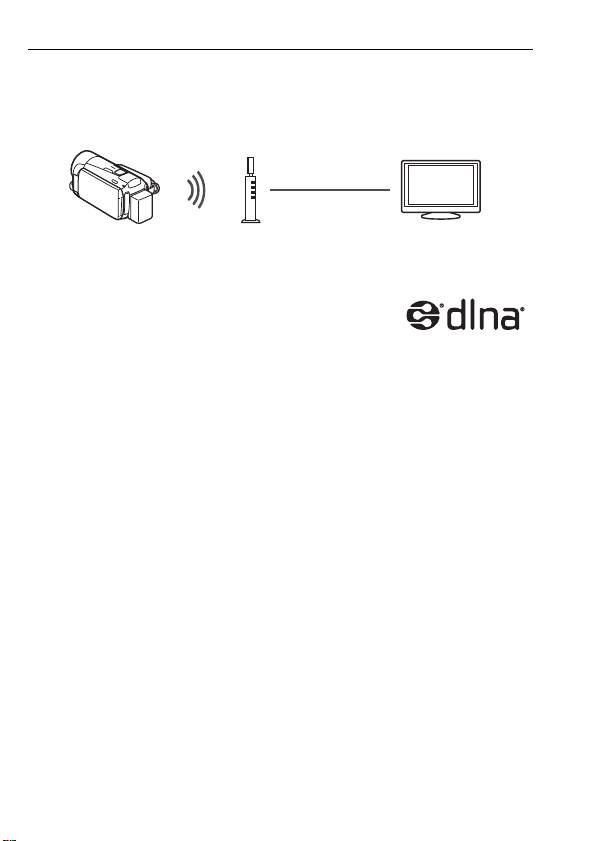
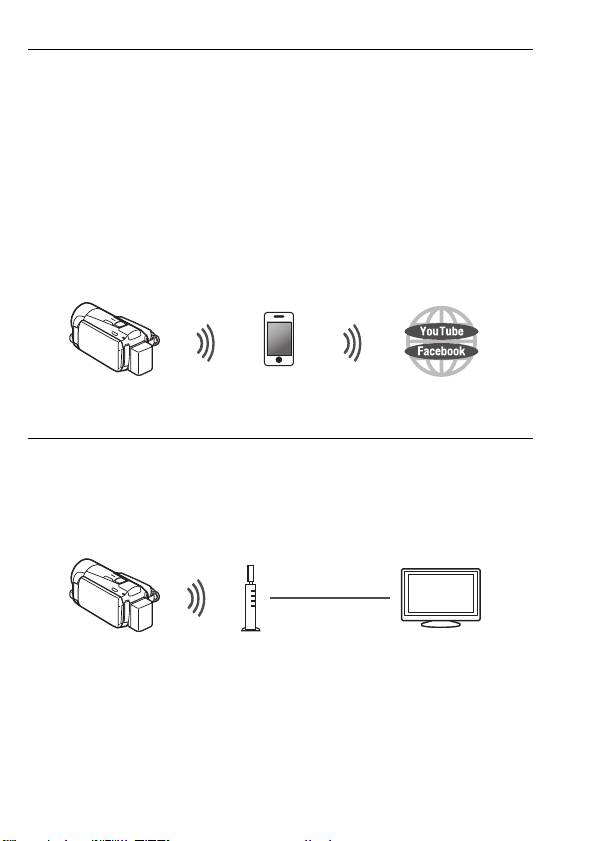
Wi-Fi connection
Infrastructure mode
Connect the camcorder to an access point on a Wi-Fi network (explained in this guide).
Use this connection if you plan to play back videos on a DLNA-compatible TV
(
; Wireless Playback on a DLNA-Compatible Device) connected to the network
using a LAN cable.
LAN cable
Access point
HDTV
4
About the camcorder's Wi-Fi standard
The camcorder's Wi-Fi standard complies with the IEEE 802.11b/g/n
protocol and operates in the 2.4 GHz band. As such, the maximum
data transfer rate is 11 Mbps for IEEE 802.11b, 54 Mbps for IEEE
802.11g, and 150 Mbps for IEEE 802.11n. Note that these are theo-
retical values and actual data transfer rates may differ.
Connecting to a Wi-Fi Network (Wi-Fi Protected Setup)
Wirelessly connecting to a Wi-Fi network via an access point (wireless
router) is commonly referred to as infrastructure mode. If your wireless
router supports Wi-Fi Protected Setup (WPS), setup will be easy and
require minimal configuring. Perform the following procedure. If your
wireless router does not support WPS or you wish to manually config-
ure settings, refer to Manual Setup (; Connecting to a Wi-Fi Net-
work).
Refer also to the instruction manual of your wireless router and other
devices you will use.
General requirements
• Correctly configured Wi-Fi network or hotspot
that uses the 802.11b/g/n protocol.
POINTS TO CHECK
• Using an unprotected Wi-Fi network can expose your files and data to
monitoring by unauthorized third parties. Be aware of the risks involved.
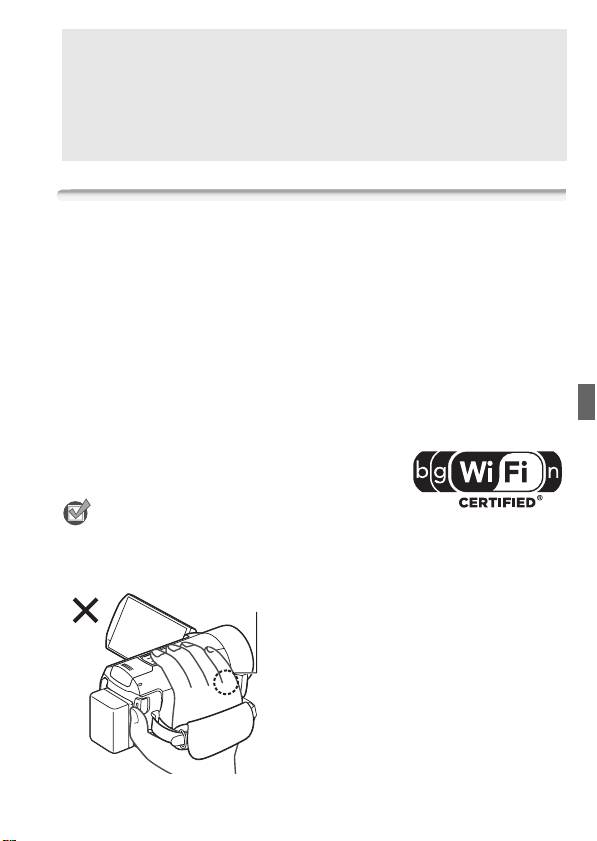
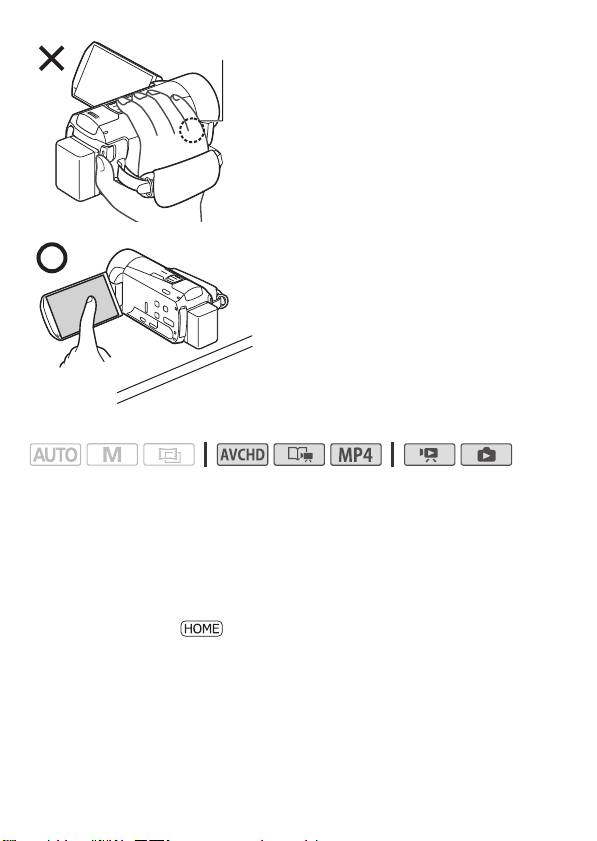
• When using the camcorder's Wi-Fi
Wi-Fi antenna
functions, do not cover the right side
of the camcorder with your hand or
other object. The Wi-Fi antenna is
located on the right side and covering
it may interfere with wireless signals.
5
Place the camcorder on a table or
similar surface and then use the Wi-Fi
functions, as shown in the illustration
on the left.
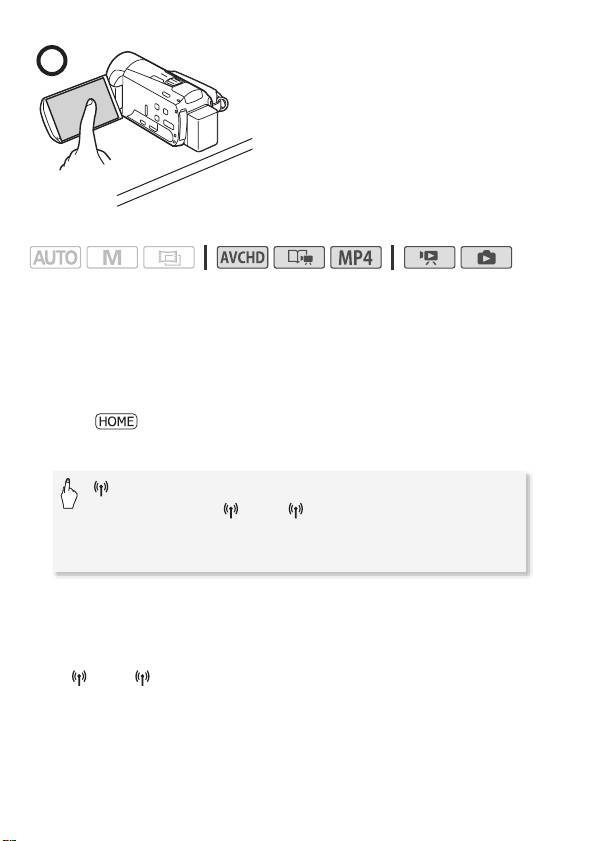
Operating modes:
If your wireless router has a WPS button, setup will be easy and all
automatic. Some wireless routers that support WPS do not have a
dedicated button but use a PIN code instead. For setup using a PIN
code, you will need to know in advance how to activate the wireless
router's WPS function.
1Press T to set the camcorder to playback mode and then
press .
2 Set up a new connection point.
[Wi-Fi]
>
[Wi-Fi Setup]
>
[Network Setup]
>
Desired
connection point ([ 1] to [ 3])
>
[Set Up New]*
>
[WPS: Button] or [WPS: PIN Code], depending on whether
your wireless router has a WPS button or uses a PIN code
* To replace the settings of an existing connection point, touch [Edit] instead and
then manually change the settings. To delete the settings, touch [Delete] and
then [Yes].
• You can set up up to three connection points for infrastructure mode
([ 1] to [ 3]). Once set up, you can use the same Wi-Fi network
without any further settings.
6
3 WPS button setup: Press and hold the WPS button on your
wireless router.
WPS PIN code setup: After a PIN code appears on the
camcorder's screen, enter it into your wireless router's setup
screen.
In most cases, the wireless router’s setup screen is accessed using
your Web browser. For details about how to activate the Wi-Fi
protected setup, refer to the instruction manual of your wireless router.
4 Within 2 minutes, touch [OK] on the camcorder's screen.
You can touch [Stop] and then [OK] to interrupt the Wi-Fi Protected
Setup while it is in progress.
5 Touch [Automatic] to automatically obtain an IP address.
• To assign the IP address manually, touch [Manual] and perform the
procedure in To manually assign an IP address below.
• A screen to test the settings will appear.
6 Select whether to test the settings.
• You can touch [Check Current Configuration] to review the network
settings.
• If you touched [Yes], a test of the settings will be performed and a
confirmation screen will appear. Touch [OK].
7 Save the settings of the connection point.
[Yes] > [OK]* > [X]
* After touching [OK], you can review the network settings. Touch [Wi-Fi Setup]
> [Check Current Configuration] > Desired connection point ([ 1] to
[ 3]) > [Î] or [Í] > [K] three times when finished.
Congratulations! You have connected your camcorder to the access
point on your Wi-Fi network. You can now use the camcorder's conve-
nient Wi-Fi features. The general requirements for each feature are out-
lined in the next section. For more details, refer to the full-version
Instruction Manual (PDF file).
7
Requirements for Wi-Fi Functions
You have connected the camcorder to your Wi-Fi network and are
ready for the next step. You can now wirelessly transfer recordings to a
computer or FTP server, upload recordings to the Internet, and play
back your recordings on a DLNA-compatible player.
Transferring Files to a Computer or FTP Server
You can wirelessly transfer recordings directly to a computer running
the supplied software Network Utility (Windows only) or an FTP server.
For a full explanation, refer to the full-version Instruction Manual
(; Transferring Files to a Computer or FTP Server).
Access point
General requirements
For computers running Windows OS:
• A computer correctly connected to the same network as the camcorder
with the supplied software Network Utility correctly installed, config-
ured and running ( appears in the notification area, depending on the
OS). Network Utility will be installed automatically after you install
VideoBrowser. For details about the software, refer to the ‘Network
Utility Software Guide’ (PDF file on the PIXELA CD-ROM in the folder
\Network Utility\Manual\English).
For FTP servers:
• Correctly configured FTP server, such as a Macintosh computer or net-
work-attached storage (NAS) drive. You will need to enter the IP
address, port, user name, password and file transfer destination as part
of the manual setup.
8
Uploading Recordings to YouTube and Facebook
You can upload movies to YouTube and movies and photos to Face-
book using the supplied software Network Utility running on a Win-
dows computer. For a full explanation, refer to the full-version
Instruction Manual (; Uploading Recordings to YouTube and
Facebook).
Access point
Computer
General requirements
• A computer correctly connected to a network with the supplied soft-
ware Network Utility correctly installed, configured (including your
YouTube and Facebook account settings) and running ( is in the
notification area). Network Utility will be installed automatically after
you install VideoBrowser. For details about the software, refer to the
‘Network Utility Software Guide’ (PDF file on the PIXELA CD-ROM in the
folder \Network Utility\Manual\English).
Uploading Videos Using an iOS Device
You can connect the camcorder to an iOS device to upload your recordings
to YouTube and Facebook even when you are away from your home net-
work. Make sure you have downloaded and are using the Movie Uploader
app provided by PIXELA, available for free from the App Store
(http://itunes.com/apps/movieuploader). Using this feature will require that
you make a wireless connection in ad hoc mode with the iOS device. For a
full explanation, refer to the full version Instruction Manual
(
;
Uploading Videos Using an iOS Device
). For details about the
Movie Uploader app, visit
http://www.pixela.co.jp/oem/canon/e/movieuploader/ (English only).
iOS device
9
Wireless Playback on a DLNA-Compatible Device
If you have a DLNA-compatible player, such as an HDTV, on your home
network, you can watch your recordings wirelessly. In such case, the
camcorder acts as a digital media server (DMS) and the HDTV acts as
a digital media player (DMP).
LAN cable
Access point
HDTV
General requirements
• An HDTV or other media player certified as a DLNA
Digital Media Player (DMP), correctly configured
and connected to the network. We recommend
using a LAN cable to connect the HDTV or media player. Look for the
DLNA Certified logo on the HDTV and refer to the instruction manual of
the HDTV for details on connecting it to the network.
For a full explanation, refer to the full-version Instruction Manual
(; Wireless Playback on a DLNA-Compatible Device).
10

Glossary
This is a glossary of some of the basic terms used frequently in this
text. The documentation for your wireless router may also contain a
glossary you can refer to.
Access Point
A wireless access point (WAP) is a device that allows wireless
devices, like your camcorder, to connect to a wired network (includ-
ing to the Internet) using the Wi-Fi standard. In most cases, this will
be your wireless router.
Ad hoc mode
A Wi-Fi connection made directly from one device to another without
using an access point.
DLNA
Digital Living Network Alliance. A standard for easy communication
and content sharing among consumer electronic devices, comput-
ers and mobile devices across a home network.
FTP server
An FTP server is an application running on a computer that allows
users to transfer files to and from that computer.
Infrastructure mode
A Wi-Fi connection in which devices are connected through an
access point.
IP Address
Exclusive number assigned to each device connected to the net-
work.
WPS
Wi-Fi Protected Setup. Standard for easy and secure setup of Wi-Fi
networks created by the Wi-Fi Alliance.
11

Troubleshooting
If you cannot successfully connect the camcorder to the wireless
router, check below. Refer also to the instruction manual of your wire-
less router and other devices you will use. Consult your dealer or a
Canon Service Center if the problem persists.
Cannot connect with the wireless router.
- Check that the wireless router is working correctly.
- The effective communication range between the camcorder and wireless router may vary
depending on the strength of the wireless signal. Try using the camcorder closer to the wire-
less router.
- Cordless phones, microwave ovens, refrigerators and other appliances in the line of sight
between the wireless router and the camcorder may interfere with the wireless signal. Try
using the camcorder in a location farther away from such appliances.
- Wi-Fi networks with a stealth function that do not broadcast their network name (SSID) will
not be detected by the camcorder during the Wi-Fi network setup. Perform the setup manu-
ally (; Manual Setup in Connecting to a Wi-Fi Network) or turn off the stealth function
of the wireless router.
List of Messages
(in alphabetical order)
Refer to these messages if a message appears during Wi-Fi Protected
Setup. If a message not in this list appears, refer to the full-version
Instruction Manual (; List of Messages).
In some cases, Wi-Fi functions may not be usable with certain acces-
sories. For details, refer to the full-version Instruction Manual (PDF file).
Multiple access points detected. Try the operation again.
- There are multiple wireless routers (access points) sending out a WPS signal at the same
time. Try the operation again later or perform Wi-Fi Protected Setup using the PIN code option.
Unable to complete WPS.
- Turn off the camcorder and wireless router. After a short while, turn them on again and try
again. If the problem persists, perform the Wi-Fi network setup manually (; Manual
Setup in Connecting to a Wi-Fi Network).
Unable to complete WPS. Try the operation again.
- Some wireless routers require pressing and holding the Wi-Fi Protected Setup (WPS) button.
For details, refer to the instruction manual of your wireless router.
- Make sure to touch [OK] on the camcorder’s screen within 2 minutes of activating the Wi-Fi
Protected Setup signal on the wireless router, whether by pressing the button or by entering
the PIN code.
12

Wi-Fi connection terminated
- Cordless phones, microwave ovens, refrigerators and other appliances may interfere with the
wireless signal. Try using the camcorder in a location farther away from such appliances.
- The camcorder may not be able to connect to the wireless router if too many devices are
accessing the wireless access point.
Wireless communication is not working correctly
- Cordless phones, microwave ovens, refrigerators and other appliances may interfere with the
wireless signal. Try using the camcorder in a location farther away from such appliances.
- Turn off the camcorder and wireless router. After a short while, turn them on again and per-
form the Wi-Fi network setup again. If the problem persists contact a Canon Service Center.
13

Table des matières
3Démarrage
3 Présentation du Wi-Fi
5 Connexion à un réseau Wi-Fi (Wi-Fi Protected Setup)
8 Configuration requise pour les fonctions Wi-Fi
13 Dépannage
Marques de commerce
• Microsoft et Windows sont des marques de commerce ou des marques déposées de Microsoft Corporation aux
États-Unis et/ou dans les autres pays.
• App Store, iPhone, iTunes, Mac OS et Macintosh sont des marques de commerce d'Apple Inc., enregistrées aux
États-Unis et dans les autres pays.
• YouTube est une marque déposée de Google Inc.
• Facebook est une marque déposée de Facebook, Inc.
• Wi-Fi est une marque de commerce de Wi-Fi Alliance.
• Wi-Fi Certified, WPA, WPA2, et le logo Wi-Fi Certified sont des marques de commerce de Wi-Fi Alliance.
• WPS, lorsqu'il est utilisé pour les réglages du caméscope, les affichages sur l'écran et dans ce manuel, signifie
Wi-Fi Protected Setup.
• DLNA, le logo DLNA et DLNA CERTIFIED sont des marques de commerce, des marques de service ou des
marques d'homologation de Digital Living Network Alliance.
• Les autres noms et produits non mentionnés ci-dessus peuvent être des marques de commerce ou des
marques déposées de leurs compagnies respectives.
2

Démarrage
Ce manuel couvre la connexion de votre caméscope à un routeur sans
fil ou à un point d'accès. Pour en savoir plus à propos des fonctions
Wi-Fi avancées et pour connaître les procédures détaillées, reportez-
vous à la version complète du manuel d'instruction (fichier PDF). Dans
ce guide, la marque ; indique le nom de la section du Manuel
d'instruction a laquelle vous reporter. Utilisez la table des matières ou
la fonction de recherche PDF pour vous aider a trouver la section.
Pour installer la version complète du manuel d'instruction, reportez-
vous à Installation du manuel d’instruction du caméscope (fichier PDF)
dans le Guide rapide fourni.
Présentation du Wi-Fi
Les fonctions Wi-Fi du caméscope vous permettent d'envoyer des
fichiers sans fil, ce qui signifie que vous n'avez pas besoin de vous
soucier des câbles. Vous pouvez connecter sans fil le caméscope à un
réseau Wi-Fi (réseau sans fil) en utilisant un point d'accès. Ce type de
connexion est habituellement appelé le
mode d'infrastructure. Vous
pouvez aussi connecter le caméscope directement à un dispositif iOS*
sans utiliser un point d'accès. Ce type de connexion est habituellement
appelé le mode Ad hoc. Ce guide couvre la mise en place d'une
connexion pour le mode d'infrastructure. Reportez-vous au Glossaire
(A 12) pour connaître la définition des termes les plus fréquemment
utilisés dans ce texte.
Les exemples suivants illustrent l'utilisation pratique de chaque type de
connexion Wi-Fi.
* "Dispositif iOS" est utilisé dans ce texte comme référence collective aux dispositif
iOS compatible Wi-Fi.
3
Connexion Wi-Fi
Mode d'infrastructure
Connectez le caméscope à un point d'accès sur un réseau Wi-Fi (expliqué dans ce guide).
Utilisez cette connexion si vous projetez de sauvegarder vos enregistrements sur un
ordinateur ou un serveur FTP (; Transfert de fichiers sur un ordinateur ou un
serveur FTP), puis de transférer les séquences vidéo sur YouTube et Facebook
(; Transfert d'enregistrements sur YouTube et Facebook).
Point d'accès
Ordinateur
Connexion Wi-Fi
Mode ad hoc
Connectez le caméscope à un dispositif iOS (; Transfert des séquences vidéo en
utilisant un dispositif iOS). Utilisez ce type de connexion si vous projetez de transférer
instantanément des séquences vidéo sur YouTube et Facebook où que vous soyez
(; Transfert d'enregistrements sur YouTube et Facebook).
Dispositif iOS
Connexion Wi-Fi
Mode d'infrastructure
Connectez le caméscope à un point d'accès sur un réseau Wi-Fi (expliqué dans ce guide).
Utilisez cette connexion si vous projetez de lire les séquences vidéo sur un téléviseur
compatible DLNA (; Lecture sans fil sur un appareil compatible DLNA) connecté à
un réseau utilisant un câble réseau.
Câble réseau
Point d'accès
Téléviseur HD
4

À propos du standard Wi-Fi du caméscope
Le standard Wi-Fi du caméscope est compatible avec le protocole
IEEE 802.11b/g/n et fonctionne dans la bande 2,4 GHz. En tant que
tel, le taux de transfert de données maximum est de 11 Mbps pour
IEEE 802.11b, 54 Mbps pour IEEE 802.11g et 150 Mbps pour IEEE
802.11n. Notez que ce sont des valeurs théoriques et que le taux de
transfert de données réel peut varier.
Connexion à un réseau Wi-Fi (Wi-Fi Protected Setup)
Une connexion sans fil à un réseau Wi-Fi via un point d'accès (routeur
sans fil) est appelé communément le mode d'infrastructure. Si votre
routeur sans fil prend en charge Wi-Fi Protected Setup (WPS), le
réglage sera facile et demandera une configuration minimale. Réalisez
la procédure suivante. Si votre routeur sans fil ne prend pas en charge
WPS ou si vous souhaitez configurer manuellement les réglages,
reportez-vous à Réglage manuel (; Connexion à un réseau
Wi-Fi).
Reportez-vous aussi au manuel d'instruction de votre routeur sans fil et
des autres appareils que vous allez utiliser.
Configuration générale requise
• Configurez correctement le réseau Wi-Fi ou le
point d'accès qui utilise le protocole
802.11b/g/n.
À VÉRIFIER
• L'utilisation d'un réseau Wi-Fi non protégé peut exposer vos fichiers et
vos données à la surveillance de tiers non autorisés. Soyez conscient
des risques que vous encourez.
5
• Lors de l'utilisation des fonctions Wi-Fi
Antenne Wi-Fi
du caméscope, ne recouvrez pas le
côté droit du caméscope avec votre
main ou un autre objet. L'antenne
Wi-Fi est située sur le côté droit et
recouvrir le côté peut interférer avec
les signaux sans fil.
Placez le caméscope sur une table ou
une surface similaire, puis utilisez les
fonctions Wi-Fi comme indiqué sur
l'illustration à gauche.
Modes de fonctionnement :
Si votre routeur sans fil possède un bouton WPS, le réglage sera facile
et entièrement automatique. Certains routeurs sans fil qui prennent en
charge le protocole WPS ne possèdent pas de touche dédiée, mais
utilisent un code PIN à la place. Pour le réglage à l'aide du code PIN,
vous avez besoin de connaître au préalable comment activer la
fonction WPS du routeur sans fil.
1Appuyez sur T pour régler le caméscope en mode de lecture,
puis appuyez sur .
6

2 Réglez un nouveau point de connexion.
[Wi-Fi] > [Configuration Wi-Fi] > [Configuration du
réseau] > Point de connexion souhaité ([ 1] à [ 3])
> [Configurer nouveau]* >
WPS : bouton] ou [WPS :
code PIN], selon que votre routeur sans fil possède un
bouton WPS ou utiliser un code PIN
* Pour remplacer les réglages d'un point de connexion existant, touchez [Éditer]
à la place, puis changez manuellement les réglages. Pour supprimer les
réglages, touchez [Effacer] puis [Oui].
• Vous pouvez régler un maximum de trois points de connexion en
mode d'infrastructure ([ 1] à [ 3]). Une fois réglé, vous pouvez
utiliser le même réseau Wi-Fi sans réglage supplémentaire.
3 Réglage du bouton WPS : appuyez sur le bouton WPS sur le
routeur sans fil et maintenez-le enfoncé.
Réglage par code WPS PIN : dès qu'un code PIN apparaît sur
l'écran du caméscope, entrez-le sur l'écran de réglage du routeur
sans fil.
Dans la plupart des cas, vous pouvez accéder à l'écran de réglage du
routeur sans fil en utilisant votre navigateur Web. Pour les détails sur
l'activation du protocole Wi-Fi protected setup, reportez-vous au
manuel d'instruction de votre routeur sans fil.
4 Avant 2 minutes, touchez [OK] sur l'écran du caméscope.
Vous pouvez toucher [Arrêter], puis [OK] pour interrompre la fonction
Wi-Fi Protected Setup qui est en cours.
5 Touchez [Auto] pour obtenir automatiquement une adresse IP.
• Pour affecter une adresse IP manuellement, touchez [Manuel] et
réalisez la procédure de Pour affecter manuellement une adresse IP
ci-dessous.
• Un écran pour tester les réglages apparaît.
6 Sélectionnez de tester les réglages.
• Vous pouvez toucher [Vérifier la configuration actuelle] pour revoir les
réglages réseau.
• Si vous avez touché [Oui], un test des réglages est réalisé et un
écran de confirmation apparaît. Touchez [OK].
7
7 Sauvegardez les réglages du point de connexion.
[Oui] > [OK]* > [X]
* Après avoir touché [OK], vous pouvez revoir les réglages du réseau. Touchez
[Configuration Wi-Fi] > [Vérifier la configuration actuelle] > Le point de
connexion souhaité ([ 1] à [ 3]) > [Î] ou [Í] > [K] trois fois quand
c'est terminé.
Félicitations ! Vous avez connecté votre caméscope au point d'accès
de votre réseau Wi-Fi. Vous pouvez maintenant utiliser les fonctions
Wi-Fi pratiques du caméscope. La configuration requise pour chaque
fonction est détaillée dans la section suivante. Pour en savoir plus,
reportez-vous à la version complète du manuel d'instruction (fichier
PDF).
Configuration requise pour les fonctions Wi-Fi
Vous avez connecté le caméscope à votre réseau Wi-Fi et vous êtes
prêt pour l'étape suivante. Vous pouvez maintenant transférer sans fil
les enregistrements à un ordinateur ou un serveur FTP, transférer les
enregistrements sur Internet et lire les enregistrements sur un lecteur
compatible DLNA.
Transfert de fichiers sur un ordinateur ou un serveur FTP
Vous pouvez transférer sans fil des enregistrements directement sur un
ordinateur utilisant le logiciel fourni Network Utility (Windows
uniquement) ou un serveur FTP. Pour une explication complète,
reportez-vous à la version complète du Manuel d'instruction
(; Transfert de fichiers sur un ordinateur ou un serveur FTP).
Point d'accès
8
Configuration générale requise
Pour les ordinateurs fonctionnant sous Windows OS :
• Un ordinateur correctement connecté au même réseau que le
caméscope avec le logiciel fourni Network Utility correctement installé,
configuré et lancé ( apparaît dans la zone de notification, en fonction
du système d'exploitation). Network Utility est installé
automatiquement après l'installation de VideoBrowser. Pour les détails
sur le logiciel, reportez-vous au ‘Guide du logiciel Network Utility’ (fichier
PDF sur le CD-ROM PIXELA dans le dossier
\Network Utility\Manual\French).
Pour les serveurs FTP :
• Un serveur FTP correctement configuré tel qu'un ordinateur Macintosh
ou un lecteur de stockage en réseau (NAS). La saisie de l'adresse du
serveur FTP, du port, du nom d'utilisateur, du mot de passe et de la
destination du transfert de fichier fait partie intégrante du réglage
manuel.
Transfert d'enregistrements sur YouTube et Facebook
Vous pouvez transférer des séquences vidéo sur YouTube et des
séquences vidéo et des photos sur Facebook en utilisant le logiciel
fourni Network Utility fonctionnant sur un ordinateur Windows. Pour
une explication complète, reportez-vous à la version complète du
Manuel d'instruction (; Transfert d'enregistrements sur YouTube
et Facebook).
Point d'accès
Ordinateur
Configuration générale requise
• Un ordinateur correctement connecté à un réseau avec le logiciel fourni
Network Utility correctement installé, configuré (y compris les réglages
du compte YouTube et Facebook) et lancé ( apparaît dans la zone
de notification). Network Utility est installé automatiquement après
l'installation de VideoBrowser. Pour les détails sur le logiciel, reportez-
vous au ‘Guide du logiciel Network Utility’ (fichier PDF sur le CD-ROM
PIXELA dans le dossier \Network Utility\Manual\French).
9
Transfert des séquences vidéo en utilisant un dispositif iOS
Vous pouvez raccorder le caméscope à un dispositif iOS pour
transférer vos enregistrements sur YouTube et Facebook, même quand
vous êtes éloigné de votre réseau domestique.
Assurez-vous que vous
avez téléchargé et que vous utilisez l'application Movie Uploader fournie
par PIXELA, et disponible gratuitement sur l'App Store (http://itunes.com/
apps/movieuploader).
Pour utiliser cette fonction vous avez besoin de
réaliser une connexion sans fil en mode ad hoc avec un dispositif iOS.
Pour une explication complète, reportez-vous à la version complète du
Manuel d'instruction (; Transfert des séquences vidéo en utilisant
un dispositif iOS). Pour en savoir plus sur l'application Movie Uploader,
consultez
http://www.pixela.co.jp/oem/canon/e/movieuploader/
(uniquement en anglais).
Dispositif iOS
Lecture sans fil sur un appareil compatible DLNA
Si vous possédez un lecteur compatible DLNA, tel qu'un téléviseur HD,
sur votre réseau domestique, vous pouvez regarder vos
enregistrements sans fil. Dans ce cas, le caméscope se comporte
comme un serveur multimédia numérique (DMS) et le téléviseur HD se
comporte comme un lecteur multimédia numérique (DMP).
Câble réseau
Point d'accès
Téléviseur HD
10
