Lelit PL41PLUS: инструкция
Раздел: Кофеварки и кофемашины
Тип: Кофе-Машина

Характеристики, спецификации
Инструкция к Кофе-Машину Lelit PL41PLUS
PL41PLUST
MACCHINA PER CAFFE’ ESPRESSO CON GRUPPO PROFESSIONALE E PID
ESPRESSO MACHINE WITH PROFESSIONAL BREWING GROUP AND PID TO BE
USED WITH GROUND COFFEE
MACHINE A’ CAFÉ’ ESPRESSO AVEC GROUP PROFESSIONNEL ET PID
ESPRESSO KAFFEEMASCHINE MIT PROFESSIONELLER BRÜHGRUPPE UND PID
КОФЕВАРКА ЭСПРЕССО С ПРОФЕССИОНАЛЬНОЙ ГРУППОЙ и PID ДЛЯ
ИСПОЛЬЗОВАНИЯ С МОЛОТЫМ КОФЕ
Pagina 2

ITALIANO
Pagina 3
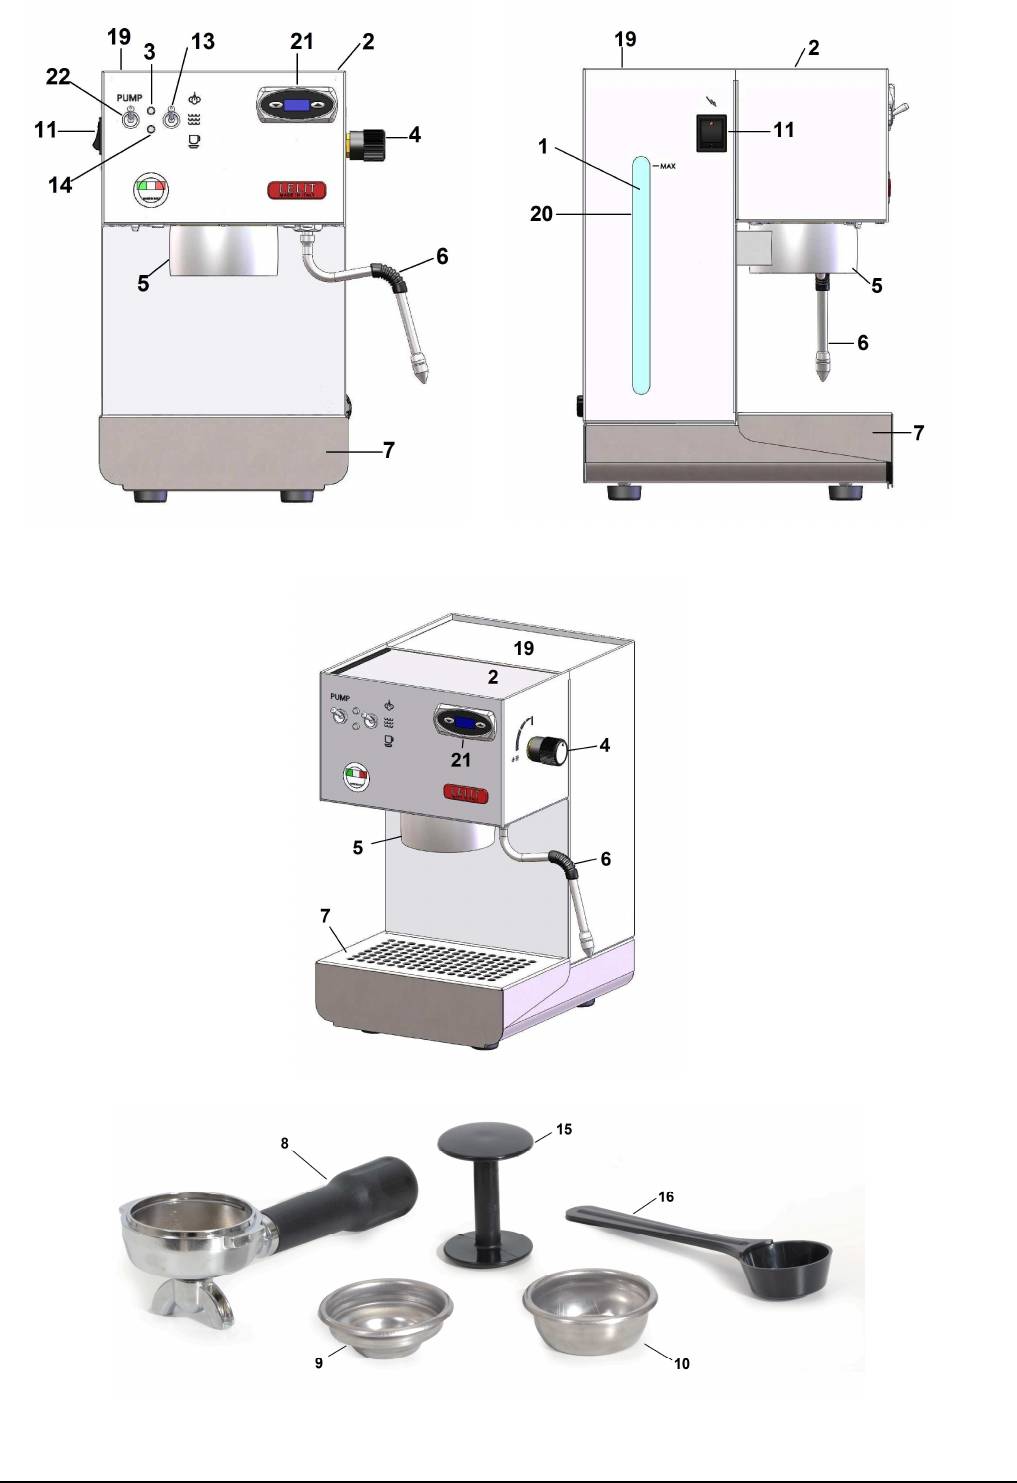
COMPONENTI:
1. Serbatoio
12. \
2. Scaldatazze
13. Interruttore caffè/acqua calda/vapore
3. Lampada spia pronto vapore
14. Lampada spia pronto caffè
4. Manopola vapore/acqua calda (sul lato destro)
15. Pressino
5. Sede del portafiltro
16. Paletta
6. Erogatore vapore/acqua calda
17. \
7. Grata removibile poggia tazza
18. \
8. Portafiltro
19. Coperchio serbatoio
9. Filtro 1 tazza
20. Visualizzatore livello acqua serbatoio
10. Filtro 2 tazze
21. TermoPID
11. Interruttore generale on/off (sul lato sinistro)
22. Interruttore pompa
ISTRUZIONI PER L’USO:
Prima accensione della macchina:
1. Estrarre la macchina per caffè espresso dalla scatola e rimuovere tutti i sacchetti ed il materiale da imballo.
2. Posizionare la macchina per caffè espresso su una superficie stabile e piana, lontano da fonti di calore e da
rubinetti della rete idrica.
3. Alzare il coperchio (19) del serbatoio posto sulla sommità posteriore della macchina ed estrarre il serbatoio (1)
facendo attenzione a non danneggiare i tubicini al suo interno.
4. Riempire il serbatoio (1) con acqua fredda.
5. Rimettere il serbatoio (1) nella sua sede, controllando che i tubicini non siano piegati e che il filtro posto
all’estremità di uno di essi sia ben saldo, richiudere il coperchio (19).
6. Inserire la spina del cavo di alimentazione elettrica nella presa della corrente (verificarne il voltaggio).
7. Inserire il portafiltro (8) nell’anello di aggancio della sede del portafiltro (5) ruotandolo da sinistra verso
destra, in modo che si scaldi e che sia facilmente pronto per l’uso.
8. Accendere la macchina premendo l’interruttore generale (11). L’accensione della lampada spia dell’interruttore
stesso conferma l’alimentazione elettrica.
9. Aprire la manopola vapore/acqua calda (4).
10. Posizionare l’interruttore erogazione vapore (13) nella posizione acqua calda e alzare l’interruttore pompa
(22).
11. Quando dal beccuccio del tubo erogatore vapore/acqua calda (6) esce l’acqua, abbassare l’interruttore (22) e
chiudere la manopola vapore/acqua calda (4) e posizionare interruttore (13) su modalità caffè.
12. Dopo aver fatto tutte queste operazioni la macchina si può anche lasciare accesa.
13. Il regolatore di temperatura Termopid (21) visualizzerà i gradi della caldaia stessa, controllando il
riscaldamento.
14. Il regolatore di temperatura e’ impostato dalla fabbrica a 95°C, temperatura ideale per la preparazione del
caffè. (Se si desidera cambiare la temperatura del Termopid, seguire le istruzioni del paragrafo Regolazione
della temperatura in caldaia tramite il controllo Termopid).
Preparazione del caffè espresso con caffè macinato:
15. Controllare che il serbatoio (1) contenga acqua, verificandone il livello dal visualizzatore livello acqua nel
serbatoio (20).
16. Premere l’interruttore generale (11): la lampada spia dell’interruttore stesso si accende (solo se la macchina è
spenta, altrimenti passare al punto successivo). Posizionare l’interruttore (13) nella posizione caffè.
17. Non appena il display del Termopid (21) visualizza la temperatura impostata e la lampada spia pronto caffè
(14) si spegne, la macchina è pronta per l’uso.
18. Inserire il filtro 1 tazza (9) o 2 tazze (10) nel portafiltro (8) preventivamente riscaldato come indicato al punto
7.
19. Tramite la paletta (16) in dotazione, riempire il filtro con il caffè macinato come indicato di seguito:
- 1+½ “paletta” = 1 tazza
- 3 “palette” = 2 tazze
ad ogni “paletta di caffè” pressare il contenuto del filtro con l’apposito pressino (15) in dotazione, assicurarsi
che il bordo del portafiltro sia pulito, senza residui di caffè, i quali possono impedire al portafitro di essere
chiuso correttamente, generando perdite.
20. Inserire il portafiltro (8) nell’anello di aggancio della sede del portafiltro (5) ruotandolo da sinistra verso destra
con forza e successivamente posizionare le tazzine sulla grata removibile poggia tazza (7).
21. Alzare l’interruttore pompa (22).
22. Una volta raggiunta la quantità desiderata del caffè abbassare di nuovo l’interruttore (22).
23. Togliere il portafiltro (8) e gettare i fondi di caffè, verificare che sia pulito e reinserirlo nell’anello di aggancio
della sede del porta filtro (5) per mantenere il portafiltro stesso alla giusta temperatura.
ITALIANO
Pagina 4
Vapore:
24. Controllare che il serbatoio (1) contenga acqua, verificandone il livello dal visualizzatore livello acqua nel
serbatoio (20).
25. Premere l’interruttore generale (11): la lampada spia dell’interruttore stesso si accende (solo se la macchina è
spenta, altrimenti passare al punto successivo).
26. Posizionare l’interruttore (13) nella posizione vapore.
27. La lampada spia (14) e la lampada spia (3) si accendono e non appena la lampada spia pronto vapore (3) si
spegne, la macchina è pronta per erogare vapore nel modo giusto. ATTENZIONE: se si attende troppo e si
spengono entrambe le lampade spie la quantità di vapore erogato sarà meno costante.
28. Aprire la manopola vapore/acqua calda (4). All’inizio uscirà un po’ d’acqua seguita dal vapore.
29. Mettere sotto il tubo vapore erogatore vapore/acqua calda (6) il recipiente con la bevanda desiderata e aprire
la manopola (4).
30. A fine operazione chiudere la manopola vapore/acqua calda (4).
31. IMPORTANTE: dopo ogni erogazione di vapore, soprattutto se si utilizza il vapore per montare il latte per fare
un cappuccino, riaprire la manopola vapore/acqua calda (4), posizionare l’interruttore (13) sulla posizione
acqua calda e alzare l’interruttore pompa (22). Quando dal tubo erogatore vapore/acqua calda (6) esce
l’acqua, richiudere la manopola vapore/acqua calda (4), contemporaneamente abbassare l’interruttore pompa
(22) e riportare l’interruttore (13) in posizione caffè; pulire accuratamente l’erogatore vapore/acqua calda (6).
Questa operazione è necessaria per mantenere puliti i condotti acqua/vapore e ripristinare il circuito dell’acqua
all’interno dei condotti.
Acqua calda:
32. Controllare che il serbatoio (1) contenga acqua, verificandone il livello dal visualizzatore livello acqua nel
serbatoio (20).
33. Premere l’interruttore generale (11): la lampada spia dell’interruttore stesso si accende (solo se la macchina è
spenta, altrimenti passare al punto successivo).
34. Posizionare l’interruttore (13) nella posizione acqua calda.
35. Non appena il display del Termopid (21) visualizza la temperatura impostata e la lampada spia (14) si spegne
la macchina è pronta per l’uso.
36. Aprire la manopola vapore/acqua calda (4) ed alzare l’interruttore pompa (22).
37. Si otterrà immediatamente l’uscita di acqua dal tubo erogatore vapore/acqua calda (6).
38. Raggiunta la quantità d’acqua desiderata, abbassare nuovamente l’interruttore pompa (22), quindi chiudere la
manopola vapore/acqua calda (4).
39. Dopo il prelievo di acqua calda si raccomanda di controllare che il serbatoio (1) contenga ancora acqua.
REGOLAZIONE DELLA TEMPERATURA IN CALDAIA TRAMITE IL CONTROLLO TERMOPID (21):
Il Termopid e’ stato impostato dalla fabbrica a 95°c. Per poter intervenire sulla regolazione procedere come segue:
- premere il tasto ; non appena sul display compare la scritta “PRG” premere il tasto ;
- quando il display visualizza la temperatura della caldaia , impostare con i tasti e il valore della
temperatura desiderata, da un minimo di 80C° ad un massimo di 130C°.
- dopo 3 secondi dalla pressione dell’ultimo tasto il dato è memorizzato ed il display visualizza la temperatura.
NB: se la temperatura viene impostata ad una soglia troppo elevata, sotto la richiesta di erogazione caffè il display
comincerà a lampeggiare.
CONSIGLI UTILI:
- I filtri 1 tazza (9), 2 tazze (10) non devono essere necessariamente lavati ogni volta dopo l’uso. L’importante è
accertarsi che non siano ostruiti i fori.
- Per ottenere un ottimo risultato, si consiglia di riscaldare le tazze sull’apposito scalda-tazze (2) che funziona solo
a macchina accesa.
- Il dispositivo controllo temperatura Termopid e’ stato impostato a valori di fabbrica per un caffè espresso ottimale.
Durante il riscaldamento e l’erogazione di caffè o acqua la temperatura può avere un’oscillazione di 10/12°C in + o
in – rispetto a quella impostata. E’ stato inserito anche un avvertimento: dopo i 108°C il display del Termopid
visualizza la temperatura ma ad intermittenza; e’ del tutto normale, in quanto questo avverte l’operatore che il
caffè non uscirà buono se erogato ad una temperatura cosi alta.

ITALIANO
Pagina 5
MANUTENZIONE ORDINARIA E PRECAUZIONI:
- Si consiglia di pulire accuratamente dopo ogni utilizzo il tubo vapore (6) ed il portafiltro (8).
- Per la pulizia si consiglia di utilizzare un normale panno umido con acqua.
- Non lasciare l’apparecchio esposto ad agenti atmosferici e non immergere l’apparecchio in acqua.
- Fare funzionare l’apparecchio soltanto sotto controllo di adulti e tenerlo fuori dalla portata dei bambini.
- Non lavare filtri e portafiltro in lavastoviglie.
- Non manomettere il prodotto, per qualsiasi problema rivolgersi a personale tecnico autorizzato.
- Durante il normale il normale funzionamento alcune parti della carrozzeria possono raggiungere temperature
elevate: maneggiare con cautela!
DATI TECNICI:
Alimentazione elettrica: 230V - 50Hz
Potenza: 1250 W
Tempo di riscaldamento: 3 minuti circa
Pressione pompa: 15 bar
Regolazione Termopid: da min. 80°C fino a max. 130°C
Capacità serbatoio acqua: 2,7 litri
Dimensioni (HxLxD): 23x27x34 cm
Peso: 9 Kg
Funzionamento: caffè macinato
CONDIZIONI DI GARANZIA
GARANZIA LEGALE
Questo prodotto è soggetto alle norme di garanzia vigenti nello stato in cui viene venduto; informazioni specifiche in
merito verranno fornite dal rivenditore o dall’importatore dello stato in cui avete acquistato il prodotto, che ne è
completamente responsabile.
L’importatore è completamente responsabile anche degli adempimenti necessari a norma di legge dello stato in cui
l’importatore stesso distribuisce il prodotto, compreso la gestione dello smaltimento a fine vita del prodotto.
Nei paesi europei fanno riferimento le leggi nazionali di attuazione della Direttiva Comunitaria 44/99/CE.

ITALIANO
Pagina 6
RISOLUZIONE DEI PROBLEMI PIÙ FREQUENTI:
La ringraziamo per aver acquistato in nostro prodotto, costruito secondo le ultime innovazioni tecnologiche.
Seguendo scrupolosamente le semplici operazioni riguardanti l’uso corretto del nostro prodotto in conformità alle
prescrizioni essenziali di sicurezza indicate nel presente manuale, potrà ottenere il massimo delle prestazioni e
verificare la notevole affidabilità di questo prodotto nel corso degli anni. Di seguito forniamo una pratica tabella
riportante alcuni malfunzionamenti e le loro relative rapide soluzioni:
PROBLEMA CAUSA SOLUZIONE
1. La miscela di caffè non è adatta per il
1. Sostituire il caffè
tipo di macchina
2. Regolare la macinatura del caffè
Non si forma la
2. La macinatura non è corretta
3. Aumentare la dose del caffè e pressarlo
crema sul caffè
3. La quantità di caffè è insufficiente.
adeguatamente
4. Il portafiltro non è stato agganciato
4. Stringere meglio il portafiltro
bene
1. La macchina non era alla giusta
temperatura
2. Mancato preriscaldamento del
Il caffè esce troppo
portafiltro
freddo
3. Mancato preriscaldamento delle tazze
1. Rispettare le indicazioni riportate nei paragrafi
“Messa in funzione della macchina” e “Preparazione
del caffè espresso”
2. Il portafiltro deve essere riscaldato
contemporaneamente all’acqua, vedi paragrafo
“Messa in funzione della macchina”
4. Il termoPID non lavora entro i valori
3. Scaldare adeguatamente le tazze
ottimali
sull’apposito scadatazze (2)
4. Impostare i valori del PID.
1. La regolazione della macinatura deve essere più
1. Il caffè è macinato troppo grosso
fine
Il caffè esce troppo
2. La quantità di caffè è insufficiente
2. Aumentare la dose di caffè
rapidamente
3. Pressatura del caffè insufficiente
3. Premere maggiormente il caffè
4. Caffè vecchio o inadatto
4. Sostituire il caffè/cialda
1. Il portafiltro non è inserito
1. Inserirlo in modo corretto
correttamente
Il caffè esce tra il
2. Diminuire la quantità di caffè
2. Eccessiva quantità di caffè nel filtro
gruppo erogazione
3. Togliere i residui di caffè dal bordo del portafiltro
3. Il bordo del portafiltro non è stato
ed il portafiltro
e pulire la guarnizione sottocoppa
pulito
4. Rivolgersi al CENTRO DI ASSISTENZA
4. La guarnizione sottocoppa è usurata
1. La regolazione della macinatura deve essere più
1. Il caffè è macinato troppo fine
grossa
Il caffè esce a gocce
2. La quantità di caffè è eccessiva
2. Diminuire la quantità di caffè
3. Eccessiva pressatura del caffè
3. Pressare meno il caffè
1. Il foro del terminale del tubo vapore
1. Pulire il foro con l’ausilio di un ago
La macchina non
è ostruito
2. Vedi paragrafo “Messa in funzione della
eroga vapore
2. Manca acqua nel serbatoio
macchina”
1. Manca acqua nel serbatoio
1. Introdurre acqua nel serbatoio
2. Interruttore (13) non è posizionato
2. Posizionare l’interruttore (13) su caffè
correttamente
Durante l’erogazione
3. Sostituire con una macinatura più grossa
3. Il caffè è macinato troppo fine
non esce caffè
4. Diminuire la quantità di caffè nel filtro
4. La quantità di caffè è eccessiva
5. Pressare meno il caffè
5. Il caffè è troppo pressato
6. Rivolgersi al CENTRO DI ASSISTENZA
6. Doccetta sporca
La macchina non
1. Manca la corrente
1. Ripristinare la corrente
funziona e la
2. La spina del cavo di alimentazione
2. Inserire correttamente la spina del cavo di
lampada spia
non è inserita correttamente
alimentazione nella presa di corrente
tensione non si
3. Il cavo di alimentazione è
3. Rivolgersi al CENTRO DI ASSISTENZA per la
accende
danneggiato
sostituzione
La spia di accensione
1. I termostati di servizio non
è accesa e la spia
funzionano
1. Rivolgersi al CENTRO DI ASSISTENZA
pronto vapore non si
2. La resistenza è interrotta oppure
2. Rivolgersi al CENTRO DI ASSISTENZA
accende entro 10
bruciata
minuti
I dati e le immagini riportati potranno subire variazioni senza preavviso al fine del miglioramento delle prestazioni
della macchina.

English
DESCRIPTION:
1. Cold water tank
12. \
2. Cup warmer
13. Coffee/hot water/steam lever switch
3. Indicator light: steam ready
14. Indicator light: coffee ready
4. Steam/hot water knob (on the right side)
15. Coffee press/tamper
5. Filter holder retaining ring
16. Measuring spoon
6. Steam/hot water arm
17. \
7. Removable water drainage tray
18. \
8. Filter holder
19. Removable water tank cover
9. Single cup filter
20. Water level indicator
10. Two cup filter
21. PID temperature controller
11. On/off switch (on the left side)
22. Pump lever switch
USER INSTRUCTIONS:
Starting of the machine:
1. Remove the machine from its packing and make sure all packing parts have been taken off (including the
protection bags).
2. Lay the machine on a flat and steady surface far away from hot places and from the water taps.
3. Remove the water tank cover (19) on the top of the machine and take out the water tank (1) paying attention
not to damage the water tubes inside the tank.
4. Fill the tank (1) with cold water.
5. Replace the water tank back in the machine and check that the water tubes are not bent and that the filter is
well set on one of them; reposition the tank cover (19).
6. Plug in the machine in the mains. Make sure that the wall socket has the right voltage.
7. Place the filter holder (8) under the brewing group (5) and turn it from the left to the right. Leave it there so
that it can get warm and it gets ready for use.
8. Turn the machine on by pushing the on /off switch (11). The indicator light of the switch (11) comes on to
confirm the power supply.
9. Open the steam/hot water knob (4).
10. Position the lever switch (13) on hot water mode and lift the pump switch up (22).
11. Once water comes out of the steam nozzle (6), push the pump switch (22) down and close the steam/hot
water knob (4). Position the toggle switch (13) on coffee mode.
12. After completing all these operations, leave the machine on.
13. The PID (21) will visualize the degrees inside the boiler and will control the boiler’s heating.
14. The PID is already set from the producer on 95°C, i.e. the ideal temperature for a good cup of coffee. (If you
want to change the PID’s temperature, please follow the instructions written under How to set the
temperature inside the boiler by means of the PID).
Preparing an espresso:
15. Check that the water tank (1) has been filled in with water by looking at the water level indicator (20).
16. Press the on/off switch (11): the indicator light of the switch (11) will come on. Do this operation only if the
machine is off. If it’s on pass to the following point.
17. As soon as the PID’s display (21) shows the set temperature and the indicator light (14) goes off, the machine
is ready for use. Position the lever switch (13) on coffee mode.
18. Fit the single cup filter (9) or the two cup filter (10) into the filter holder (8) that has been warmed up by
leaving it attached to the brewing group as described in point 7.
19. Fill the filter with ground coffee by means of the supplied measure spoon (16): 1+ ½ measuring spoonful (16)
= 1 coffee cup - 3 measuring spoonful (16) = 2 coffee cups. Every time you fill the filter with a spoonful of
coffee, press the coffee with the coffee press/tamper (15) before proceeding to fill it with the next spoonful
and make sure that there are no coffee rests on the filter border.
20. Insert the filter holder (8) in the brewing group ring (5), turn it from left to right with force, and then put the
cup on the removable water drainage tray (7).
21. Push the pump switch (22) up.
22. Once you get the desired quantity of coffee, push the pump switch (22) down.
23. Remove the filter holder (8) and throw away the coffee grounds. Make sure that the filter holder is clean and
reposition it in the brewing group to warm up again.
Steam:
24. Check that the water tank (1) has been filled in with water by looking at the water level indicator (20).
25. Press the on/off switch (11): the indicator light of the switch (11) will come on. Do this operation only if the
machine is off. If it’s on pass to the following point.
26. Position the lever switch (13) on steam mode.
27. The lights (14) and (3) will go on and once the indicator light (3) goes off the machine is ready for a good and
constant steam distribution. ATTENTION: if you’ll wait to much and both lights will go off, the steam quantity
will be less constant.
28. Open the steam/hot water knob (4). First some water will flow out and then the steam.
29. Put the cup with the desired infusion under the steam tube (6) and turn the knob (4).
Pagina 7
English
30. Once the drink has been suitably frothed, close the steam/hot water knob (4).
31. IMPORTANT: after you have frothed your milk, reopen the steam/hot water knob (4), position the steam
switch (13) on hot water, and lift the pump switch (22) up. When the water flows out of the steam tube (6),
close the steam/hot water knob (4), at the same time push the switch (22) down and re-position the switch
(13) on coffee mode. Clean carefully the steam/hot water tube (6). This operation is needed in order to
restore the water circuit inside the machine’s tubes.
Hot water:
32. Check that the water tank (1) contains enough water by looking at the water level indicator (20).
33. Press the on/off switch (11): the indicator light of the switch (11) will come on. Do this operation only if the
machine is off. If it’s on pass to the following point.
34. Position the lever switch (13) on hot water.
35. As soon as the PID’s display (21) shows the set temperature and the indicator light (14) goes off, the machine
is ready for use.
36. Open the steam/hot water knob (4) and lift the pump switch (22) up.
37. Hot water will flow out from the steam arm (6) immediately.
38. Once you have got the desired quantity of water, repress the switch (22) down and close the steam/water
knob (4).
39. After obtaining hot water from the arm (6), make sure that there is still water in the tank (1).
HOW TO SET THE BOILER’S TEMPERATURE BY MEANS OF THE PID:
The PID has been set by the producer of this machine on a temperature of 95°C. In order to change the temperature
please proceed as follows:
- press the button ; as soon as the display shows the writing “PRG” press the button ;
- as soon as the display shows the boiler’s temperature, help yourself with the buttons and in
order to set the desired temperature, starting from a min. of 80C° up to a max. of 130C°.
- after 3 sec. from pressing the last button, the inserted temperature is memorized and the display shows the
set temperature.
NB: if the temperature is set too high, once a coffee request is made, the display starts to flash.
USEFUL TIPS:
- The single cup filter basket (9) and the two cup filter basket (10) do not need to be washed after each use but
please check that the holes are not obstructed.
- For best results, we suggest warming the cups up on the cup warmer (2) which works only when the machine
is on.
- The PID (21) is already set by the producer on the right temperature for an excellent espresso. During heating
and coffee or water distribution, the temperature can oscillate (+/- 10/12°C). Also, a warning has been
inserted: after 108°C the PID’s display shows the temperature but intermittently; this is normal and it warns
the user that the coffee will not be good if made with such high temperature.
ROUTINE MAINTANCE AND PRECAUTIONS:
- It is recommended to clean, after each use, the steam arm (6) and the strainer holder (8) carefully.
- For cleaning it is recommended the use of a wet damp cloth.
- Do not leave the machine outdoor. And do not immerse the machine in water.
- The machine can be used only by adults and must be kept away from children.
- Do not wash strainer and strainer holder in dishwasher
- During normal functioning some parts of the appliance body may reach high temperatures: please handle
with care!
TECNICAL DATA:
Voltage: 230 V – 50 Hz
Power: 1250 W
Heating time: ca. 3 min.
Pump pressure: 15 bar
PID’s regulation: from 80°C up to 130°C
Water tank: 2,7 litres
Dimensions (HxLxD): 23x27x34 cm
Weight: 9 kg
To be operated with ground coffee
Pagina 8
English
TROUBLESHOOTING:
We thank you for buying one of our products, projected and assembled in accordance with the most up-to date
technological innovations.
Following carefully the simple operations described in this manual, which respect all essential safety regulations, you
will get the best performances and will appreciate the remarkable reliability of this product in the years to come.
Please find below the description of the most frequent problems and of their solution:
PROBLEM CAUSE SOLUTION
1. Coffee blend not suitable for machine
1. Use a different coffee blend
2. Improper grinding
2. Adjust coffee grinding
Coffee is not creamy
3. Insufficient coffee in filter basket
3. Put more coffee in the filter basket and press
4. The filter holder has not be tightened
it properly
under the brewing group ring
4. Tighten better the filter holder
1. See section “Starting the Machine” and
1. The machine had not reached the
“Making an Espresso Coffee”
proper temperature
2. Filter-holder must be heated together with
The coffee is too cold
2. Filter-holder has not been preheated
the water – see section “Starting the Machine”
3. Cups have not been preheated
3. Properly heat the cups on the cup-warmer
4. ThermPID malfunctions.
(2)
4. Set the PID correctly.
1. Coffee too coarsely ground
1. Use a finer grinding step
The coffee comes out too
2. Insufficient coffee in the filter basket
2. Put more coffee in the filter basket
quickly
3. Coffee has not been pressed enough
3. Press the coffee more firmly
4. Old or unsuitable coffee
4. Use a different coffee blend
1. Insert the filter-holder correctly
1. Filter-holder not properly inserted
Coffee comes out
2. Put less coffee in the filter
2. Too much coffee in the filter
between the coffee group
3. Clean the edge of the filter-holder and the
3. Edge of the filter-holder not clean
and the filter-holder
brewing group seal
4. The douche seal is worn or damaged
4. Contact the nearest SERVICE CENTER
Coffee comes out in drops
Pagina 9
1. Coffee too finely ground
1. Use a coarser grinding
2. Too much coffee in the filter
2. Put less coffee in the filter
3. Coffee too firmly pressed
3. Press the coffee more gently
The machine does not
1. The water tube hole may be
1. Clean the hole with a needle
produce steam
obstructed
2. See section “Starting the Machine”
2. Lack of water in the tank
1. Lack of water in the tank
1. Fill the tank
2. Switch (13) not in right position
2. Position the switch (13) on coffee mode.
No coffee produced during
3. Coffee too finely ground
3. Use a coarser grinding
the coffee cycle
4. Too much coffee in the filter
4. Put less coffee in the filter basket
5. Coffee too firmly pressed
5. Press the coffee more gently
6. The brewing group douche is dirty
6. Contact the nearest SERVICE CENTER
1. No electricity
The machine does not
1. Restore electrical power
2. The power cable is not properly
work and the ON light on
2. Plug in the power cable correctly
plugged in
the main switch does not
3. Contact the nearest SERVICE CENTER for a
come on
replacement cable
3. The power cable is damaged
The ON light on the main
switch is on but the ready
1. Thermostat malfunction
1. Contact the nearest SERVICE CENTER
steam indicator does not
2. Heating element malfunction
2. Contact the nearest SERVICE CENTER
go on within 10 minutes
The inserted data and pictures can be subject to changes without previous notice for the improvement of the machine’s
performances.
WARRANTY TERMS: LEGAL WARRANTY
This product is covered by the warranty laws valid in the country where the product has been sold; specific
information about the warranty terms can be given by the seller or by the importer in the country where the product
has been purchased. The seller or importer is completely responsible for the product. The importer is completely
responsible also for the fulfilment of the laws in force in the country where the importer distributes the product,
including the correct disposal of the product at the end of its working life.
Inside the European countries the laws in force are the national laws implementing the EC Directive 44/99/CE.

Français
DESCRIPTION:
1. Réservoir
12. \
2. Chauffe tasses
13. Interrupteur café/eau chaude/vapeur
3. Voyant lumineux vapeur prête
14. Voyant lumineux café prêt
4. Bouton vapeur/eau chaude (sur la partie
15. Tasseur à café/Tamper
droite)
16. Mesure à café
5. Siège porte filtre
17. \
6. Distributeur vapeur/eau chaude
18. \
7. Grille amovible appuie tasse
19. Couvercle amovible réservoir
8. Porte filtre
20. Verre niveau de l’eau réservoir
9. Filtre 1 tasse
21. PID
10. Filtre 2 tasses
22. Interrupteur pompe
11. Interrupteur général on/off (sur la partie
gauche)
MODE D’EMPLOI:
Mise en fonction de la machine:
1. Otez la machine de la boite et éloignez tous les sachets et le matériel d’emballage.
2. Positionnez la machine sur une surface stable et plane, loin de fontes de chaleur et de robinets du réseau
hydrique.
3. Enlevez le couvercle amovible (19) du réservoir et ôtez le réservoir (1) en faisant attention à ne pas
endommager les tubes à l’intérieur.
4. Remplissez le réservoir (1) avec de l’eau froide.
5. Remettez le réservoir (1) dans son siège, en contrôlant que les tubes ne soient pliés et que le filtre mis à
l’extrémité d’un des deux tubes soit bien fixé. Remettez le couvercle (19).
6. Insérez la fiche du câble d’alimentation dans la prise de courant (vérifiez le voltage).
7. Insérez le porte filtre (8) dans le siège filtre (5) en tournant de gauche à droite, de sorte qu’il se réchauffe et
qu’il soit prêt à l’emploi.
8. Allumez la machine en appuyant sur l’interrupteur général (11). Le voyant lumineux de l’interrupteur même
s’illuminera pour confirmer l’alimentation au réseau électrique.
9. Ouvrez le bouton vapeur/eau chaude (4).
10. Positionnez l’interrupteur à levier (13) sur eau chaude et levez l’interrupteur pompe (22).
11. Lorsque l’eau sort du bec de la buse de vapeur (6), abaissez l’interrupteur (22) et fermez le bouton
vapeur/eau chaude (4). Ensuite positionnez l’interrupteur (13) en position café.
12. Lorsque ces opérations sont terminées, la machine peut rester branchée.
13. Le PID (21) montre les degrés à l’intérieur de la chaudière, en contrôlant la réchauffement.
14. Le PID est déjà régulé par le producteur de cette machine à 95°C, c’est à dire la température optimale pour la
préparation d’un bon café. (Si vous désirez changer cette température, vous êtes prié de suivre les
instructions fournies dans le paragraphe Comment réguler la température dans la cuve avec l’aide du PID)
Préparation du café expresso avec du café moulu:
15. Contrôlez que le réservoir (1) contient de l’eau, en regardant le verre niveau de l’eau (20).
16. Appuyez sur l’interrupteur général (11). Le voyant de l’interrupteur (11) s’allume (faites ces opérations
seulement si la machine est éteinte, autrement passez au point suivant). Positionnez l’interrupteur (13) en
position café.
17. Dès que l’écran du PID (21) montre la température régulée et que le voyant café prêt (14) s’éteint, la machine
est prête à l’emploi.
18. Insérez le filtre (9) 1 tasse ou le filtre 2 tasses (10) dans le porte-filtre (8), après l’avoir fait réchauffer comme
décrit au point 7.
19. Avec l’aide de la mesure à café (16) en dotation, (1+ ½ mesure = 1 tasse; 3 mesures = 2 tasses), remplissez
le filtre avec le café moulu. Après chaque mesure mise dans le filtre utilisez le tamper (15) en dotation pour
presser le café. Assurez-vous que le bord du portefiltre soit propre, sans traces de café, qui pourraient
empêcher la fixation correcte du portefiltre, en causant des pertes.
20. Insérez le porte filtre (8) dans le siège du porte-filtre (5) en le tournant, avec force, de gauche vers la droite;
ensuite positionnez les tasses sur la grille appuie tasses (7).
21. Levez l’interrupteur pompe (22).
22. Lorsque la quantité de café souhaitée est atteinte, abaissez de nouveau l’interrupteur (22).
23. Enlevez le porte-filtre (8) et jetez le marc de café, vérifiez qu’il soit propre et insérez-le dans le support (5)
pour le maintenir à la juste température.
Pagina 10
Français
Vapeur:
24. Contrôlez que le réservoir (1) contient de l’eau, en regardant le verre niveau du réservoir (20).
25. Appuyez sur l’interrupteur général (11). Le voyant de l’interrupteur même s’allume (faites ces opérations
seulement si la machine est éteinte, autrement passez au point suivant).
26. Positionnez l’interrupteur (13) sur vapeur.
27. Les voyants (14) et (3) s’allument et dès que le voyant vapeur prête (3) s’éteint, la machine est prête à
distribuer une bonne quantité de vapeur. ATTENTION : si on attend trop de temps et les 2 voyants lumineux
s’éteignent la quantité de vapeur sera moins constante.
28. Ouvrez le bouton vapeur/eau chaude (4). Au début il y aura une perte d’eau et de la vapeur.
29. Mettez, sous la buse vapeur (6), le récipient contenant la boisson souhaitée et tournez complètement le
bouton (4).
30. A la fin de l’opération, refermez le bouton vapeur/eau chaude (4).
31. IMPORTANT: après chaque utilisation de la vapeur, surtout si cela a été utilisée pour faire la crème du lait
pour la préparation d’un cappuccino, ouvrez de nouveau le bouton vapeur/eau chaude (4), positionnez
l’interrupteur (13) sur eau chaude et levez l’interrupteur (22). Quand l’eau commence à sortir de la buse
vapeur/eau chaude (6), fermez le bouton vapeur/eau chaude (4), simultanément abaissez l’interrupteur (22)
et remettez l’interrupteur (13) en fonction café; nettoyez la buse vapeur/eau chaude (6). Cette opération est
nécessaire pour maintenir les conduits eau/vapeur propres et rétablir le circuit de l’eau dans les conduits.
Eau chaude:
32. Contrôlez que le réservoir (1) contient de l’eau, en regardant le verre niveau du réservoir (20).
33. Appuyez sur l’interrupteur général (11). Le voyant de l’interrupteur même s’allume (seulement si la machine
est éteinte, autrement passer au point suivant).
34. Positionnez l’interrupteur (13) sur eau chaude.
35. Lorsque l’écran du PID (21) montre la température régulée et le voyant (14) s’éteint, la machine est prête à
l’emploi.
36. Ouvrez le bouton de vapeur/eau chaude (4) et levez l’interrupteur pompe (22).
37. Il y aura immédiatement une sortie d’eau de la buse vapeur (6).
38. Lorsque la quantité d’eau souhaitée est atteinte, abbaissez de nouveau sur l’interrupteur (22) et refermez le
bouton de vapeur/eau chaude (4).
39. Après le prélèvement d’eau chaude, il est recommandé de contrôler que le réservoir (1) contient de l’eau.
COMMENT REGULER LA TEMPERATURE DANS LA CHAUDIERE AVEC L’AIDE DU PID (21):
Le PID a été régulé à 95°C. Pour changer la température vous êtes prié de suivre les points suivants:
- appuyez sur le bouton ; dès que l’écran du PID montre l’écriture “PRG” appuyez sur le bouton
- quand l’écran du PID montre la température de la chaudière, régulez avec les boutons et la
valeur de la température desirée, à partir de 80C° jusqu’à 130C°.
- 3 sec. après avoir appuyé le dernier bouton, la température est dans la Mèmoire et l’écran montre la
température régulée.
NB: si la température est régulée trop haute, une fois demandé le café, l’écran du PID commencera à s’allumer avec
intermittance.
CONSEILS PRATIQUES:
- Les filtres 1 tasse (9) et 2 tasses (10) ne doivent pas être nécessairement lavés après chaque utilisation.
L’important est de s’assurer que les trous ne sont pas colmatés.
- Pour obtenir un excellent résultat, il est conseillé de réchauffer les tasses sur le chauffe-tasses (2) qui ne
fonctionne que si la machine est allumée.
- Le PID a été régulé avec des valeurs imposées par le producteur pour obtenir un café excellent. Pendant le
réchauffage et la distribution du café ou eau chaude la température peut osciller (+/- 10/12°C) par rapport à la
température régulée. Il est inclus aussi un avertissement: après 108°C l’écran du PID montre la température
mais avec intermittence; c’est normal, en s’agissant d’un avertissement pour l’utilisateur que le café ne sera
pas bon s’il sera fait en utilisant une température si haute.
Pagina 11

Français
ENTRETIEN COURANT ET PRECAUTIONS:
- Il est conseillé de nettoyer, après chaque utilisation, la buse de vapeur (6) et le portefiltre (8).
- Pour le nettoyage, utilisez un chiffon humidifié d’eau.
- Ne pas exposer l’appareil aux agents atmosphériques.
- Ne pas plonger l’appareil dans l’eau.
- Ne faire fonctionner l’appareil que sous le contrôle des adultes et le tenir hors de la portée des enfants.
- Ne pas laver filtre et porte-filtre dans la machine à laver la vaisselle.
- Pour tout problème il faut s’adresser au personnel technique autorisé.
- Pendant le normal fonctionnement de la machine certaines parties de la carrosserie peuvent atteindre des
hautes températures : manéger avec précaution!
DONNEES TECHNIQUES
Alimentation électrique : 230V – 50 Hz
Puissance : 1250 W
Durée de réchauffage : environ 3 min
Pression de la pompe : 15 bar
Régulation du PID: à partir de 80°C et jusqu’à 130°C
Capacité du réservoir d’eau : 2,7 litres
Dimensions: 23x27x34 cm
Poids: 9 kg
Fonctionnement avec: café moulu
CONDITIONS DE GARANTIE: GARANTIE LEGALE
Ce produit est couvert par les normes de garantie en vigueur dans le pays où il a été vendu; informations plus
spécifiques peuvent être fournies par le revendeur ou par l'importateur dans le pays où le produit a été acheté; le
revendeur ou l'importateur est complètement responsable de ce produit. L'importateur est complètement
responsable même pour l'accomplissement des lois en vigueur dans le pays où l'importateur distribue le produit, y
compris la correcte élimination du produit au terme de son utilisation.
Dans les pays européens
il faut prendre en considération les lois nationales relatives à l'application de la Directive EC
44/99/CE.
Pagina 12
Français
SOLUTIONS AUX PROBLEMES PLUS FREQUENTS
Nous Vous remercions pour avoir acheté notre produit, il est fait selon les nouvelles innovations technologiques.
Vous devez seulement suivre les indications relatives à l’usage correct en conformité des prescriptions de sûreté
indiquées sur ce manuel et Vous aurez les meilleurs prestations et pourrez vérifier la fiabilité de ce produit au cours
des années.
De suite Vous trouvez un tableau avec quelques-uns mal fonctionnements et leurs relatives solutions :
PROBLEMÈS CAUSE SOLUTION
1. Le mélange de café n'est pas
approprié à ce type de machine.
1. Remplacez le café.
Il n'y a pas de mousse
2. La mouture n'est pas correcte.
2. Réglez la mouture du café.
sur le café.
3. La quantité de café n’est pas suffisante
3. Augmentez la dose du café et presser-le bien.
4. Le porte filtre n’a pas été bien fixé
4. Fixez bien le porte filtre.
correctement.
1. Respectez les indications présentées au
1. La machine n’était pas à la bonne
paragraphe « Mise en fonction de la machine »
température.
et « Préparation du café espresso ».
Le café sort trop froid.
2. Le porte-filtre n’a pas été préchauffé.
2. Le porte-filtre doit être chauffé en même
3. Les tasses n'ont pas été préchauffées.
temps que l’eau - Voir paragraphe « Mise en
4. Le thermostat ne fonctionne pas dans
fonction de la machine »
de bonnes limites.
3. Chauffez les tasses sur le chauffe-tasse (2).
4. S’adresser au CENTRE D’ASSISTANCE
1. Le café est moulu trop grossièrement.
1. Le réglage de la mouture doit être plus fin.
Le café sort trop
2. Il n'y a pas assez de café.
2. Augmentez la dose de café.
rapidement.
3. Le café n'est pas assez pressé.
3. Pressez davantage le café.
4. Café vieux ou inapproprié.
4. Remplacez le café/la dosette.
1. Le porte-filtre n'est pas inséré
1. L’insérer correctement.
correctement.
Le café sort entre le
2. Diminuez la quantité de café.
2. Il y a trop de café dans le filtre.
groupe de distribution
3. Enlevez les résidus de café du bord du porte-
3. Le bord du porte-filtre n’a pas été
et le porte-filtre.
filtre.
nettoyé.
4. S’adresser au CENTRE D’ASSISTANCE.
4. Le joint sous la coupe est usé.
Le café sort goutte à
1. Le café est moulu trop finement
1. Le réglage de la mouture doit être plus gros.
goutte.
2. Il y a trop de café.
2. Diminuez la quantité de café.
3. Le café est trop pressé.
3. Pressez moins le café.
1. L’orifice de la partie finale du tube de
1. Nettoyez l’orifice à l'aide d'une aiguille.
La machine ne fournit
vapeur est bouché.
2. Voir paragraphe «Mise en fonction de la
pas de vapeur
2. Il n'y a pas d’eau dans le réservoir.
machine».
1. Il n'y a pas d’eau dans le réservoir.
1. Versez de l’eau dans le réservoir.
2. L’interrupteur vapeur est appuyé.
2. Relâchez l’interrupteur vapeur.
Pendant la distribution
3. Le café est moulu trop finement.
3.Le remplacer par du café moulu plus grossièrement.
le café ne sort pas
4. Il y a trop de café.
5. Le café est trop pressé.
6. Douchette sale.
Pagina 13
4. Diminuez la quantité de café dans le filtre.
5. Pressez moins le café.
6. S’adresser au CENTRE D’ASSISTANCE.
La machine ne
1. Absence de courant.
1. Vérifiez l’alimentation courant.
fonctionne pas et le
2. La fiche du câble d’alimentation n'est
2. Branchez correctement la fiche du câble
voyant de tension sur
pas bien branchée.
d’alimentation dans la prise de courant.
l’interrupteur ne
3. Le câble d’alimentation est
3. S’adresser au CENTRE D’ASSISTANCE pour le
s’allume pas.
endommagé.
remplacement.
Le voyant tension est
allumé et le voyant
vapeur ne s’allume plus
1. Les thermostats de service ne
fonctionnent pas.
1. S’adresser au CENTRE D’ASSISTANCE.
2. La résistance est interrompue ou
2. S’adresser au CENTRE D’ASSISTANCE .
grillée.
Les données et les images indiquées peuvent etre changées afin d’améliorer les prestations du produit meme.

Deutsch
Komponenten:
1. Wassertank
11. Haupt-Ein/Aus-Schalter (auf linkser Seite)
2. Passiv geheizte Tassenwarmhaltefläche
12. \
3. Lämpchen für “Dampf fertig”
13. Kipphebel-Schalter Espresso/Warmwasser/Dampf
4. Drehknopf für Dampf oder Warmwasserentnahme (auf
14. Lämpchen für „Kaffee bereit“
rechter Seite)
15. Plastik-Tamper
5. Siebträgerhalterung
16. Plastik-Meßlöffel
6. Dampfhahn für Dampf oder Warmwasserentnahme
17. \
7. Entfernbare Tassenabstellfläche
18. \
8. Siebträger
19. Deckel für Wasserbehälterfach
9. Filter für 1 Tasse
20. Sichtfenster für Wasserstandsanzeige
10. Filter für 2 Tassen
21. Themo-PID
22. Kipphebel-Schalter für Pumpe
BEDIENUNGSANLEITUNG:
Erst-Inbetriebnahme der Maschine:
1. Entnehmen Sie die Maschine aus der Verpackungsschachtel und entfernen Sie alle weiteren
Verpackungsmaterialien wie Plastik etc.
2. Stellen Sie die Maschine auf eine ebene und stabile Fläche und halten Sie die Maschine fern von Wärmequellen
und/oder Wasserquellen.
3. Öffnen Sie den Deckel für das Wasserbehälterfach (19), welches sich hinten oben auf der Maschine befindet und
entnehmen Sie den Wasserbehälter (1) vorsichtig, ohne die im Wasserbehälter befindlichen Schläuche zu
beschädigen.
4. Befüllen Sie den Wasserbehälter (1) mit kaltem Wasser.
5. Stellen Sie den Wasserbehälter (1) anschließend wieder an seinen vorgesehenen Platz zurück und kontrollieren
Sie, dass die beiden Schläuche (welche sich im Wassertank befinden sollen) nicht geknickt sind und dass sich
der kleine Filter am Ende des einen Schlauches befindet und gut befestigt ist. Anschließend den Deckel (19)
wieder schließen.
6. Schließen Sie das Stromkabel der Maschine an eine Steckdose an und beachten Sie die korrekte
Stromspannung.
7. Nehmen Sie den Siebträger (8) und setzen diesen in die Siebträgerhalterung (5) ein, indem Sie den Siebträger
von links nach rechts hineindrehen. Damit kann der Siebträger sich aufwärmen und ist somit leichter bereit für
die spätere Nutzung.
8. Schalten Sie die Maschine an, indem Sie den Hauptschalter (11) betätigen. Das Aufleuchten des Lämpchen des
gleichen Hauptschalters zeigt Ihnen die Stromversorgung der Maschine an.
9. Öffnen Sie den Drehknopf für Dampf/Warmwasserentnahme (4).
10. Stellen Sie den Kipphebelschalter (13) auf warmes Wasser (mittlere Stellung) und betätigen Sie sofort den
Kipphebel-Schalter für die Pumpe (22). Die Maschine beginnt zu pumpen und den Heizkessel mit Wasser zu
befüllen.
11. Sobald Wasser aus dem Dampfrohr (6) austritt, den Kipphebel-Schalter für die Pumpe (22) wieder
betätigen/abstellen. Der Heizkessel ist somit mit Wasser befüllt. Schließen Sie dann den Drehknopf für
Dampf/Warmwasserentnahme (4) ein. Betätigen Sie den Kipphebel-Schalter für die Pumpe (22) auf Kaffee.
12. Nachdem Sie alle diese Punkte befolgt haben, kann die Maschine auch angeschaltet bleiben.
13. Die Thermo-PID-Steuerung (21) zeigt die Heizkesseltemperatur an und kontrolliert die Temperatur im
Heizkessel.
14. Die Thermo-PID-Steuerung ist ab Werk auf 95 Grad eingestellt, die ideale Temperatur für die Espresso-
Zubereitung. (Wenn Sie die Temperatur der Thermo-PID-Steuerung ändern möchten, befolgen Sie bitte die
Anleitungen im Kapitel „Regelung der Heizkesseltemperatur mit Hilfe der Thermo-PID-Steuerung“)
Zubereitung des Espresso mit gemahlenem Pulver:
15. Stellen Sie sicher, dass der Wasserbehälter (1) mit Wasser befüllt ist, indem Sie den Wasserstand im
Sichtfenster für Wasserstandsanzeige (20) kontrollieren.
16. Schalten Sie die Maschine an, indem Sie den Hauptschalter (11) betätigen. Das Lämpchen des gleichen
Hauptschalters leuchtet auf. (nur wenn die Maschine ausgeschaltet ist, ansonsten setzen Sie mit den nächsten
Punkten fort). Stellen Sie den Kipphebelschalter für Espresso/Dampf/Warmwasserentnahme (13) auf Espresso
(untere Stellung).
17. Sobald die Thermo-PID-Steuerung (21) die eingestellte Temperatur anzeigt und das Lämpchen für „Kaffee
bereit“ (14) ausleuchtet, ist die Maschine betriebsbereit.
18. Setzen Sie den Filter für eine Tasse (9) oder für zwei Tassen (10) in den Siebträger (8) ein, der wie in Punkt 7
beschrieben idealerweise angewärmt ist.
19. Mit Hilfe des Plastik-Meßlöffel (16) befüllen Sie den Filter mit gemahlenem Pulver wie folgt:
- 1+ ½ gestrichenem Meßlöffel für 1 Tasse Espresso
- 3 gestrichene Meßlöffel für 2 Tassen Espresso
- Nach jedem Einfüllen drücken Sie das Pulver mit dem Plastiktamper fest an und vergewissern sich, dass der
Rand des Siebträgers sauber und frei von Pulver ist, welches verhindern könnte, dass der Siebträger korrekt
eingesetzt werden kann und zu Wasserverlusten am Siebträger führen könnte.
Pagina 14

Deutsch
20. Nehmen Sie den Siebträger (8) und setzen Sie diesen in die Siebträgerhalterung (5) ein, indem Sie den
Siebträger von links nach rechts kräftig hineindrehen und anschließend die Espresso-Tassen auf der
Tassenabstellfläche (7) unter den Auslauf des Siebträgers positionieren.
21. Betätigen Sie den Kipphebel-Schalter für die Pumpe (22).
22. Wenn die gewünschte Menge des Espresso erreicht ist, den Kipphebel-Schalter für die Pumpe (22) wieder
abstellen.
23. Entnehmen Sie den Siebträger (8) und entleeren Sie diesen von den Pulverresten. Vergewissern Sie sich, dass
der Siebträger sauber ist und spannen ihn wieder in die Siebträgerhalterung (5) ein, damit der Siebträger warm
bleibt.
Dampfentnahme:
24. Stellen Sie sicher, dass der Wasserbehälter (1) mit Wasser befüllt ist, indem Sie den Wasserstand im
Sichtfenster für Wasserstandsanzeige (20) kontrollieren.
25. Schalten Sie die Maschine an, indem Sie den Hauptschalter (11) betätigen. Das Lämpchen des gleichen
Hauptschalters leuchtet auf. (nur wenn die Maschine ausgeschaltet ist, ansonsten setzten Sie mit den nächsten
Punkten fort).
26. Stellen Sie den Kipphebelschalter für Espresso/Dampf/Warmwasserentnahme (13) auf Dampf.
27. Das Lämpchen (14) und das Lämpchen (3) dauerhaft aufleuchten; sobald das Lämpchen Dampf-bereit (3)
ausleuchtet kann die Maschine Dampf produzieren. ACHTUNG: falls Sie zu viel warten und die beiden
Lämpchen ausleuchten, wird die Dampfmenge nicht konstant sein.
28. Öffnen Sie den Drehknopf für Dampf oder Warmwasserentnahme (4). Zu Beginn wird aus dem Dampfhahn (6)
ein wenig Wasser austreten, gefolgt von Dampf.
29. Halten Sie unter den Dampfhahn für Dampf oder Warmwasserentnahme (6) das Gefäß mit der gewünschten
Flüssigkeit (Milch) und öffnen Sie den Drehknopf (4) komplett.
30. Am Ende des Aufschäumens schließen Sie den Drehknopf (4).
31. WICHTIG: nach jeder Dampfentnahme – insbesondere wenn der Dampf zum Aufschäumen von Milch genutzt
wird – nochmals den Drehknopf für Dampf (4) komplett öffnen und den Kipphebel-Schalter
Espresso/Warmwasser/Dampf (13) auf Warmwasser stellen und den Kipphebel für die Pumpe (22) anstellen.
Sobald aus dem Dampfhahn (6) Wasser austritt, schließen Sie den Drehknopf (4), stellen den Kipphebelschalter
für die Pumpe (22) ab und stellen den Espresso/Dampf/Warmwasserentnahme (13) wieder auf Espresso.
Reinigen Sie den Dampfhahn (6) von außen von (Milch-)Resten. Diese Vorgehensweise ist notwendig, um die
Wasser- und Dampfwege sauber zu halten und den Wasserkreislauf im Inneren der Maschine wieder
herzustellen.
Warmwasserentnahme:
32. Stellen Sie sicher, dass der Wasserbehälter (1) mit Wasser befüllt ist, indem Sie den Wasserstand im Sichtfenster
für Wasserstandsanzeige (20) kontrollieren.
33. Schalten Sie die Maschine an, indem Sie den Hauptschalter (11) betätigen. Das Lämpchen des gleichen
Hauptschalters leuchtet auf. (nur wenn die Maschine ausgeschaltet ist, ansonsten setzten Sie mit den nächsten
Punkten fort).
34. Stellen Sie den Kipphebelschalter für Espresso/Dampf/Warmwasserentnahme (13) auf Warmwasserentnahme.
35. Sobald die Thermo-PID-Steuerung (21) die eingestellte Temperatur anzeigt und das Lämpchen für „Maschine
betriebsbereit“ (14) ausleuchtet, ist die Maschine betriebsbereit.
36. Öffnen Sie den Drehknopf für Dampf oder Warmwasserentnahme (4) und betätigen Sie den Kipphebel für die
Pumpe (22).
37. Sie erhalten nunmehr sofort Warmwasser aus dem Dampfhahn (6).
38. Wenn die gewünschte Menge an Warmwasser erreicht ist, den Kipphebel für die Pumpe (22) wieder umlegen und
anschließend den Dampfdrehknopf (4) wieder schließen.
39. Nach der Warmwasser-Entnahme wird empfohlen, den Wasserstand im Wasserbehälter (1) zu kontrollieren.
Regelung der Heizkesseltemperatur mithilfe der Thermo-PID-Steuerung
Die Thermo-PID-Steuerung ist ab Werk auf 95 Grad eingestellt. Um die Temperatursteuerung zu verändern, gehen
Sie bitte wie folgt vor:
- Drücken Sie die Taste
▼
; sobald auf dem Display die Schrift „PRG“ erscheint, drücken Sie die Taste
▲
.
- Wenn das Display nun die eingestellte Heizkesseltemperatur anzeigt, können Sie die gewünschte Temperatur mit
den Tasten
▲
und
▼
einstellen, zwischen Minimum 80 C und Maximum 130C.
- 3 Sekunden nach Bedienung der letzten Taste wird der eingestellte Wert gespeichert und die Temperatur kann am
Display abgelesen werden.
Anmerkung: Wenn die Temperatur auf einen zu hohen Wert eingestellt wird, beginnt das Display zu blinken, sobald
man einen Espresso zubereiten will.
Pagina 15

Deutsch
Nützliche Hinweise:
- Die Filter für 1 Tasse (9) u. 2 Tassen (10) müssen nicht notwendigerweise jedes Mal nach der Nutzung gereinigt
werden. Wichtig ist sicherzustellen, dass die Löcher der Siebe nicht „zu“ sind.
- Um ein optimales Ergebnis zu erhalten, empfiehlt es sich, die Tassen auf der passiven Tassenwarmhaltefläche
aufzuwärmen, welche nur bei eingeschalteter Maschine funktioniert.
- Die Temperaturregelung des Thermo-PID ist ab Werk auf einen optimalen Wert für einen Espresso eingestellt.
Während der Aufheizzeit, des Espressobezuges oder der Warmwasserentnahme kann die Temperatur eine
Schwankung aufweisen von +/- 10/12 Grad von der eingestellten Temperatur. Darüber hinaus ist im Thermo-PID
eine Warnung einprogrammiert worden. Über 108 Grad hinaus zeigt der Thermo-PID die Temperatur an, jedoch
blinkend! Dies ist normal, warnt jedoch den Nutzer, dass der Espresso bei einer solch hohen Temperatur nicht
korrekt herauslaufen wird.
Übliche Wartungen und Vorsichtsmaßnahmen:
• Es wird empfohlen, nach jeder Nutzung den Siebträger (8) und den Dampfhahn (6) sorgfältig zu reinigen.
• Für die Reinigung des Maschinengehäuses wird ein feuchtes Tuch empfohlen.
• Die Maschine nicht der Witterung aussetzen und nicht in Wasser tauchen.
• Die Maschine nur unter Kontrolle von Erwachsenen verwenden und fern von Kinderhänden halten.
• Filter und Siebträger nicht in der Geschirrspülmaschine reinigen.
• Nicht in die Maschine eingreifen, bei jeglichen Problemen wenden Sie sich an ein autorisiertes Service-
Center/autorisiertes technisches Personal von Lelit.
• Während des normalen Funktionieren der Maschine können einige Teile des Gehäuses eine höhe Temperatur
erreichen: vorsichtig behandeln!
TECHNISCHE DATEN:
Betriebspannung: 230V – 50Hz -- Leistung: 1250W
Erwärmungszeit: 3 Min. ungefähr
PID Regulierung: von min. 80°C bis zum max. 130°C
Pumpsdruck: 15 Bar
Wasertankvolumen: 2,7 Lt.
Maßen: (HxLxD): 23x27x34 cm
Gewicht: 9kg
Funktioniert mit gemahlenem Kaffee
GARANTIEBEDINGUNGENЮ GESETZLICHE GARANTIE
Dieses Produkt ist von den Gesetzten gedeckt, die in dem Land gültig sind, wo das Produkt verkauft wurde. Mehrere
Informationen darüber kann der Händler oder der Importeur geben, der für das verkaufte Produkt völlig
verantwortlich ist. Der Importeur ist auch für die Vollziehung der Gesetzte im dem Land, wo das Produkt verteilt
wurde, völlig verantwortlich. Das enthält auch die Anordnung der korrekten Entsorgung des Produkts am Ende seiner
Nutzzeit.
In den EU-Ländern sind die staatlichen Gesetzte bezüglich der EU Richtlinie 44/99/CE zu betrachten.
Pagina 16

Deutsch
STÖRUNGEN UND STÖRUNGSBEHEBUNG:
Wir danken Ihnen, um unser Produkt eingekauft zu haben. Es ist der letzten technologischen Neuerungen gemäß
gebaut. Sie sollen die einfache Angabe bezüglich des Betriebs unseres Produkts ausführen, die in Übereinstimmung
mit den Schutzvorschriftlichten dieses Handbuchs sind, so können Sie die beste Leistung haben werden und die
Zuverlässigkeit während der Jahre überzuprüfen.
Hier unter finden Sie eine Tabelle über einenge Störungen und die Störungsbehebung:
STÖRUNG URSACHE MASSNAHME ZUR BEHEBUNG
Auf dem Kaffee bildet
1. Ungeeignete Kaffeemischung.
1. Verwenden Sie nur für die Maschine geeignete
sich keine Crema.
2. Falscher Mahlgrad.
Kaffeemischungen.
3. Zu wenig Kaffee im Sieb.
2. Verwenden Sie nur Kaffee in der für die Maschine
4. Siebträger nicht korrekt eingespannt
geeigneten Feinheit.
3. Geben Sie mehr Kaffee in das Sieb.
4. Spannen Sie den Siebträger fest ein
Kaffee tritt zu kalt
1. Maschine hat die vorschriftsmäßige
1. Beachten Sie die Angaben im Kapitel
aus.
Betriebstemperatur nicht erreicht.
„Inbetriebnahme“ - „Zubereitung eines Espressos“
2. Siebträger nicht vorgewärmt
2. Der Siebträger muss gleichzeitig mit dem Gerät
vorgewärmt werden, siehe Kapitel „Inbetriebnahme“.
3. Tasse nicht vorgewärmt.
4. Druckwächter falsch eingestellt.
Pagina 17
3. Sorgen Sie für die Vorwärmung der Tassen.
4. Wenden Sie sich an den KUNDENDIENST.
Der Kaffee tritt zu
1. Kaffee zu grob gemahlen.
1. Geben Sie feiner gemahlenen Kaffee in den Sieb.
schnell aus.
2. Zu wenig Kaffee im Sieb.
2. Geben Sie mehr Kaffee in das Sieb.
3. Kaffee zu leicht angepresst
3. Pressen Sie den Kaffee stärker an.
4. Kaffee/Kaffeetab zu alt oder
4. Frischen bzw. anderen Kaffee/Kaffeetab
ungeeignete Qualität.
verwenden.
Kaffeeaustritt
1. Siebträger nicht korrekt
1. Spannen Sie den Siebträger fest ein.
zwischen Brühkopf
eingespannt.
2. Reduzieren Sie die Menge des Kaffees im Sieb.
und Siebträger
2. Zu viel Kaffee im Sieb.
3. Befreien Sie den Rand des Siebträgers von
3. Rand des Siebträgers verschmutzt.
Kaffeeresten.
4. Wenden Sie sich an den KUNDENDIENST.
4. Siebträgerdichtung abgenutzt.
Der Kaffee tritt nur in
1. Kaffee zu fein gemahlen.
1. Geben Sie gröber gemahlenen Kaffee in das Sieb.
Tropfen aus
2. Zu viel Kaffee im Sieb.
2. Reduzieren Sie die Menge des Kaffees im Sieb.
3. Kaffee zu stark gepresst.
3. Pressen Sie den Kaffee weniger stark an.
Maschine gibt keinen
1. Das Dampfrohr ist zugesetzt.
1. Reinigen Sie die Öffnung mit einer Nadel.
Dampf ab.
2. Kein Wasser im Wassertank.
2. Siehe Kapitel 11.1
Während des
1. Kein Wasser im Wassertank.
1. Füllen Sie Wasser in den Wassertank.
Abgabevorgangs tritt
2. Schalter für Dampf steht auf EIN.
2. Setzen Sie den Schalter für Dampf auf AUS.
kein Kaffee aus.
3. Kaffee zu fein gemahlen.
3. Geben Sie gröber gemahlenen Kaffee in das Sieb.
4. Zu viel Kaffee im Filtereinsatz.
4. Reduzieren Sie die Menge des Kaffees im Sieb.
5. Kaffee zu stark gepresst.
5. Pressen Sie den Kaffee weniger stark an.
6. Dampfdüse zugesetzt.
6. Dampfdüse reinigen oder austauschen.
Die Kontrollleuchte
1. Die Thermostate der Maschine sind
1. Wenden Sie sich an den KUNDENDIENST.
«Maschine EIN»
ausgefallen, oder die
leuchtet auf, doch das
Sicherheitsvorrichtung ist aktiviert.
im Wasserkessel
2. Der Heizdraht ist gebrochen oder
2. Wenden Sie sich an den KUNDENDIENST.
befindliche Wasser
durchgebrannt.
wird nichterhitzt.
Maschine schaltet sich
1. Kein Netzstrom.
1. Kontrollieren Sie das Stromnetz.
nicht ein, und die
2. Der Stecker des Netzkabels ist nicht
2. Stecken Sie den Stecker des Netzkabels
Kontrollleuchte des
richtig eingesteckt.
vorschriftsmäßig in die Netzsteckdose.
Hauptschalters
3. Netzkabel beschädigt.
3. Wenden Sie sich zum Austausch des Netzkabels
leuchtet nicht auf.
an den autorisierten KUNDENDIENST.
Die eingefügten Daten und Fotos können ohne Voranmeldung verändert werden, um die Leistungen des Produkts zu
verbessern

Русский
КОМПОНЕНТЫ:
1. Контейнер для воды
12. \
2. Платформа для подогрева чашек
13. Включатель: «пар/горячая вода/кофе»
3. Контрольная лампочка: «пар готов»
14. Контрольная лампочка: «кофе готов»
4. Регулятор «пар/горячая вода» (на боковой
15. Прессователь/темпер
правой стороне)
16. Мерная ложка
5. Группа с кольцом сцепления для
17. \
фильтродержателя
18. \
6. Трубка выдачи «пар/горячая вода»
19. Съемная крышка контейнера для воды
7. Съемный поддон для сбора остатков воды
20. Контроль уровня воды в резервуаре
8. Фильтродержатель
21. PID температурный контроль
9. Фильтр для 1 порции кофе
22. Выключатель насоса
10. Фильтр для 2 порций кофе
11. Общий выключатель «on/off» - «вкл./выкл.»
(на левой стороне)
ИНСТРУКЦИЯ ПО ИСПОЛЬЗОВАНИЮ:
Подключение и наладка функционирования кофеварки
ВНИМАНИЕ покупателей из России: кофеварки, поставляются с бойлерами, полностью освобожденными от
воды, в связи с климатическими условиями; для того, чтобы избежать перегрева нагревательного элемента,
после подключения кофеварки бойлер нужно сразу заполнить водой, для этого выполняйте пункты 8-11
немедленно без перерыва!
1. Достаньте кофеварку для приготовления кофе эспрессо из коробки и освободите все предметы в
оснащении от полиэтиленовой упаковки.
2.Установите электроприбор на прочной горизонтальной поверхности вдали от источников тепла и
водоснабжения.
3.Снимите крышку контейнера для воды, установленную сверху кофеварки. Осторожно выньте контейнер
для воды (1) из кофеварки, контролируя сохранность трубочек, находящихся внутри него.
4. Наполните контейнер (1) холодной водой.
5. Вставьте контейнер (1) в его место расположения в кофеварке, контролируя, чтобы трубочки не погнулись
и фильтр, установленный на краю одного из них, был прочно закреплен.
6. Вставьте вилку шнура электропитания в электророзетку (проверьте напряжение).
7. Вставьте фильтродержатель (8) в кольцо сцепления в месте установки фильтродержателя (5), поворачивая
слева направо. Таким образом, он подогреется и сократит время готовности к использованию.
8. Включить электроприбор, нажав на кнопку общего выключателя (11). Световая индикация лампочки
напряжения (11) подтверждает наличие электроснабжения.
9. Откройте регулятор подачи горячего пара/воды (4).
10. Переключите выключатель рычага (13) на рисунок «горячая вода» и включите насос вверх (22).
11. Когда вода начнет выходит из паровой трубки (6), выключите насос вниз (22) и закройте регулятор
пара/воды (4).
12. Проделав вышеуказанные операции, кофеварка может быть оставлена включенной.
13. PID температурный контроль в бойлере (21), отображает и управляет температурой воды в бойлере.
14. PID уже установлен от производителя на 95°C, это идеальная температура для хорошей чашки эспрессо.
(Если Вы захотите изменить температуру PID, пожалуйста, следуйте за инструкциями, написанными под
разделом: Как установить температуру в бойлере, используя PID ).
Приготовление кофе эспрессо из молотого кофе:
15. Убедитесь, что в контейнере (1) есть вода, проверяя ее уровень через специальное окошко контроля
уровня воды (20).
16. Включите электроприбор, нажав на кнопку общего выключателя (11): световая индикация кнопки общего
выключателя (11) подтверждает наличие электроснабжения. Проделайте эту операцию, только в том
случае, если машина была выключена. Если она была уже включена, переходите к следующему пункту.
17. Как только PID (21) покажет на дисплее температуру в бойлере и контрольная лампочка (14) погаснет,
машина готова к использованию. Переключите выключатель рычага (13) на способ кофе.
18. Вставьте фильтр для 1 порции кофе (9) или фильтр для 2-х порций кофе (10) в фильтродержатель (8),
который должен быть подогрет, как описано в пункте 7.
19. С помощью мерной ложки (16), которая входит в комплект, наполните фильтр молотым кофе, как указано
ниже: 1+1/2 мерной ложки = 1 порция; 3 мерной ложки = 2 порции. Каждый раз, когда Вы заполняете
фильтр ложкой молотого кофе прессуйте его прессователем-темпером (15), который входит в комплект.
Убедитесь, что края фильтродержателя чистые и на них нет остатков кофе.
20. Вставьте фильтродержатель (8) в кольцо сцепления в месте установки фильтродержателя (5), поворачивая
его с силой слева направо, затем поставьте чашечки для кофе на съемный поддон (7).
21. Переключите рычаг насоса вверх (22).
22. По достижении необходимого количества кофе в чашечке, переключите рычаг насоса вниз (22) выключив
его.
Pagina 18

Русский
23. Удалите из фильтродержателя (8) кофейную гущу. Проверьте, чтобы фильтродержатель был чистым и
установите его в кольцо сцепления (5), чтобы продолжал нагреваться.
Пар:
24. Убедитесь, что в контейнере для воды (1) есть вода, проверяя ее уровень через специальное окошко
контроля уровня воды (20).
25. Включите электроприбор, нажав на кнопку общего выключателя (11). Световая индикация лампочки
напряжения (11) подтверждает наличие электроснабжения. Проделайте эту операцию, только в том случае,
если машина выключена. Если кофеварка включена, переходите к следующему пункту.
26. Переключить выключатель рычага (13) на рисунок «пар».
27. Сигнальные лампочки (14) и (3) загорятся, как только сигнальная контрольная лампочка (3) погаснет,
машина готова к подаче хорошего, постоянного пара. ВНИМАНИЕ: если Вы не сразу приступите к производству
пара и обе сигнальные лампочки погаснут, пар будет менее постоянен.
28. Открыть регулятор пара (4). Сначала выйдет немного воды (конденсат) и затем пойдет пар.
29. Подставьте под паровую трубку (6) емкость с взбиваемым молоком и поверните до конца регулятор подачи
пара/вода (4).
30. Когда молоко достаточно взбилось, закройте регулятор пара (4).
31. ВАЖНО: после того, как Вы взбили молоко, повторно откройте регулятор пара (4) и переключите рычаг
(13) на рисунок «горячая вода» и включите насос (22). Когда вода начнет выходить из паровой трубки (6),
закройте регулятор пара (4), одновременно отключите выключатель (22) и переключите выключатель (13) на
кофе. Тщательно очистите трубку выдачи воды/пара от молока (6). Эта операция необходима, чтобы
восстановить кругооборот воды в трубах кофеварки.
Горячая вода:
32. Убедитесь, что в контейнере для воды (1) есть вода, проверяя ее уровень через специальное окошко
контроля уровня воды (20).
33. Включите электроприбор, нажав на кнопку общего выключателя (11). Световая индикация лампочки
напряжения (11) подтверждает наличие электроснабжения. Проделайте эту операцию, только в том случае,
если машина выключена. Если кофеварка включена, переходите к следующему пункту.
34. Переключите выключатель рычага (13) на рисунок «горячая вода».
35. Как только PID (21) покажет на дисплее температуру в бойлере и контрольная лампочка (14) погаснет,
машина готова к использованию.
36. Открыть регулятор пара (4) и включить насос (22).
37. Горячая вода сразу начнет выходить из паровой трубки (6).
38. По достижении желаемого количества воды, выключите насос (22) и закройте регулятор подачи горячего
пара/воды (4).
39. После слития некоторого количества горячей воды из паровой трубки (6), рекомендуется контролировать
наличие воды в контейнере для воды (1) в кофеварке.
КАК УСТАНОВИТЬ ТЕМПЕРАТУРУ КОТЛА С ПОМОЩЬЮ PID:
PID (температурный контроль в бойлере) был установлен производителем этой кофеварки на температуре
95°C. Чтобы изменить температуру, пожалуйста, поступайте следующим образом:
- нажать кнопку ; как только дисплей покажет надпись “PRG” нажмите кнопку ;
- как только дисплей покажет температуру воды в бойлере, установите БЫСТРО нужную Вам температуру,
пользуясь кнопками и , начинающуюся с мин. 80C° до макс. 130C°.
- по истечении 3 сек. после последнего нажатия кнопки, запоминается выставленная температура, и дисплей
показывает цифры набора температуры набора.
NB: если температура установлена слишком высокая, сделан запрос на приготовление кофе, дисплей начнет
мигать.
ПОЛЕЗНЫЕ СОВЕТЫ:
- Фильтры на одну порцию (9), на две порции (10) и для таблетированного кофе (18) не имеют
необходимости быть вымытыми после каждого пользования. Важно постоянно проверять, чтобы не были забиты
дырочки фильтров.
- Чтобы достигнуть высоких результатов, советуем предварительно подогревать чашки на специальной
платформе (2), которая работает только когда электроприбор включен.
- PID уже установлен производителем на правильной температуре для превосходного кофе эспрессо. Вовремя
нагревания и производства кофе или выдачи воды, температура может колебаться (+/-10/12°C). Также,
внесено предупреждение: после 108°C дисплей PID показывает температуру мигая периодически; это
нормально, и это предупреждает пользователя, что кофе не будет хорош, если будет сделан с такой высокой
температурой.
ПОВСЕДНЕВНЫЙ УХОД И МЕРЫ ПРЕДОСТОРОЖНОСТИ:
- Рекомендуется после каждого пользования тщательно промывать трубку выдачи пара (6) и фильтродержатель
(8).
Pagina 19

Русский
- Для работ по чистки рекомендуем пользоваться простой влажной тканью.
- Не оставлять электроприбор в местах воздействия атмосферных явлений и не погружать в воду.
- Функционирование электроприбора должно происходить под контролем взрослого человека, электроприбор
держать подальше от детей.
- Не мыть фильтры и фильтродержатель в посудомоечной машине.
ТЕХНИЧЕСКИЕ ДАННЫЕ:
Напряжение: 230В
Мощность: 1250 Вт.
Время готовности к работе: около 3 минут
Давление насоса: 15 бар
Регулирование PID: от 80°C до 130°C
Объем бочка для воды: 2.7 литра
Размеры (ВxШxД): 23x27x34см
Вес: 10 кг.
Функционирование: молотый кофе и кофе в таблетках
Pagina 20

Русский
РАЗРЕШЕНИЕ ВСТРЕЧАЮЩИХСЯ ПРОБЛЕМ:
Уважаемый покупатель!
Благодарим Вас за покупку нашей продукции, которая сконструирована по последним технологическим
новшествам. Тщательно следуя простым правилам по корректному пользованию, указанным в настоящей
инструкции, Вы получите максимальную отдачу от работы кофеварки и уверенность в надежности этой
продукции на протяжении многих лет. Ниже предлагается практическая таблица, в которой отображены
встречающиеся неполадки и их быстрое устранение.
ПРОБЛЕМА ПРИЧИНА РАЗРЕШЕНИЕ
1. Кофейная смесь не подходит к
1. Поменять кофейную смесь
Не формируется
данному типу кофеварки
2. Поменять степень помола кофе
пенка кофе
2. Не подходит степень помола кофе
3. Увеличить кофейную дозу и соразмерно ее
3. Недостаточное количество дозы кофе
прессовать
(указанное манометром (14) давление
4. Зафиксировать правильно
остается ниже 8 бар).
фильтродержатель
4.Фильтродержатель плохо вставлен
Выходит холодный
кофе
1. Кофеварка не достигла нужной
температуры
Pagina 21
2. Не был подогрет фильтродержатель
1. Следовать указаниям инструкции в разделе
«Подключение и наладка функционирования
кофеварки» и «Приготовление кофе эспрессо»
3. Не были подогреты чашки
4. Термопид не правильно работает
2. Фильтродержатель должен подогреваться
одновременно с водой, см. в разделе
«Подключение и наладка функционирования
кофеварки»
3. Подогреть чашки на предназначенной для
этого платформе (2)
4. Обратиться в ЦЕНТР ТЕХОБСЛУЖИВАНИЯ
1. Кофейный помол очень крупный
1. Регулировать кофейный помол на более
Кофе выходит очень
2. Недостаточное количество кофе
мелкий
быстро
3. Недостаточно спрессовано
2. Увеличить кофейную дозу
4. Срок годности кофе/таблетки
3. Увеличить прессование кофе
просрочен или они не подходят
4. Заменить кофе/таблетку
Кофе выходит
между группой
выдачи и
фильтродержателем
1.
Фильтродержатель плохо вставлен
1. Правильно вставить фильтродержатель
2. Уменьшить количество кофе
2. Передозировка кофе в фильтре
3. Очистить от остатков кофе края
3. Края фильтродержателя не очищены
фильтродержателя
4. Испорченна прокладка в группе
4. Обратиться в ЦЕНТР ТЕХОБСЛУЖИВАНИЯ
выдачи
для замены прокладки
1. Регулировать кофейный помол на более
1. Кофейный помол слишком мелкий
Кофе выходит по
крупный
2. Излишнее количество кофе
каплям
2. Уменьшить количество кофе
3. Кофе слишком сильно спрессован
3. Уменьшить прессование кофе
1. Прочистить с помощью иглы носик трубки
Кофеварка не
1. Засорен проход в носике трубки
выдачи пара
выдает пар
выдачи пара
2. См. в разделе «Подключение и наладка
2. Нехватка воды в контейнере
функционирования кофеварки»
Во время работы
1. Залить воду в контейнер.
1. Нехватка воды в контейнере
цикла выдача кофе,
2. Рычаг переключить на кофе.
2. Рычаг (13) не правильно включен
кофе не выходит.
3. Регулировать кофейный помол на более
3. Кофейный помол слишком мелкий
крупный
4. Излишнее количество кофе
4. Уменьшить количество кофе
5. Кофе слишком сильно спрессован
5. Уменьшить прессовку кофе
6. Засор в группе выдачи
6. Обратиться в ЦЕНТР ТЕХОБСЛУЖИВАНИЯ
Кофеварка не
1. Нет электропитания
1. Восстановить электропитание
работает и
2. Вилка шнура электропитания плохо
2. Вставить правильно вилку в электророзетку
сигнальная
вставлена
лампочка не
3. Поврежден шнур электропитания
загорается
3. Обратиться в ЦЕНТР ТЕХОБСЛУЖИВАНИЯ
для замены шнур электропитания
Лампочка
включения горит, а
1. Термостаты не функционируют
1. Обратиться в ЦЕНТР ТЕХОБСЛУЖИВАНИЯ
лампочка «готовый
2. Поврежден нагревательный элемент
2. Обратиться в ЦЕНТР ТЕХОБСЛУЖИВАНИЯ
пар» не включится
в течение 10 минут
Указанные данные и фотографии могут быть изменены без предварительного предупреждения для улучшения
работы кофеварки.
ITALIANO
Pagina 22
AVVERTENZE PER IL CORRETTO SMALTIMENTO DEL PRODOTTO AI SENSI DELLA DIRETTIVA
EUROPEA 2002/96/EC
Alla fine della sua vita utile il prodotto non deve essere smaltito insieme ai rifiuti urbani. Può essere
consegnato presso gli appositi centri di raccolta differenziata predisposti dalle amministrazioni comunali,
oppure presso i rivendito
ri che forniscono questo servizio. Smaltire separatamente un elettrodomestico
consente di evitare possibile conseguenze negative per l’ambiente e per la salute derivanti da un suo
smaltimento inadeguato e permette di recuperare i materiali di cui è compost
o al fine di ottenere un
importante risparmio di energia e di risorse. Per rimarcare l’obbligo di smaltire separatamente gli
elettrodomestici, sul prodotto è riportato il marchio del contenitore di spazzature mobile barrato.
DICHIARAZIONE DI CONFORMITA’ CE
Gemme Italian Producers srl dichiara sotto la propria responsabilità che il prodotto PL41PLUST-
PL41PLUSTAUS al quale è riferita questa dichiarazione, è conforme alle seguenti norme:
CEI EN 60335-1, CEI EN 60335-2-15
Dichiara inoltre che i prodott
i sopra indicati risultano conformi in base alle prove di compatibilità
elettromagnetica EMC.
NB: La presente dichiarazione perde la sua validità se la macchina viene modificata senza la nostra espressa
autorizzazione.
ENGLISH
IMPORTANT INFORMATION FOR CORRECT DISPOSAL OF THE PRODUCT IN ACCORDANCE WITH
EC DIRECTIVE 2002/96/EC
At the end of its working life, the product must not be disposed of as urban waste. It must be taken to a
special local authorit
y differential waste collection centre or to a dealer providing this service. Disposing of a
household appliance separately avoids possible negative consequences for the environment and health
deriving from inappropriate disposal of enables the constituent
materials to be recovered to obtain
significant savings in energy and resources. As a reminder of the need to dispose of household appliances
separately, the products is marked with a crossed-out wheeled dustbin.
EC DECLARATION OF CONFORMITY
Gemme Italian Producers srl declares under its own responsibility that the product PL41PLUST-
PL41PLUSTAUS, to which this declaration relates, is
in accordance with the provisions of the specific
directives:
CEI EN 60335-1, CEI EN 60335-2-15
It also declares th
at the above mentioned products conform with the electromagnetic compatibility test
EMC.
NB: The present declaration voids should the machine be modified without our specific authorization.
FRANÇAIS
AVER
TISSEMENT POUR L’ÉLIMINATION CORRECTE DU PRODUIT AUX TRMES DE LA DIRECTIVE
EUROPÉENE 200/96/EC
Au terme de son utilisation, le produit ne doit pas être éliminé avec les déchets urbains. Le produit doit être
remis à l’un des centres de collecte sélective p
révus par l’administration communale ou auprès des
revendeurs assurant ce service. Éliminer séparément un appareil électroménager permet d’éviter les
retombée négatives pou l’environnement et la santé dérivant d’une élimination incorrecte, et permet de
ré
cupérer les matériaux qui le composent dans le but d’une économie importante en termes d’énergie et de
ressources. Pour rappeler l’obligation d’éliminer séparément les appareils électroménagers, le produit porte
le symbole d’un caisson à ordures barré.
DECLARATION DE CONFORMITE CE
Gemme Italian Producers srl déclare que les produits suivants: PL41PLUST-PL41PLUSTAUS auxquels
se
réfère cette déclaration, sont faits selon les prescriptions des directives spécifiques:
CEI EN 60335-1, CEI EN 60335-2-15.
Il déclare aussi que les produits sont conforme à les essais de compatibilité électromagnétique EMC.
NB: La Présente déclaration perd sa validité dés lors que la machine est modifiée sans notre expresse
autorisation.
DEUTSCH
WICHTIGER HINWEIS FÜR DIE KORREKTE ENTSORGUNG DES PRODUKTS IN
ÜBEREINSTIMMUNG MIT DER EG-RICHTLINIE 2002/96/EG
Am Ende seiner Nutzzeit darf das Produkt NICHT zusammen mit dem Siedlungsabfall beseitigt werden. Es
kann zu den eigens von den städtischen Behören eingerichteten Sammelstellen oder zu den
Fachhändlern, die einen Rücknahmeservice anbieten, gebracht werden. Die getrennte Entsorgung eines
Haushaltsgerätes vermeidet mögliche negative Auswirkungen auf die Umwelt und die menschliche
Gesundheit, die durch eine nicht vorschriftsmäßige Entsorgung bedingt sind. Zudem ermöglicht wird die
Wiederverwertung der Materialien, aus denen sich das Gerät zusammensetzt, was wiederum eine
bedeutende Einsparung an Energie und Ressourcen mit sich bringt. Zur Erinnerung an die Verpflichtung,
die Elektrohaushalsgeräte zu beseitigen, ist das Produkt mit einer Mülltonne, die durchgestrichen ist,
gekennzeichnet.
CE–KONFORMITÄTSERKLÄRUNG
Gemme Italian Producers srl erklärt auf einige Verantwortung, dass PL41PLUST-PL41PLUSTAUS, auf
die sich diese Erklärung bezieht, der Vorschriften der spezifischen Richtlinien CEI EN 60335-1, CEI EN
60335-2-15 entsprechen.
Die o.g. Firma erklärt, dass die oben genannten Produkte gemäß der EMC elektromagnetischen
Verträglichkeitstesten produziert sind.
NB: Die vorliegende Erklärung verliert Ihre Gültigkeit, wenn die Maschine ohne unsere ausdrückliche
Genehmigung verändert wird.
Русский
УКАЗАНИЯ ПО ПО КОРРЕКТНОМУ ИЗБАВЛЕНИЮ ОТ ИЗДЕЛИЯ В СООТВЕТСТВИИ С
ЕВРОПЕЙСКОЙ ДЕРЕКТИВОЙ 2002/96/ЕС
Pagina 23
По окончании срока службы, электроприбор не следует помещать в общий контейнер с
мусорными отходами. Его можно сдать в специальные центры по сбору дифференциальных
отходов, предоставленных административными муниц
ипалитетами, или в специализированные
фирмы, которые занимаются таким обслуживанием. Раздельная переработка электроприборов
позволяет избежать возможные негативные последствия, возникающие из-
за не
соответствующей переработки отходов, для окружающей среды
и здоровья общества. Дает
возможность достигнуть значительной экономии энергии и ресурсов, благодаря повторному
использованию материалов изготовления электроприбора. Чтобы подчеркнуть обязательство
сдачи электроприбора на раздельную переработку, на изделие
нанесена маркировка в виде
зачеркнутого передвижного мусорного контейнера.
ДЕКЛАРАЦИЯ О СООТВЕТСТВИИ ДИРЕКТИВАМ ЕЭС
Gemme Italian Producers srl заявляет с полной ответственностью, что изделие
PL41PLUST-
PL41PLUSTAUS
, к которому относится эта декларация, соответствуют следующим нормам:
В
60335-1, ЦЕНТРАЛЬНОЕВРОПЕЙСКАЯ ИНИЦИАТИВА В 60335-2-15
CEI EN 60335-1, CEI EN 60335-2-15.
Заявляет также, что вышеуказанные изделия отвечают
требованиям, на основании результатов тестирования по электромагнитной совместимости ЕМС.
НОТА: Настоящая декларация теряет свою силу, если в данное оборудование будут внесены
какие-либо изменения без нашего официального разрешения.
Castegnato, 01/02/2012
Amministratore delegato

Gemme Italian Producers srl
Via del Lavoro 45 - I - 25045 Castegnato (BS) Italy
Tel: +39 030 2141199 - Fax: +39 030 2147637
www.lelit.com - lelit@lelit.com - P.Iva 03426920173
AB 01
Pagina 24


