Pioneer KRL-32V – page 2
Manual for Pioneer KRL-32V
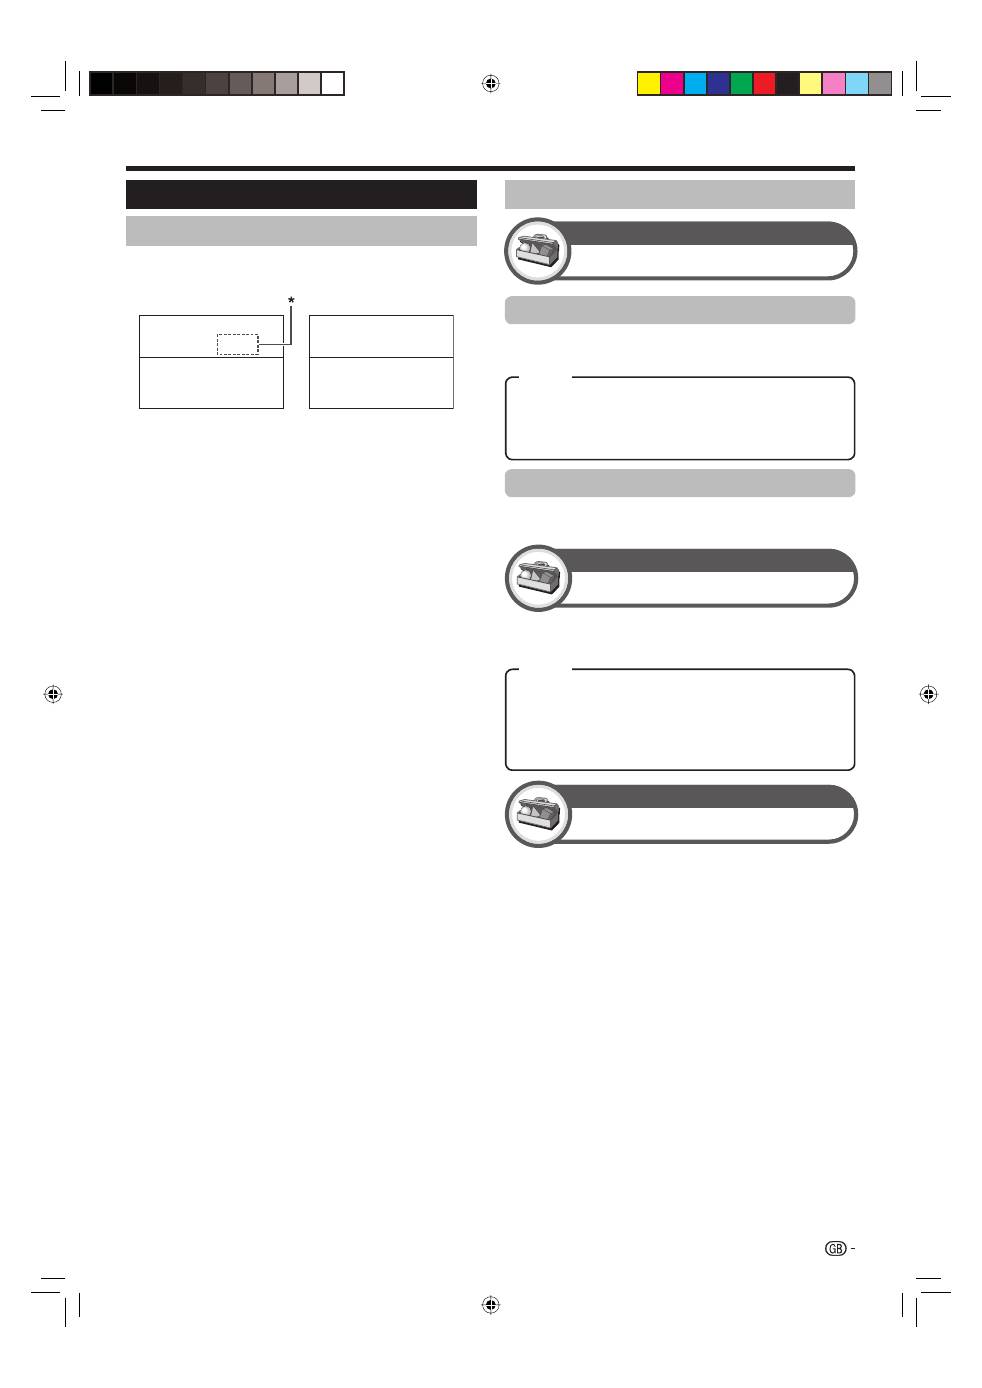
Check programme information
Press
a
/
b
/
c
/
d
to select the programme you
want to check.
Press
Red
button.
040
10 : 00AM - 1 : 00 AM
BBC News 24
BBC News
Programme Info.
Back to EPG
The BBC’s rolling news service with headlines every 15 minutes.
10 AM
11
0 PM
1
2
3
BBC TWO
002
BBC THREE
007
BBC FOUR
010
BBC FIVE
012
CBBC Channel
030
BBC
1
061
BB22
062
BBC NEWS 24
340
BBCi
351
This is BBC THREE
BBC NEWS
BBC NEWS
BBC NEWS
BBC NEWS
BBCi
BBCi
This is BBC THREE
R
Next
B
Press
ENTER
to tune to the selected programme.
Search a programme in a category
Press
Green
button.
Press
a
/
b
to select the desired genre, and
then press
ENTER
.
Press
a
/
b
to select a programme you want to
watch, and then press
ENTER
.
10 : 50 AM - 11 : 05 AM
Mon 19/05
CBBC Cahnnel
030
time
10 : 50 AM - 11 : 10 AM
Mon 19/05
BBC TWO
002
School is Lock
11 : 05 AM - 11 : 20 AM
Mon 19/05
CBBC Cahnnel
030
Words and Pictures
Movie/Drama
News/Current affairs
Show/Game show
Sports
Children’s/Youth programmes
Music/Ballet/Dance
Arts/Culture (without music)
Social/Political Issues/Economics
Education/Science/Factual Topics
Leisure hobbies
[Today] 0-12
[Today] 12-0
[Tue] 20 0-12
[Tue] 20 12-0
Refer to page 17 for the genre setting.
3
1
2
3
4
1
2
3
•
Search for a programme by date/time
Press
Yellow
button.
Press
c
/
d
to select the desired time span, and
then press
ENTER
.
Search by Time
10 AM
11 0
PM
1 2 3
BBC TWO
002
BBC THREE
007
BBC FOUR
010
BBC FIVE
012
CBBC Channel
030
BBC 1
061
BB22
062
BBC NEWS 24
340
This is BBC THREE
BBC NEWS
BBC NEWS
BBC NEWS
BBC NEWS
This is BBC THREE
Back to EPG
R
Next
Next
B
SIT 1
994
: Select Time
Enter
G
+1 Week
Y
OK
: Enter
0 AM -
6 AM
6 AM -
0 PM
0 PM -
6 PM
6 PM -
0 AM
Today
Press
a
/
b
to select the desired programme,
and then press
ENTER
.
NOTE
When you select a programme outside of the current time
span, the timer setting screen is displayed (Page 19).
5
1
2
3
•
Select a programme
Select the time span
Press
c
/
d
to select the time span you want to search.
Continue to press
d
to display programmes in the next time span.
Select the desired programme
Press
a
/
b
to select the desired programme.
If
a
or
b
are displayed on the left of the services, continue to press
a
/
b
to display next or previous screen.
E
1
•
2
•
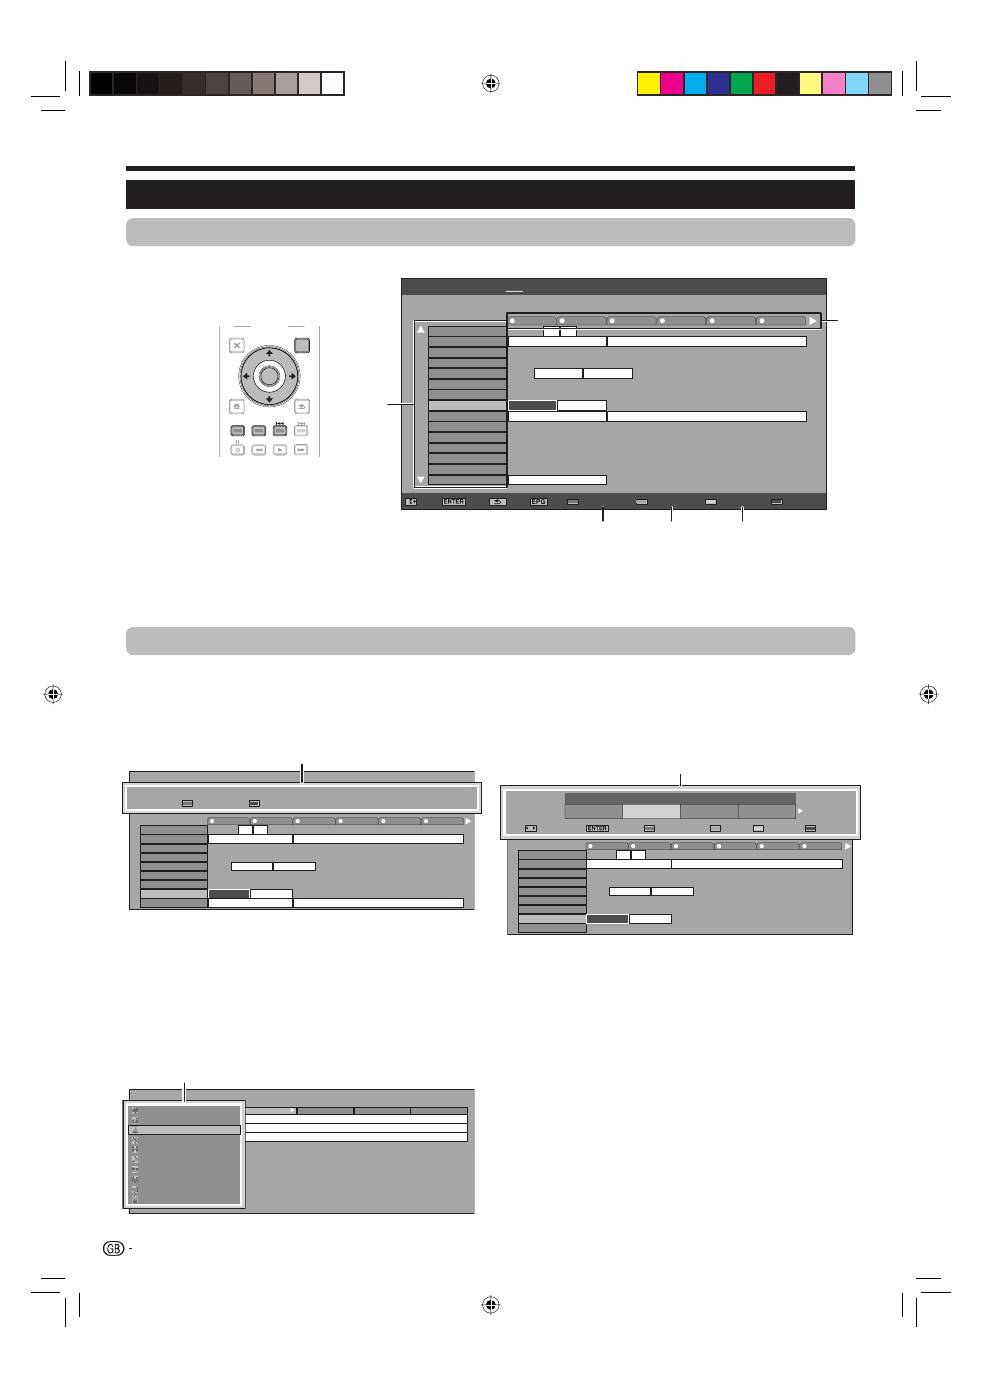
Watching TV
Selecting a programme using EPG
Basic Operation
The illustrations on this page are explained using three digit services.
Display/Close the EPG screen
Press
EPG
.
E
Selecting a programme
18
EPG
[Mon]16/04 10:57 AM
[DTV-TV]
Today (Tue)20
(Wed)21
(Thu)22
(Fri)23 (Sat)24
(Sun)25
(Mon)26
040
10 : 00AM - 1 : 00 AM
BBC News 24
BBC News
10 AM
11
0 PM
1
2
3
BBC TWO
002
BBC THREE
007
BBC FOUR
010
BBC FIVE
012
CBBC Channel
030
BBC
1
061
BB22
062
BBC NEWS 24
340
BBCi
351
SIT
3
996
BBC ONE
999
SIT
1
994
SIT
2
995
SIT
5
998
SIT
4
997
This is BBC THREE
BBC NEWS
BBC NEWS
BBC NEWS
BBC NEWS
This is BBC THREE
BBCi
BBCi
This is BBC THREE
: Select
: Enter
: Back
: Exit
Programme info.
Search By Genre
Search By Date
Timer List
2
1
3
4
5
EXIT
DVD TOPMENU/
GUIDE
EPG
ENTER
HOME
MENU
MENU
RETURN
EXIT
HOME
MENU
MENU
RETURN
Programme Information
Search by Time
Back to EPG
Next
Next
: Select Time
Enter +1
Week
: Enter
0 - 6
6 -12
12 - 18
18 - 0
Today
Programme Info.
Back to EPG
The BBC’s rolling news service with headlines every 15 minutes.
Next
Movie/Drama
News/Current affairs
Show/Game show
Sports
Children’s/Youth programmes
Music/Ballet/Dance
Arts/Culture (without music)
Social/Political Issues/Economics
Education/Science/Factual Topics
Leisure hobbies
Genre
Date/Time
KRL3237V_GB.indd 18
KRL3237V_GB.indd 18
2008/06/13 14:49:55
2008/06/13 14:49:55

Watching TV
Timer recording using EPG
You can record TV programmes using data from the
EPG.
Press
EPG
.
Press
a
/
b
/
c
/
d
to select the programme you
want to record, and then press
ENTER
.
Press
c
/
d
to select the preferred timer setting,
and then press
ENTER
.
Watch
Record
No
If you select “No”, the TV returns to the EPG screen.
Watching a programme at a set time
Press
c
/
d
to select “Watch”, and then press
ENTER
.
Press
c
/
d
to select “Yes”, and then press
ENTER
.
The selected TV programme is marked with an icon.
Recording a programme at a set time
Press
c
/
d
to select “Record”, and then press
ENTER
.
Press
c
/
d
to select the preferred timer
recording type, and then press
ENTER
.
1
2
3
•
E
1
2
•
E
1
2
Press
c
/
d
to select “Yes”, and then press
ENTER
.
The selected TV programme is marked with an icon.
NOTE
Refer to pages 21–23 for connecting external devices.
3
•
•
Cancelling the timer recording
Press
EPG
.
Press
a
/
b
/
c
/
d
to select the programme on
timer setup, and then press
ENTER
.
Press
c
/
d
to select “Cancel”, and then press
ENTER
.
Press
c
/
d
to select “Yes”, and then press
ENTER
.
Cancelling using the Blue button on the
remote control unit
Press
EPG
.
Press
Blue
button to display the timer recording
screen.
Press
a
/
b
to select a programme with a set
timer recording you want to change, and then
press
ENTER
.
Press
c
/
d
to select “Cancel” and then press
ENTER
.
Press
c
/
d
to select “Yes”, and then press
ENTER
.
1
2
3
4
E
1
2
3
4
5
i/o link.A:
Records a programme at a set time when a
device compatible with i/o link.A is connected.
VHS tape:
Records a programme at a set time when a
device compatible with VHS tape is connected.
19
Item
KRL3237V_GB.indd 19
KRL3237V_GB.indd 19
2008/06/13 14:49:59
2008/06/13 14:49:59
Buttons for teletext operations
Buttons
Description
P
k
/
l
(
e
/
f
)
Increase or decrease the page number.
Colour (Red/
Green/Yellow/
Blue)
Select a group or block of pages
displayed in the coloured brackets at
the bottom of the screen by pressing
the corresponding
Colour (Red/Green/
Yellow/Blue)
buttons on the remote
control unit.
0–9
Directly select any page from 100 to 899
by using the
0
–
9
numeric buttons.
k
(Reveal
hidden
Teletext)
Reveal or hide hidden information such
as an answer to a quiz.
3
(Freeze/
Hold)
Stop updating teletext pages
automatically or release the hold mode.
[
(Subtitle
for Teletext)
Display the subtitle or exit the subtitle
screen.
Subtitles will not be displayed when
the service does not contain subtitle
information.
•
1
(Subpage)
Reveal or hide subpages.
Red
button: Move to the previous
subpage.
Green
button: Move to the following
subpage.
These two buttons are shown on the
screen by the symbols “
e
”
and “
f
”.
•
•
•
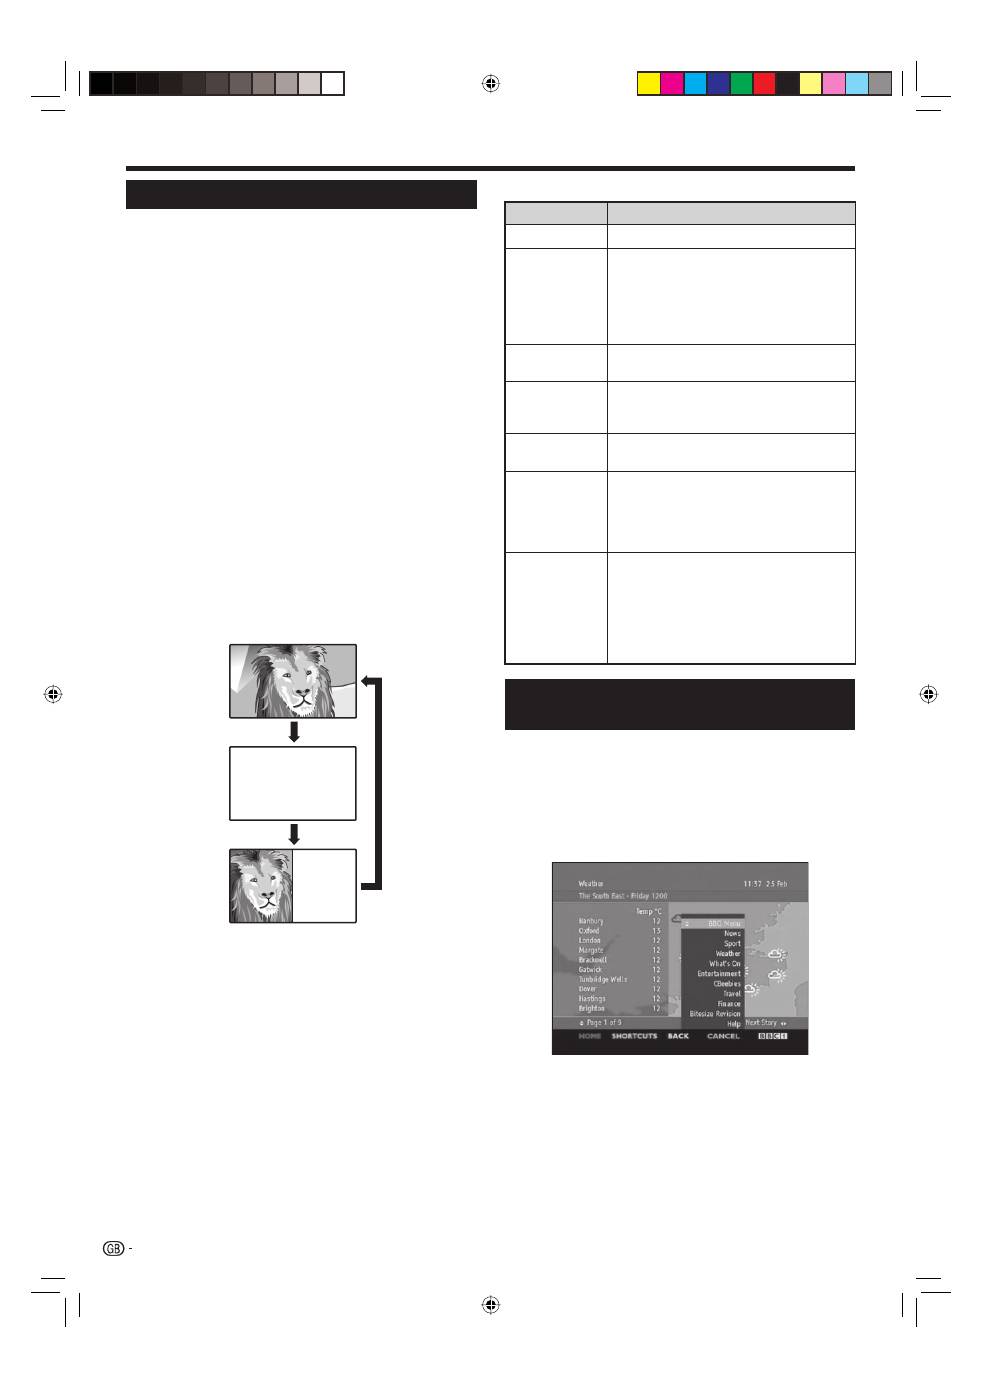
Using the MHEG-5 application (UK
only)
Some services bring you programmes with the MHEG
(Multimedia and Hypermedia Expert Group) application
encoded, letting you experience DTV interactively.
If provided, the MHEG-5 application will start when you
press
m
.
Sample MHEG-5 screen
Watching TV
Teletext
What is Teletext?
Teletext broadcasts pages of information and
entertainment to specially equipped TV. Your TV
receives teletext signals broadcast by a TV network,
and decodes them into graphical format for viewing.
News, weather and sports information, stock
exchange prices and programme previews are among
the many services available.
Turning Teletext on/off
Select a TV channel or external source providing
a teletext programme.
Press
m
to display the Teletext.
Many stations use the TOP operating system, while
some use FLOF (e.g. CNN). Your TV supports both
these systems. The pages are divided into topic
groups and topics. After switching on the teletext, up
to 2,000 pages are stored for fast access.
Each time you press
m
, the screen switches as
shown below.
Press
m
again to display the teletext on the right
screen and the normal image on the left screen.
If you select a programme with no teletext signal, “No
Teletext available” displays.
The same message displays during other modes if no
teletext signal is available.
1
2
•
•
•
•
•
NOTE
Teletext will not work if the selected signal type is
RGB (Page 38).
•
20
TELETEXT
TELETEXT
KRL3237V_GB.indd 20
KRL3237V_GB.indd 20
2008/06/13 14:50:00
2008/06/13 14:50:00
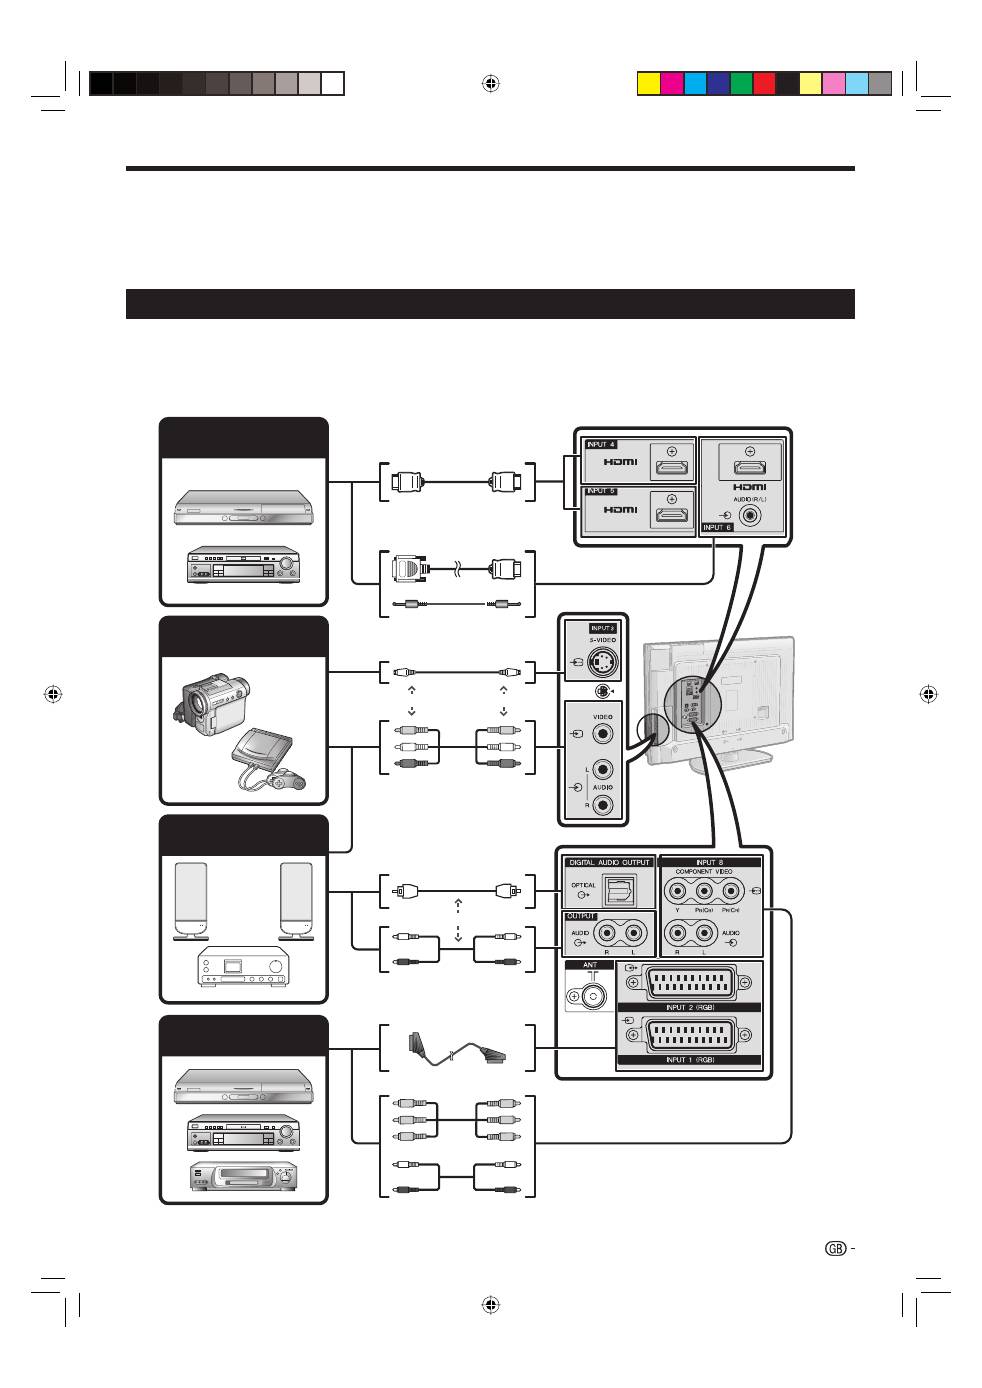
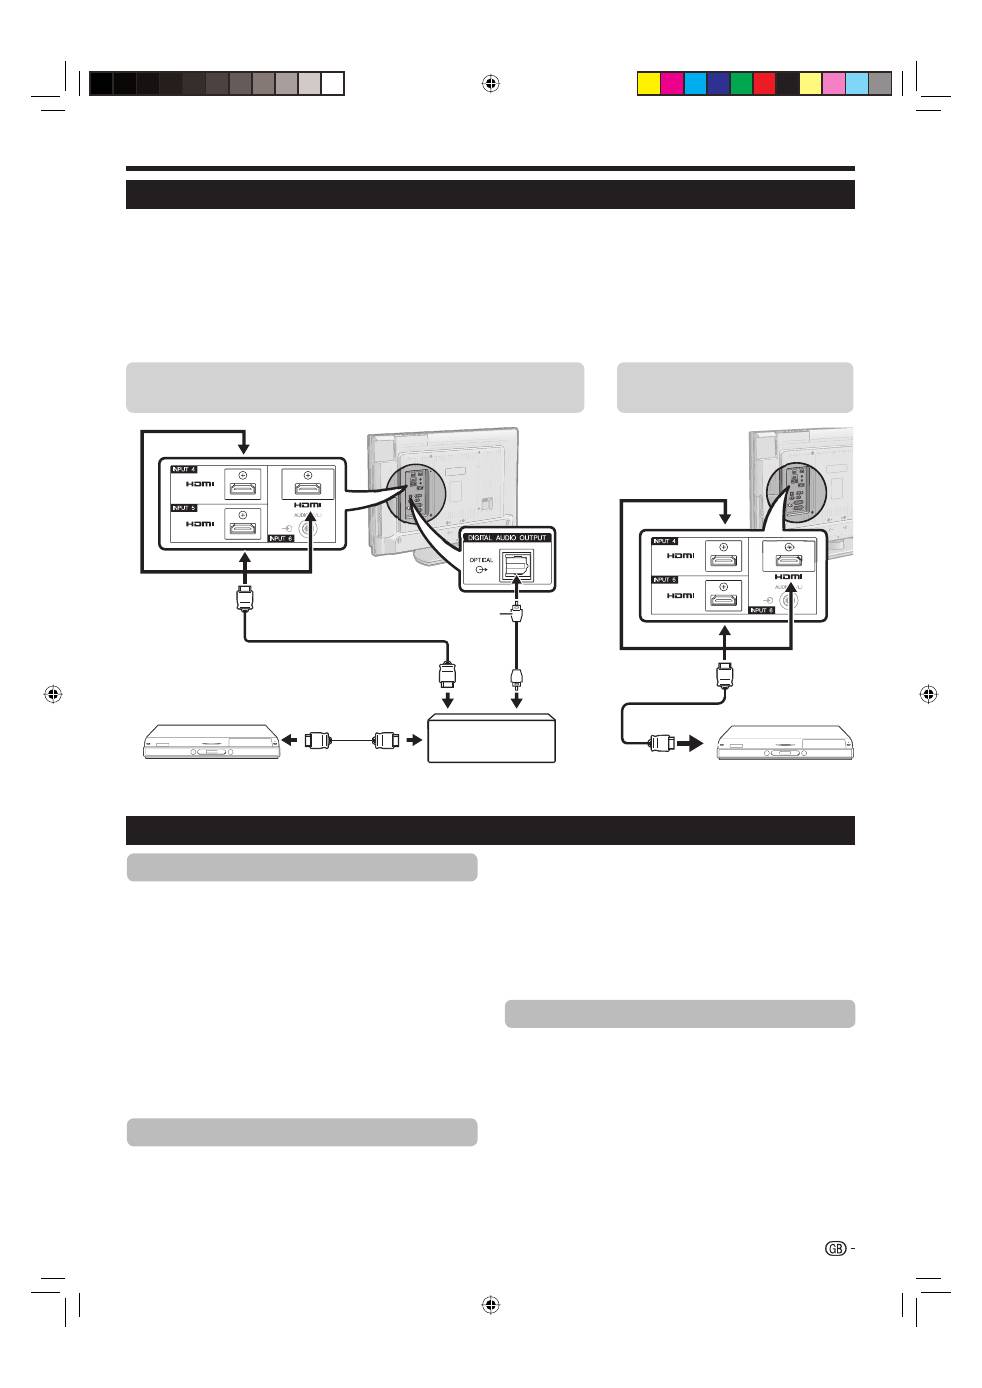
Connecting external devices
Before connecting ...
Be sure to turn off the TV and any devices before making any connections.
Firmly connect a cable to a terminal or terminals.
Carefully read the operation manual of each external device for possible connection types. This also helps you
get the best possible audiovisual quality to maximise the potential of the TV and the connected device.
Refer to page 39 for connecting a PC to the TV.
Introduction to connections
The TV is equipped with the terminals as shown below. Find the cable corresponding the TV’s terminal and
connect the device.
NOTE
The cables illustrated in pages 21–24 are commercially available items.
E
•
•
•
•
•
When using an S-video cable, you also need to connect an audio cable (R/L).
*
21
HDMI device (Page 22)
Game console or
camcorder (Page 22)
Audio device (Page 24)
HDMI-certified cable
DVI/HDMI Cable
ø 3.5 mm stereo minijack cable
S-video cable
*
AV cable
*
Audio cable
Optical audio cable
SCART cable
or
Component cable
Audio cable
Video recording device
(Pages 22 and 23)
or
or
KRL3237V_GB.indd 21
KRL3237V_GB.indd 21
2008/06/13 14:50:01
2008/06/13 14:50:01
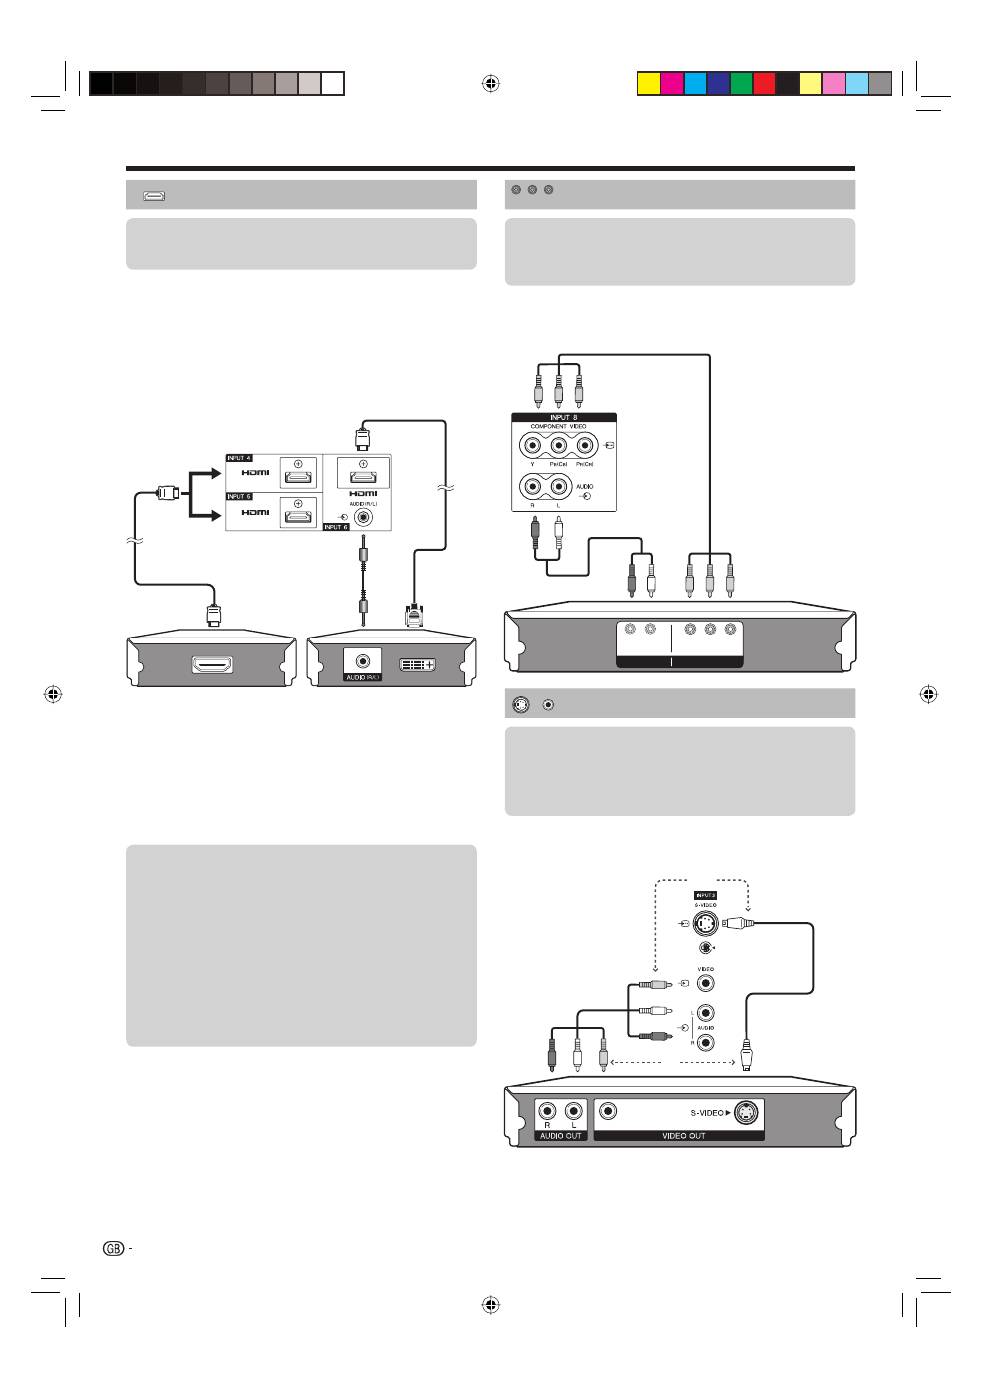
Connecting external devices
HDMI connection
The HDMI connections (High Definition Multimedia
Interface) permit digital video and audio transmission
via a connection cable from a player/recorder. The
digital picture and sound data are transmitted without
data compression and therefore lose none of their
quality. Analogue/digital conversion is no longer
necessary in the connected devices, which also would
result in quality losses.
DVI/HDMI conversion
Using an DVI/HDMI adapter cable, the digital video
signals of a DVD can also be played via the compatible
HDMI connection. The sound must be fed in additionally.
When connecting a DVI/HDMI conversion adapter/cable to the
HDMI terminal, the image may not come in clearly.
Both HDMI and DVI use the same HDCP copy
protection method.
NOTE
If a connected HDMI device is HDMI CONTROL compatible,
you can take advantage of versatile functions (Pages 26–28).
Video noise may occur depending on the type of HDMI cable used.
Make sure to use a certified HDMI cable.
When playing the HDMI image, the best possible format for the
picture will be detected and set automatically.
Supported video signal:
576i, 576p, 480i, 480p, 1080i, 720p, 1080p
See page 42 for PC signal compatibility.
•
•
•
•
Component connection
You will enjoy accurate colour reproduction and high
quality images through the INPUT8 terminal when
connecting a DVD player/recorder or other device.
Y
P
B
(
C
B)
L
R
P
R
(
C
R)
COMPONENT
AUDIO
S-VIDEO/VIDEO connection
You can use the INPUT3 terminal when connecting to
a game console, camcorder, a DVD player/recorder or
other device.
NOTE
When using an S-video cable, you also need to connect an
audio cable (R/L).
INPUT3: The S-VIDEO terminal has priority over the VIDEO terminal.
•
•
22
DVI/HDMI
cable
ø 3.5 mm stereo
minijack cable
HDMI-certified
cable
Audio cable
Component
cable
or
or
AV cable
S-video cable
Example of connectable devices
DVD player/recorder
E
Blu-ray player/recorder
E
After connecting
HDMI Audio Select
After connecting, you must set the audio signal
compatible with the cable you use for the HDMI
device.
Go to “HOME MENU” > “Option” > “HDMI
Audio Select”.
Select “Digital” for audio signals via the
HDMI terminal. Select “Analogue” for audio
signals via the AUDIO jack (INPUT6).
E
1
2
Example of connectable devices
VCR
E
DVD player/recorder
Blu-ray player/recorder
E
E
Example of connectable devices
VCR
E
DVD player/recorder
Blu-ray player/recorder
Game console
E
Camcorder
E
E
E
Y
P
B
(
C
B)
P
R
(
C
R)
KRL3237V_GB.indd 22
KRL3237V_GB.indd 22
2008/06/13 14:50:05
2008/06/13 14:50:05
Connecting external devices
NOTE
In cases when the decoder needs to receive a signal from the TV, make sure to select the appropriate input terminal to which
the decoder is connected in “Manual Adjust” in the “Analogue Setting” menu (Page 33).
TV-VCR advanced AV Link systems may not be compatible with some external sources.
You cannot connect the VCR with Decoder using a fully wired SCART cable when selecting “Y/C” under “INPUT2” in the
“Input Select” menu.
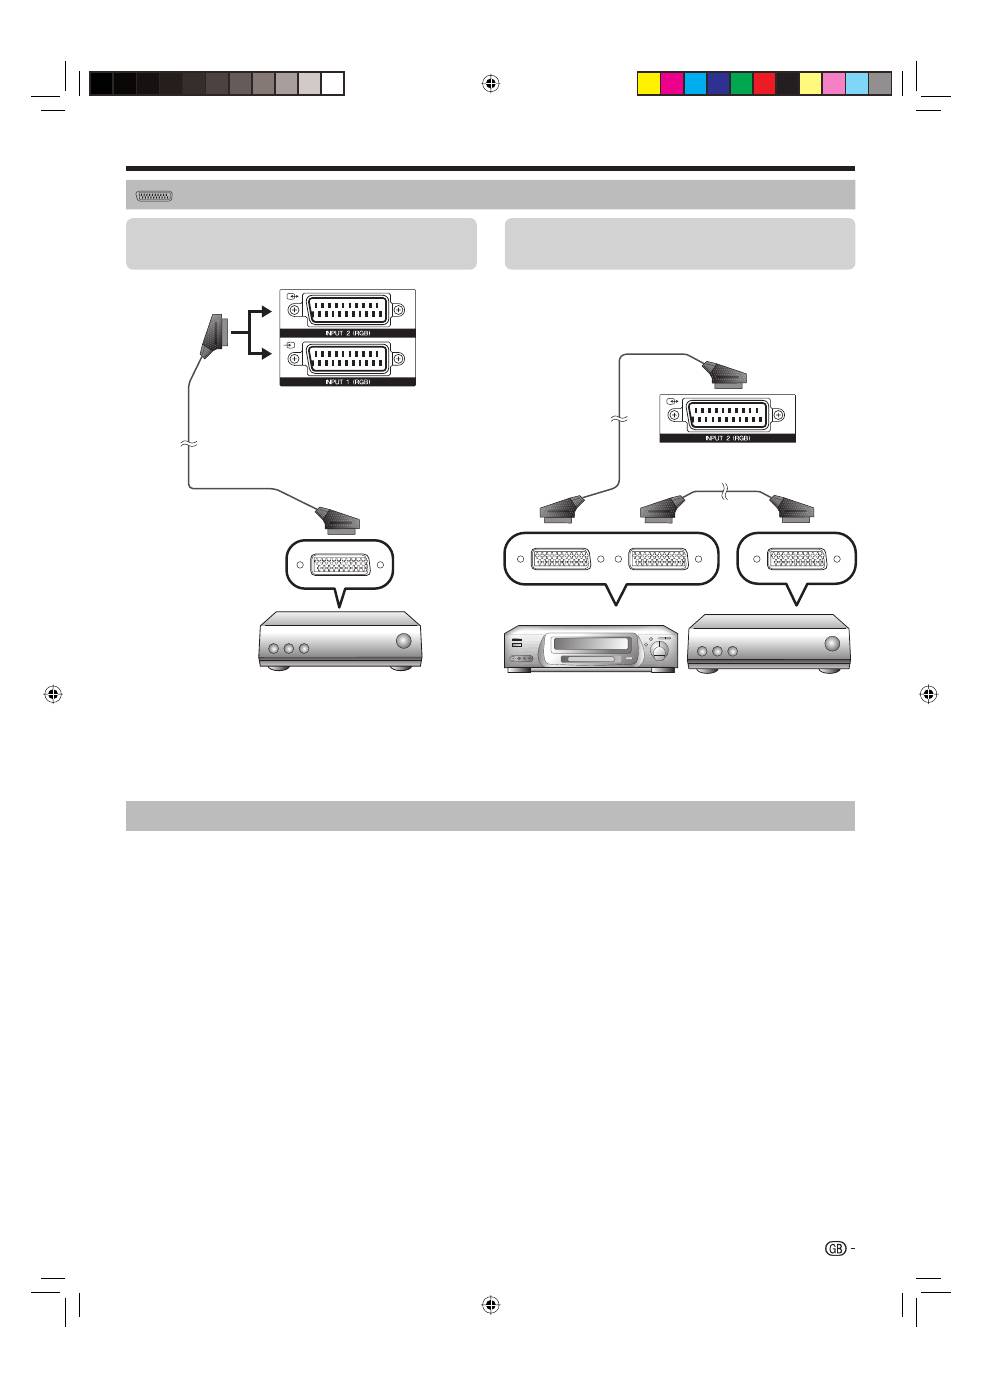
Controlling devices with SCART using i/o link.A
This TV incorporates four typical i/o link.A functions for smooth connections between the TV and other audiovisual
equipment.
One Touch Play
While the TV is in standby mode, it automatically turns on and plays back the image from the audiovisual source
(e.g. VCR, DVD player/recorder).
TV Standby
When the TV enters standby mode, the connected audiovisual equipment (e.g. VCR, DVD player/recorder) enters
standby mode as well.
WYSIWYR (What You See Is What You Record)
When the remote control unit of the connected VCR has the WYSIWYR button, you can automatically start
recording by pressing the WYSIWYR button.
Preset Download
Automatically transfers the channel preset information from the tuner on the TV to the one on the connected
audiovisual equipment (e.g. VCR) via the INPUT2 terminal.
NOTE
Refer to the operation manuals of external equipment for details.
The i/o link.A function works only when audiovisual equipment is connected to the INPUT2 terminal with a fully wired SCART
cable.
The use of the i/o link.A function is only possible if the TV has enforced a complete auto installation with the connected
audiovisual equipment (Page 15, Initial auto installation).
The availability of the i/o link.A function depends on the audiovisual equipment used. Depending on the manufacturer and type
of equipment used, it is possible that the described functions may be completely or partially unusable.
•
•
•
•
•
•
SCART connection
Example of connectable devices
Decoder
E
When using the INPUT2 (SCART) terminal
If your VCR supports TV-VCR advanced AV Link
systems, you can connect the VCR using a fully wired
SCART cable.
E
Example of connectable devices
VCR
E
DVD player/recorder
E
23
SCART cable
Decoder
SCART cable
SCART cable
Decoder
VCR
KRL3237V_GB.indd 23
KRL3237V_GB.indd 23
2008/06/13 14:50:07
2008/06/13 14:50:07
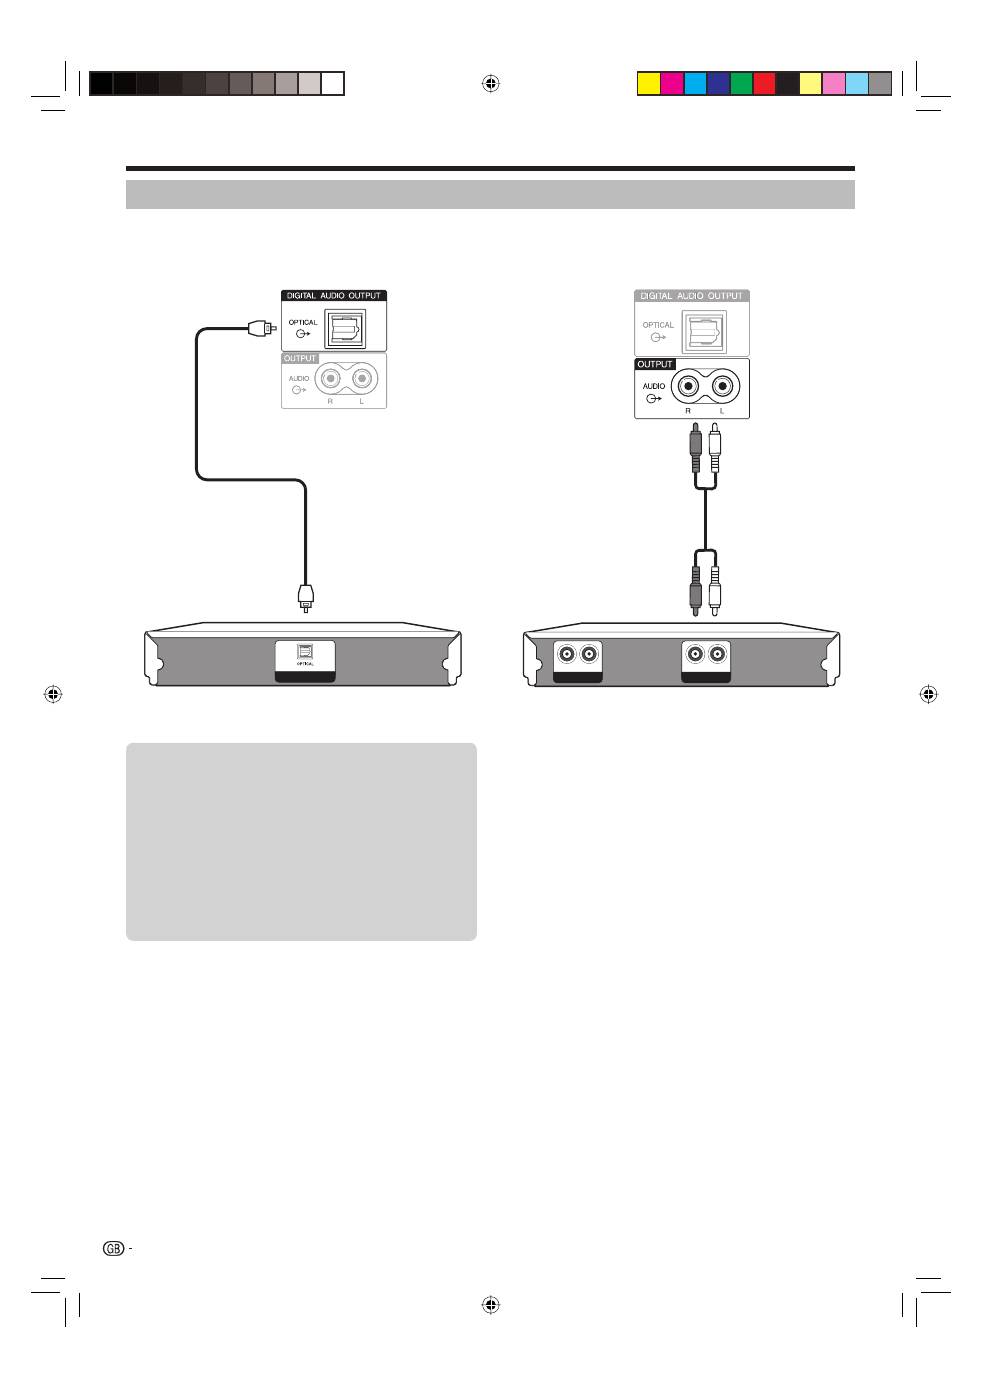
Connecting external devices
DIGITAL AUDIO IN
AUX1 IN
L
R
AUX OUT
L
R
Connecting an amplifier with analogue
audio input
E
Connecting an amplifier with digital audio
input
E
Speaker/amplifier connection
Connect an amplifier with external speakers as shown below.
After connecting
Digital audio output setting
After connecting an amplifier with digital audio
input and external speakers as shown, you should
set an audio output format compatible with
the programme you are watching or the device
connected.
Go to “HOME MENU” > “Option” > “Digital
Audio Output” > select “PCM” or “Dolby
Digital”.
E
24
Optical audio cable
Audio cable
Amplifier with
analogue audio input
Amplifier with
digital audio input
KRL3237V_GB.indd 24
KRL3237V_GB.indd 24
2008/06/13 14:50:09
2008/06/13 14:50:09
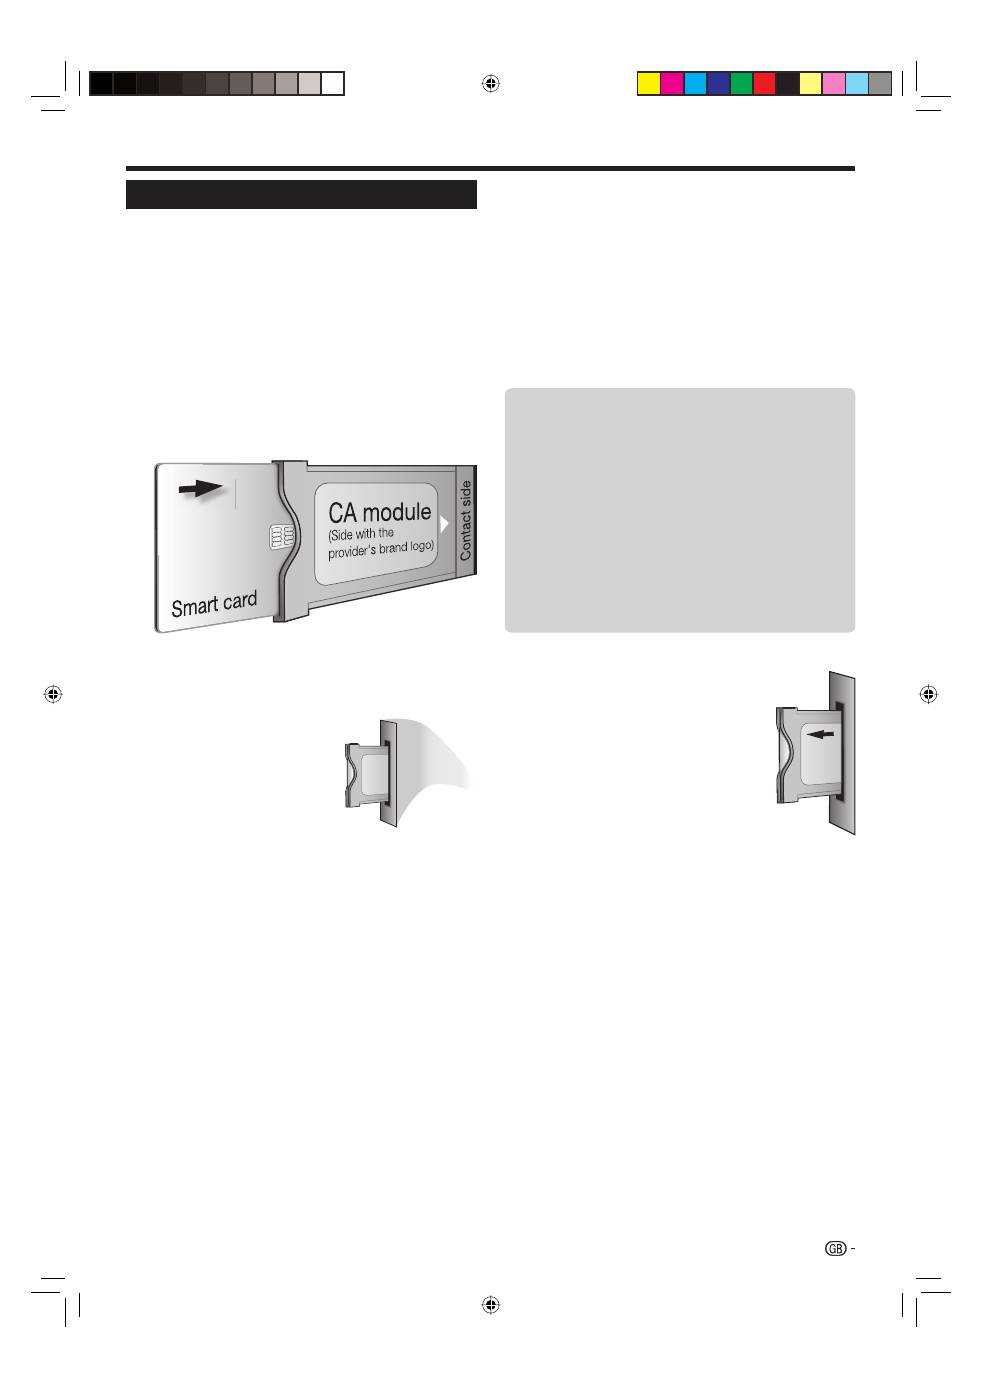
Connecting external devices
Inserting a smart card
In order to receive coded digital stations, a Common
Interface Module (CA Module) and a smart card must
be inserted in the Common Interface slot of the TV
(Page 14).
The CA Module and the smart card are not supplied
accessories. They are usually available from your
dealers.
Inserting the smart card into the CA Module
With the side with the gold coloured contact
chip facing the side of the CA Module marked
with the provider’s logo, push the smart card
into the CA Module as far as it will go. Note the
direction of the arrow printed on the smart card.
Inserting the CA Module in the Common
Interface slot
Carefully insert the CA
Module in the Common
Interface slot with the
contact side forward. The
logo on the CA Module
must be facing forward
from the rear of the TV.
Do not use excessive
force. Make sure the
module is not bent in the
process.
1
2
Checking CA Module information
NOTE
Make sure that the CA Module is properly inserted.
This menu is only available for digital stations.
Press
h
and the “HOME MENU” screen
displays.
Press
a
/
b
to select “Digital Setup”.
The content of this menu depends on the provider of
the CA Module.
Press
a
/
b
to select “CI Menu”, and then press
ENTER
.
Removing the CA Module
Remove the cover from the rear of
the TV.
Remove the module from the TV.
Replace the cover.
•
•
1
2
•
3
1
2
3
25
Module
General information on CA Module displays.
Menu
Adjustment parameters of each smart card
displays.
Enquiry
You can input numerical values such as passwords
here.
NOTE
The content of each screen depends on the provider of
the CA Module.
E
E
E
•
KRL3237V_GB.indd 25
KRL3237V_GB.indd 25
2008/06/13 14:50:10
2008/06/13 14:50:10
HDMI CONTROL
Controlling HDMI devices using HDMI CONTROL
What is HDMI CONTROL?
Using the HDMI CEC (Consumer Electronics Control) protocol, with HDMI CONTROL
you can interactively operate compatible system devices (AV amplifier, DVD player/
recorder, Blu-ray player/recorder) using a single remote control unit.
What you can do with HDMI CONTROL
One Touch Recording
You do not have to search for the remote control unit of your recording device. Press the
E
or the
REC STOP
q
buttons to start/stop recording what you see on the recorder.
One Touch Play
When the TV is in standby mode, it will automatically turn on and play back the image
from the HDMI source.
Single remote control operation
HDMI CONTROL automatically recognises the connected HDMI device and you can
control the TV and the devices as if using a universal remote control unit.
Operating Title list of external devices
In addition to displaying the TV’s own Timer list (Page 18), you can also call up the
external player’s Top menu or Pioneer BD Player’s/Pioneer Recorder’s Title list provided
that the devices support HDMI CONTROL.
Multiple control of HDMI devices
You can select which HDMI device to operate using the
HDMI CTRL
button.
NOTE
When you use HDMI CONTROL, make sure to use a certified HDMI cable.
Point the remote control unit toward the TV, not to the connected HDMI device.
Video noise may occur depending on the type of HDMI cable used. Make sure to use a certified
HDMI cable.
Up to three HDMI recording devices, one AV amplifier and two players can be connected using
this system.
These operations affect the HDMI device selected as the current external source. If the device
does not operate, turn on the device and select the appropriate external source using
INPUT1–8
on the remore control unit or
b
on the TV.
After unplugging connection cables or changing the connection pattern, turn on all connected
HDMI devices before turning on the TV. Confirm that picture and audio are correctly output by
selecting “INPUT4”, “INPUT5” or “INPUT6” using
INPUT1–8
on the remore control unit or
b
on the TV.
The KURO LINK function name used on the web and in catalogues is referred to as HDMI
CONTROL in the operating instructions and on the product.
✔
✔
✔
✔
✔
•
•
•
•
•
•
•
26
TV
DTV
RADIO
1
2
3
4
5
6
7
8
TV
INPUT
4
5
6
7
8
9
1
2
3
0
P.INFO
INFO
P
CH RETURN
EXIT
DVD TOPMENU/
GUIDE
EPG
ENTER
HOME
MENU
MENU
RETURN
CTRL
HDMI
REC STOP
HDD
AV
SELECTION
CM SKIP
DVD
TOOLS
SCREEN
SIZE
SOURCE
TV
STB DVR VCR
DVD
SELECT
KRL3237V_GB.indd 26
KRL3237V_GB.indd 26
2008/06/13 14:50:14
2008/06/13 14:50:14
HDMI-certified
cable
HDMI CONTROL
HDMI CONTROL connection
First connect the Pioneer AV Sound system or a Pioneer BD Player/Pioneer Recorder that supports the HDMI
CEC protocol.
NOTE
Refer to the operation manual of the device to be connected for further details.
After unplugging connection cables or changing the connection pattern, turn on the power of the TV after all relevant devices’
power have been turned on. Change the external input source by pressing
INPUT1–8
, select the appropriate external source
and verify the audiovisual output.
The cables illustrated in the following explanation are commercially available items.
•
•
•
HDMI CONTROL
Set to “On” to enable HDMI CEC functions. When
turning on the power while “HDMI CONTROL” is set
to “On”, the connected HDMI devises’ power will be
turned on in conjunction with the TV.
Press
h
and the “HOME MENU” screen displays.
Press
a
/
b
to select “Option”.
Press
a
/
b
to select “HDMI CONTROL Setup”,
and then press
ENTER
.
Press
a
/
b
to select “HDMI CONTROL”, and
then press
ENTER
.
Press
c
/
d
to select “On”, and then press
ENTER
.
Auto Power On
If this is activated, the One Touch Play function
is enabled. While the TV is in standby mode, it
automatically turns on and plays back the image from
the HDMI source.
1
2
3
4
5
HDMI CONTROL Setup
Repeat steps 1 to 3 in
HDMI CONTROL
.
Press
a
/
b
to select “Auto Power On”, and then
press
ENTER
.
Press
c
/
d
to select “On”, and then press
ENTER
.
NOTE
The factory default for this item is “Off”.
Selecting recorder
Here, you can select a recorder for the recording from
several connected recorders.
Repeat steps 1 to 3 in
HDMI CONTROL
.
Press
a
/
b
to select “Selecting Recorder”, and
then press
ENTER
.
Select the recorder, and then press
ENTER
.
NOTE
If you have connected the Pioneer AV Sound system
between the TV and a Pioneer Recorder, the external
source’s indication changes (e.g. from “INPUT5” to
“INPUT5 (Sub)”).
1
2
3
•
1
2
3
•
Connecting a Pioneer BD
Player/Pioneer Recorder only
Connecting a Pioneer BD Player/Pioneer Recorder via
the Pioneer AV Sound system
27
HDMI-certified cable
Pioneer AV Sound
system
HDMI-certified cable
Pioneer BD Player/
Pioneer Recorder
Optical audio
cable
Pioneer BD Player/
Pioneer Recorder
KRL3237V_GB.indd 27
KRL3237V_GB.indd 27
2008/06/13 14:50:14
2008/06/13 14:50:14

HDMI CONTROL
Operating an HDMI CONTROL
device
HDMI CONTROL allows you to operate the HDMI-
connected device with a single remote control unit.
Press
n
to start playback of a title.
See below, the section “
Playback of titles using
HDMI CONTROL
” if you want to start playback using
the list of the titles of the Pioneer BD Player/Pioneer
Recorder.
Press
o
to fast forward.
Press
m
to reverse.
Press
r
to stop.
Press
a
(TV)
to turn the HDMI-connected
device on/off.
Recording via the Pioneer Recorder EPG
(only for recorders)
You can call up the CEC-compatible recorder’s EPG and
preset timer recordings using the TV’s remote control unit.
Press
HDMI CTRL
.
HDMI CONTROL Menu
Recorder EPG
Top Menu/Title List
Media change
Switch to AV Sound
Switch to TV Sound
Sound mode change
Setup Menu
Model select
Press
a
/
b
to select “Recorder EPG”, and then
press
ENTER
.
The external input source switches and the recorder’s
EPG is displayed.
Select the programme to record.
Refer to the operation manual of the recorder for details.
Playback of titles using HDMI CONTROL
This section explains how to play back a title in the
Pioneer BD Player/Pioneer Recorder.
Press
HDMI CTRL
.
Press
a
/
b
to select “Top Menu/Title List”, and
then press
ENTER
.
The linked recorder now powers on and the TV
automatically selects the appropriate external input source.
The title list data from the connected Pioneer BD
Player/Pioneer Recorder displays.
Select the title with
a
/
b
/
c
/
d
, and then press
n
.
Selecting media type for CEC-compatible
recorder
If your recorder has multiple storage media, select the
media type here.
Press
HDMI CTRL
.
Press
a
/
b
to select “Media change”, and then
press
ENTER
.
1
•
2
1
2
•
3
•
1
2
•
•
3
1
2
Select the desired medium, such as DVD
recorder or HDD. The media type changes every
time you press
ENTER
.
NOTE
This function may not work depending on the connected
recording devices.
Listening with the Pioneer AV Sound system
You can choose to listen to the TV sound only from the
Pioneer AV Sound system.
Press
HDMI CTRL
.
Press
a
/
b
to select “Switch to AV Sound”, and
then press
ENTER
.
The sound from the TV speaker and headphone
terminal is silenced and only the sound from the
Pioneer AV Sound system is audible.
Listening with the TV Sound system
You can choose to listen to the TV sound only from the
TV Sound system.
Press
HDMI CTRL
.
Press
a
/
b
to select “Switch to TV Sound”, and
then press
ENTER
.
Manually changing the Pioneer AV Sound
system’s sound mode
Press
HDMI CTRL
.
Press
a
/
b
to select “Sound mode change”.
The sound mode changes every time you press
ENTER
.
Refer to the operation manual of the Pioneer AV
Sound system for details.
Calling up the menu of an external device
connected with the TV via HDMI
You can call up the menu of an HDMI CEC-compatible
external device (player, recorder, decoder, etc.) using
the “Setup Menu” function.
Press
HDMI CTRL
.
Press
a
/
b
to select “Setup Menu”, and then
press
ENTER
.
NOTE
If a connected device does not have this function or the
device is in a status where the menu cannot be displayed
(recording, entering standby, etc.), this function may not be
available.
HDMI device selection
If multiple HDMI devices are connected in a daisy
chain, you can specify which device to control here.
Press
HDMI CTRL
.
Press
a
/
b
to select “Model select”, and then
press
ENTER
. The HDMI device changes every
time you press
ENTER
.
3
•
1
2
•
1
2
1
2
3
•
1
2
•
1
2
28
KRL3237V_GB.indd 28
KRL3237V_GB.indd 28
2008/06/13 14:50:17
2008/06/13 14:50:17
TV
DTV
RADIO
1
2
3
4
5
6
7
8
TV
INPUT
4
5
6
7
8
9
1
2
3
0
P.INFO
INFO
P
CH RETURN
EXIT
DVD TOPMENU/
GUIDE
EPG
ENTER
HOME
MENU
MENU
RETURN
CTRL
HDMI
REC STOP
HDD
AV
SELECTION
CM SKIP
DVD
TOOLS
SCREEN
SIZE
SOURCE
TV
STB DVR VCR
DVD
SELECT
TV
DTV
RADIO
1
2
3
4
5
6
7
8
TV
INPUT
4
5
6
7
8
9
1
2
3
0
P.INFO
INFO
P
CH RETURN
DVD TOPMENU/
GUIDE
EPG
CTRL
HDMI
REC STOP
HDD
AV
SELECTION
CM SKIP
DVD
TOOLS
SCREEN
SIZE
SOURCE
TV
STB DVR VCR
DVD
SELECT
Menu operation
1
Picture
Sound
Power Control
Setup
Option
Digital Setup
Information
No Signal Off
No Operation Off
Ecology
Sleep Timer
[Disable]
[Disable]
Analogue Search
Digital Search
3 2
NOTE
“HOME MENU” options differ in the selected input modes, but the operating procedures are the same.
The screens in the operation manual are for explanation purposes (some are enlarged, others cropped) and may vary slightly from the actual screens.
Items with
4
cannot be selected for various reasons.
•
•
•
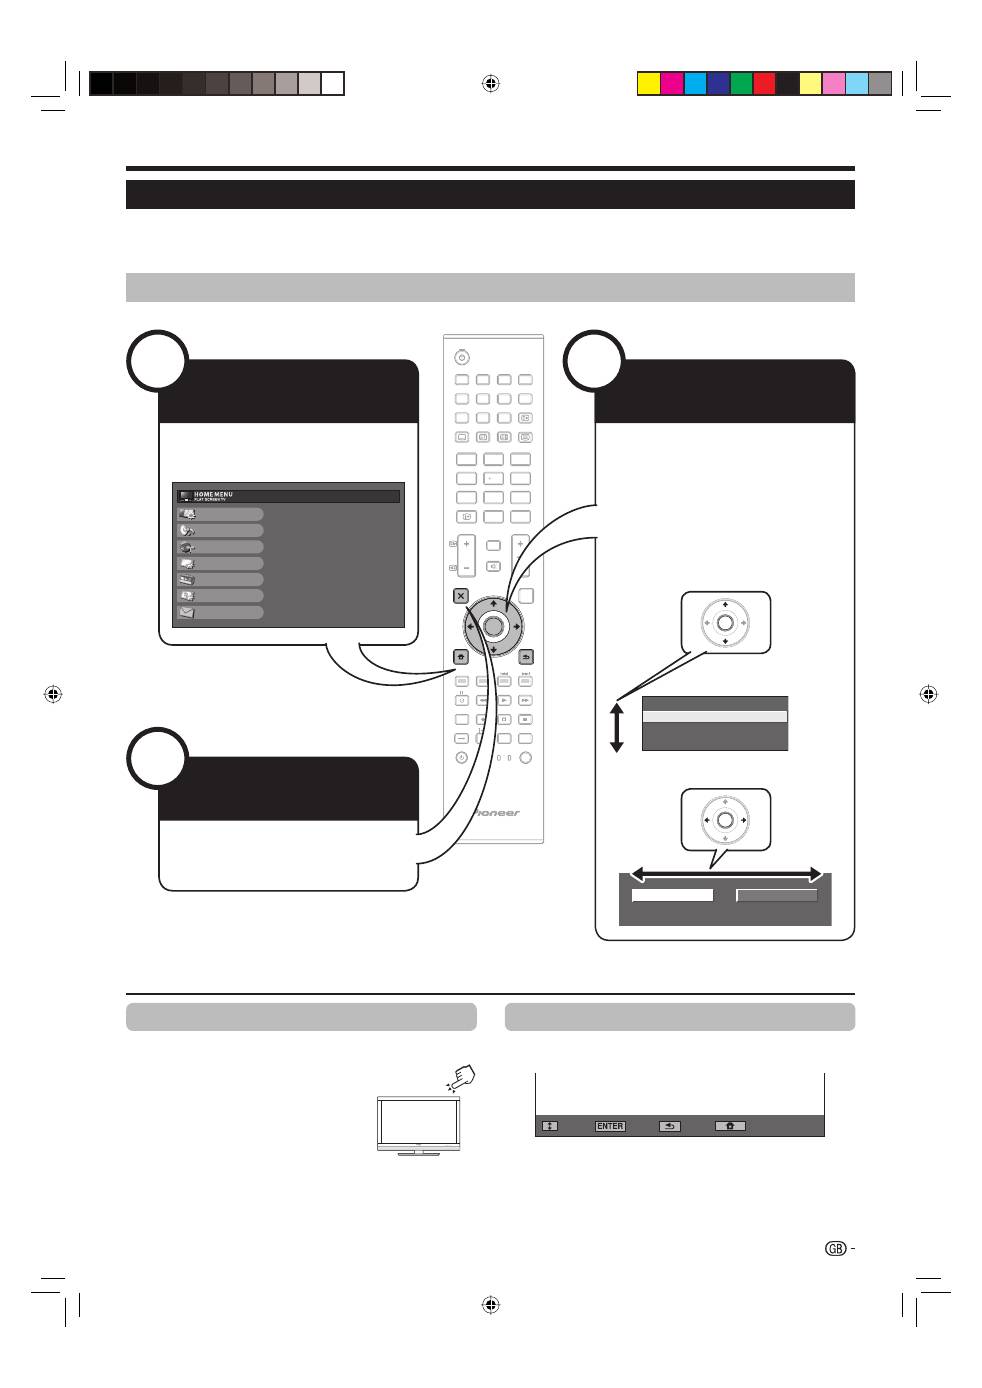
What is the HOME MENU?
You need to call up the OSD to perform settings for the TV. The OSD for the settings is called “HOME MENU”.
The “HOME MENU” enables various settings and adjustments.
The “HOME MENU” can be operated with the remote control unit.
Common operations
•
•
•
Operation without a remote control unit
This function is useful when there is no remote control
unit within your reach.
Press
HOME MENU
and the
“HOME MENU” screen displays.
Press
P
k
/
l
instead of
a
/
b
or
i
k
/
l
instead of
c
/
d
to
select the item.
Press
b
to complete the setting.
NOTE
The “HOME MENU” screen will disappear if left unattended
for several seconds.
1
2
3
•
About the Guide Display
The Guide Display at the bottom of the screen shows
operations with the OSD.
: Select
: Enter
: End
: Back
The bar above is an operational guide for the remote
control unit. The bar will change in accordance with
each menu setting screen.
ENTER
29
Display the HOME
MENU Screen
Exit the HOME
MENU screen
Select an item
Press
h
and the “HOME MENU”
screen displays.
The operation will exit the “HOME
MENU” screen if you press
g
(EXIT)
before it is completed.
Press
a
/
b
/
c
/
d
to select/adjust
the desired menu, and adjust the
item to the desired level, and then
press
ENTER
.
Press
6
to return to the previous
“HOME MENU” page.
ENTER
Selecting in the menu
E
Selecting options
E
KRL3237V_GB.indd 29
KRL3237V_GB.indd 29
2008/06/13 14:50:18
2008/06/13 14:50:18
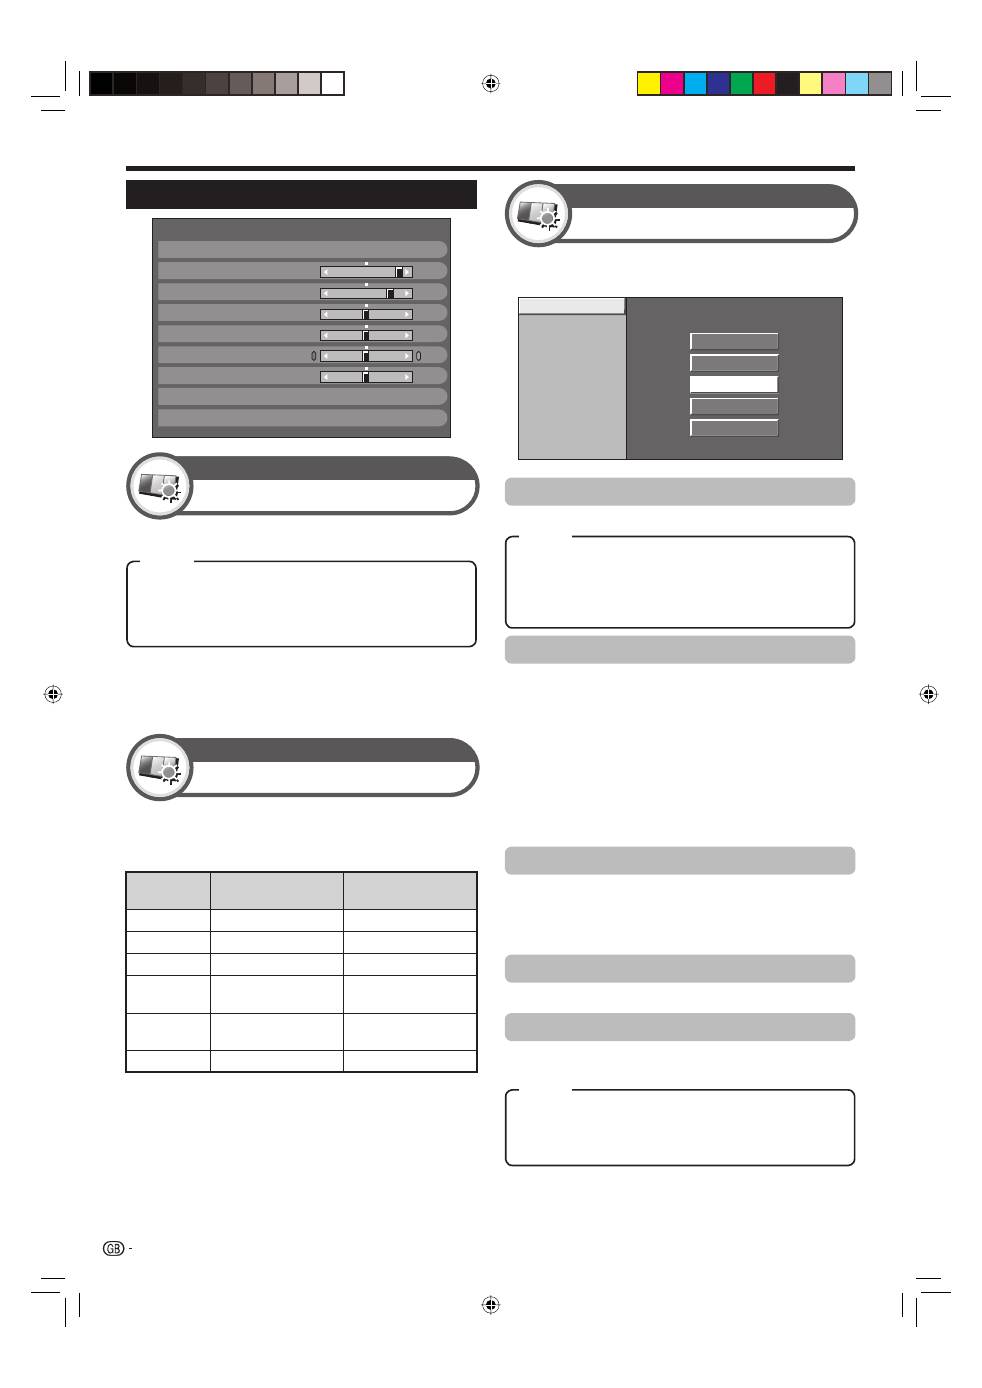
Basic adjustment
NOTE
When set to “On”, the TV senses the surrounding light and
automatically adjusts the backlight brightness. Make sure no
object obstructs the RLS, which could affect its ability to sense
surrounding light.
•
This TV provides various advanced functions for
optimising the picture quality.
Colour Temp.
100Hz
PureCinema
Active Contrast
3D-Y/C
Monochrome
Range of RLS
High
Mid-High
Middle
Mid-Low
Low
Colour Temp.
Adjusts the colour temperature to give the best white image.
NOTE
“3D-Y/C” may not operate depending on the input signal type or
when the input signal is noisy.
“3D-Y/C” has even more effect on composite video signals (CVBS).
•
•
Picture Settings
Contrast
RLS
[Off]
Brightness
Colour
Tint
Sharpness
Pro Adjust
Reset
[+30]
[0]
[0]
[0]
[0]
0
–30
–30
–30
–10
+40
+30
+30
+30
+10
Backlight [+14]
–16
+16
DYNAMIC
100Hz
“100Hz” technology provides superior solutions for
digital display picture quality removing motion blur.
NOTE
Press and hold both
g
and
6
on the remote control unit to show
“100Hz” demonstration in a dual screen format.
This effect is greater on fast moving images.
“100Hz” will have no effect in the following cases;
1) The type of signal received is a PC signal.
2) An OSD is being displayed.
3) Teletext is activated.
If images appear blurred, set the “PureCinema” to “Off”.
PureCinema
Automatically detects a film-based source (originally
encoded at 24 or 25 frames per second, depending on
the vertical frequency), analyses it and then recreates
each still film frame for high-definition picture quality.
Active Contrast
Automatically adjusts the contrast of an image according to the scene.
3D-Y/C
Provides high quality images with minimal dot crawl and
cross colour noise by detecting changes in the image.
•
•
•
•
Off:
The brightness is fixed at the value set in “Backlight”.
On:
Automatically adjusts.
On:Display:
Displays the RLS effect on the screen while
adjusting the brightness of the screen.
RLS
Picture
Automatically adjusts the brightness of the screen.
Adjusts the picture to your preference with the
following picture settings.
Adjustment items
Selectable
items
c
button
d
button
Backlight
The screen dims
The screen brightens
Contrast
For less contrast
For more contrast
Brightness
For less brightness
For more brightness
Colour
For less colour
intensity
For more colour
intensity
Tint
Skin tones become
purplish
Skin tones become
greenish
Sharpness
For less sharpness
For more sharpness
Pro Adjust
Picture
High:
White with bluish tone.
Mid-High:
Intermediate tone between “High” and “Middle”.
Middle:
Natural tone.
Mid-Low:
Intermediate tone between “Middle” and “Low”.
Low:
White with reddish tone.
Standard:
Normal adjustment.
Fast:
Sets the optimum image quality for fast-moving images.
Slow:
Sets the optimum image quality for slow-moving images.
Off:
No detecting.
Picture adjustments
Picture
30
Item
Item
Item
KRL3237V_GB.indd 30
KRL3237V_GB.indd 30
2008/06/13 14:50:22
2008/06/13 14:50:22
Basic adjustment
NOTE
The item marked with * is available only when selecting
“INPUT4”, “INPUT5”, “INPUT6” or “INPUT7” using
INPUT1–8
on the remore control unit or
b
on the TV.
The item marked with ** is available only when accepting
an “x.v.Colour” signal through an HDMI terminal.
•
•
Monochrome
For viewing a colour video in black & white.
Range of RLS
The brightness level range of the RLS’s automatic
adjustments can be set according to your preferences.
The adjustment range of the RLS can be set to a
maximum of
e
16 and a minimum of
f
16.
Selectable
items
Description
Max.
f
16 through
e
16
Min.
f
16 through
e
16
NOTE
This function is available only when the “RLS” setting is set
to “On” or “On:Display”.
The maximum setting cannot be set to a smaller number
than the minimum setting.
The minimum setting cannot be set to a bigger number
than the maximum setting.
The maximum and minimum settings cannot be set to the
same number.
Depending on the brightness of the surrounding light, the
RLS might not operate if the adjustment range is small.
AV SELECTION
AV SELECTION
gives you several viewing options to
choose from to best match the system environment,
which can vary due to factors like room-brightness,
type of programme watched or the type of image input
from external equipment.
Press
AV SELECTION
.
Each time you press
AV SELECTION
, the mode
changes.
You can also switch the mode on the “Picture” and
“Sound” menu screen by pressing
AV SELECTION
.
•
•
•
•
•
1
2
•
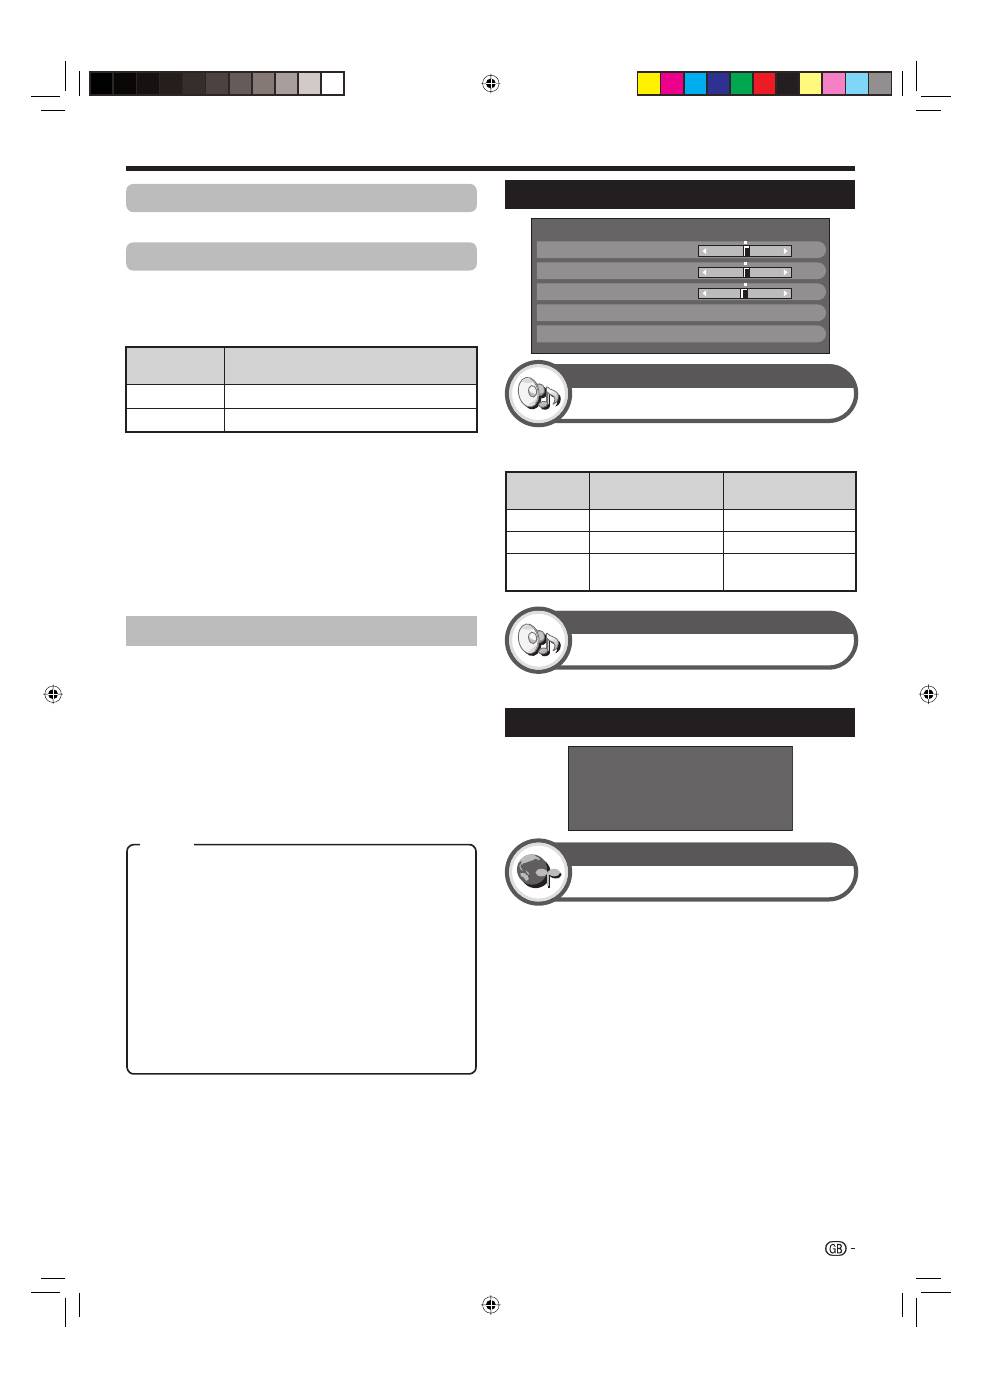
Sound Settings
Balance
Treble
Surround
Reset
[ 0]
[ 0]
–15
L
+15
R
[Off]
Bass
[ 0]
–15
+15
DYNAMIC
STANDARD:
For a highly defined image in a normally
bright room.
MOVIE:
For viewing a movie in a darkened room.
GAME:
For playing of video games.
PC*:
For PC.
x.v.Colour**:
Produce realistic colour on the TV screen
unlike any other signal.
USER:
Allows you to customise settings as desired. You
can set the mode for each input source.
DYNAMIC (Fixed):
For a clear-cut image emphasising
high contrast for sports viewing (The “Picture” and
“Sound” settings cannot be adjusted).
DYNAMIC:
For a clear-cut image emphasising high
contrast for sports viewing.
Sound adjustment
Sound
Surround
Sound
No Signal Off
Power Control
When set to “Enable”, the TV will automatically enter
standby mode if there is no signal input for 15 minutes.
Five minutes before the TV enters standby mode, the
remaining time displays every minute.
NOTE
Even if a TV programme finishes, this function may not
operate because of interference from other TV stations or
other signals.
•
•
This function allows you to enjoy realistic live sound.
Power Save Settings
No Signal Off
No Operation Off
Ecology
Sleep Timer
[Disable]
[Disable]
You can adjust the sound quality to your preference
with the following settings.
Selectable
items
c
button
d
button
Treble
For weaker treble
For stronger treble
Bass
For weaker bass
For stronger bass
Balance
Decrease audio from
the right speaker
Decrease audio from
the left speaker
31
Item
KRL3237V_GB.indd 31
KRL3237V_GB.indd 31
2008/06/13 14:50:23
2008/06/13 14:50:23
The TV will automatically enter standby mode if no
operations are performed during the time span you set
(“30min.” or “3hr.”).
Five minutes before the TV enters standby mode, the
remaining time displays every minute in the lower-left
corner of the screen.
•
When set to “Yes”, the TV activates the following
power saving mode.
“RLS” set to “On” (Page 30).
“Standby Mode” set to “Mode2” (Page 38).
“No Signal Off” set to “Enable” (Page 31).
“No Operation Off” set to “3hr.” (Page 32).
•
•
•
•
Allows you to set a time when the TV automatically
enters standby mode.
NOTE
Select “Off” to cancel the sleep timer.
When the time has been set, countdown automatically
starts.
Five minutes before the preset of time expires, the
remaining time displays each minute in the lower-left corner
of the screen.
Channel Settings
Auto Installation
•
•
•
No Operation Off
Power Control
Ecology
Power Control
Sleep Timer
Power Control
Basic adjustment
Auto Installation
Setup
The TV automatically detects and stores all available
services in your area. This function also allows you to
perform the channel setting for digital and analogue
individually and reconfigure the settings after the initial
auto installation has been completed.
After selecting “Yes” on the screen, you can set
language and channel search the same as in the
initial auto installation. Follow steps 2, 4 and 5
on page 15.
NOTE
You cannot set the country setting in “Auto Installation” in
the “Setup” menu. If you want to reconfigure the country
setting, automatically execute initial auto installation after
executing “Reset” from the “Setup” menu.
The current country setting is displayed on the screen.
•
•
Programme Setup
Setup
Digital Setting
You can reconfigure the DTV service settings
automatically or manually.
Additional Search
Use this menu to add new services automatically after
auto installation has been completed.
Manual Search
Add new services within a specified frequency band.
Enter the frequency using
0
–
9
numeric buttons.
You can perform “Manual Search” with a service number
only when the five Nordic countries have been selected in
the country setting.
Manual Adjust
Configure various settings for each service using the
Colour (Red/Green/Yellow/Blue)
buttons.
DTV 993
Service
No.
Old
LCN
EPG
Skip
CH
Skip
Lock
Service
Name
SIT 3
DTV 994
✔ ✔
SIT 2
DTV 995
✔
SIT 1
DTV
999
HD Monosco
: Lock
: CH Skip
: EPG Skip
: Sort
Press
a
/
b
to select the desired service.
Press the colour button on the remote control unit
corresponding with the item you want to reconfigure.
The
✔
mark indicates the operation is set to on. Each
time the colour button is pressed, you can switch the
corresponding operation on/off.
E
E
•
•
E
1
2
•
Digital channel settings
32
Buttons for Manual Adjust operation
Lock: Press Red button.
When the service is locked, you must enter your PIN
whenever you tune to the service.
CH Skip: Press Green button.
Services with a
✔
mark are passed over when pressing
P
e
/
f
on the TV or remote control unit.
EPG Skip: Press Yellow button.
Services with a
✔
mark are passed over in the Electronic
Programme Guide (EPG).
Sort: Press Blue button.
The item position of services can be sorted.
Press
a
/
b
to select the service whose item
position you want to move, and then press
ENTER
.
DTV 994
✔ ✔
SIT 2
DTV 995
✔
SIT 1
Press
a
/
b
to move it to the desired position,
and then press
ENTER
.
DTV
994
✔
✔
SIT 1
DTV
995
✔
SIT 2
Repeat steps 1 and 2 until all desired service
items are sorted.
1
2
3
KRL3237V_GB.indd 32
KRL3237V_GB.indd 32
2008/06/13 14:50:25
2008/06/13 14:50:25

Basic adjustment
Channels with “Skip” set to “On” are passed over
when using
P
k
/
l
even if selected while watching the
image from the TV.
When connecting a decoder to the TV, you need to
select “INPUT1” or “INPUT2”.
NOTE
The factory preset value is “Off”.
•
You can block the viewing of any channel.
NOTE
See “Child Lock” for setting a PIN.
When “Lock” is set to “On” for a channel, “Child lock has
been activated” displays, and the image and sound of the
channel are blocked.
When pressing
6
while “Child lock has been activated”
displays, the PIN input window will display. Inputting the
correct PIN unlocks the “Child Lock” temporarily until the
power is turned off.
Sort
Channel positions can be sorted freely.
Press
c
/
d
to select “Yes”, and then press
ENTER
.
Press
a
/
b
/
c
/
d
to select the channel you
want to move, and then press
ENTER
.
Press
a
/
b
/
c
/
d
to move it to the desired
position, and then press
ENTER
.
Repeat steps 2 and 3 until all desired channels
are sorted.
Erase Programme
Channels can be erased individually.
Press
c
/
d
to select “Yes”, and then press
ENTER
.
Press
a
/
b
/
c
/
d
to select the channel you
want to erase, and then press
ENTER
.
A message window pops up.
Press
c
/
d
to select “Yes”, and then press
ENTER
to erase the selected channel. All the
subsequent channels move up.
Repeat steps 2 and 3 until all desired channels
are erased.
•
•
•
E
1
2
3
4
E
1
2
•
3
4
Programme Setup
Setup
Analogue Setting
You can reconfigure the analogue TV channels settings
automatically or manually.
Additional Search
Use this menu to add new channels automatically after
auto installation has been made.
Start searching channels after selecting the colour system
and sound system.
Manual Adjust
Use this menu to set up analogue TV channels
manually.
After selecting “Yes” on the screen, press
a
/
b
/
c
/
d
to select the channel you want to set and
then press
ENTER
.
E
•
E
You can adjust the frequency to the desired position.
NOTE
Adjust while checking the background picture as a
reference.
Instead of pressing
c
/
d
to adjust the frequency, you
can set by directly entering the frequency number of the
channel with
0
–
9
numeric buttons.
EXAMPLE
179.25 MHz: Press
1
s
7
s
9
s
2
s
5
.
49.25 MHz: Press
4
s
9
s
2
s
5
s
ENTER
.
•
•
•
•
Select the optimum colour system to receive (“Auto”,
“PAL”, “SECAM”).
Select the optimum sound systems (Broadcasting
systems) to receive (“B/G”, “D/K”, “I”, “L/L’”).
When a TV channel sends its Network Name, the
“Auto Installation” detects the information and assigns
a name to it. However, you can change channel names
individually.
Press
a
/
b
/
c
/
d
to select each character of
the new name for the channel, and then press
ENTER
.
Repeat step 1 above until the name is fully spelt
out.
NOTE
The name can be five characters or less.
If a channel name is less than five characters, select “END”
to set the channel name.
1
2
•
•
Analogue channel settings
33
Fine
Colour sys.
Sound sys. (Broadcasting systems)
Label
Skip
Decoder
Lock
KRL3237V_GB.indd 33
KRL3237V_GB.indd 33
2008/06/13 14:50:26
2008/06/13 14:50:26
Basic adjustment
Child Lock
Setup
Allows you to use a PIN to protect certain settings
from being accidentally changed.
Change PIN
Register a four-digit password number to use the
“Child Lock” function.
Enter the four-digit number as a PIN using
0
–
9
numeric buttons.
Enter the same four-digit number as in step 1 to
confirm.
“The system PIN has been changed successfully” displays.
NOTE
To view a locked channel, you must enter the PIN (See pages 32
and 33 for locking channels from viewing in DTV and ATV mode).
When you select a locked channel, a PIN prompt message pops
up. Press
6
to display the PIN input window.
Cancel PIN
Allows you to reset your PIN.
NOTE
As a precautionary measure, make a note of your PIN on the
back of this operation manual, cut it out and keep it in a safe
place that children cannot reach.
Parental rating
This function allows DTV services to be restricted.
It prevents children from watching violent or sexual
scenes that may be harmful.
NOTE
“Universal viewing” and “Parental approval pref.” are ratings used
exclusively in France.
Refer to page 46 for details about ratings.
1
2
•
•
•
•
•
Language
Setup
You can select a OSD language from the “Setup”
menu. Select from among 22 languages (Czech,
Danish, Dutch, English, Estonian, Finnish, French,
German, Greek, Hungarian, Italian, Latvian, Lithuanian,
Norwegian, Polish, Portuguese, Russian, Slovak,
Slovene, Spanish, Swedish, Turkish).
Subtitle
Digital Setup
Set up to two preferred subtitle languages (including
subtitles for the hearing impaired) to display if subtitles
are available.
NOTE
Subtitles will not be displayed when the service does not contain
subtitle information.
•
Digital Audio Language
Option
Set up to three preferred multi audio languages to
display if the audio languages are available.
Switching the multi audio languages
Each time you press
t
on the remote control unit,
the audio language switches.
E
Key Lock
Option
This function allows you to lock the buttons on the TV
or remote control unit in order to prohibit children from
changing the channel or volume.
NOTE
You cannot set both “RC Control Lock” and “Button Control Lock”
at the same time.
Cancelling the lock
Press the
HOME MENU
button on the TV and set to
“Off” to cancel the “RC Control Lock”. Press the
h
button on the remote control unit and set to “Off” to
cancel the “Button Control Lock”.
Refer to page 29 for menu operation using the
h
button on the TV.
•
E
•
1st Language
E
2nd Language
For hearing impaired
E
E
Switching subtitle languages
Each time you press
[
on the remote control unit, the
subtitle switches.
E
Password/Parental lock settings
Off:
Unlocks the buttons.
RC Control Lock:
Locks all buttons on the remote control unit.
Button Control Lock:
Locks the buttons on the TV except the
power switch.
Language Settings (language,
subtitle, multi audio)
1st Language
Off
2nd Language
• • • • • •
1st Language
1st Language
(For hearing impaired)
Set “For hearing impaired” to “Yes”
Subtitles for the hearing impaired have priority over
each of the subtitle language settings (Example: “1st
Language”, “2nd Language”, etc.).
EXAMPLE
E
34
Item
Selectable items
KRL3237V_GB.indd 34
KRL3237V_GB.indd 34
2008/06/13 14:50:27
2008/06/13 14:50:27
Useful Viewing functions
WSS
Setup
WSS signal 4:3 screen
4:3 Mode
Setup
The “WSS” signal has 4:3 auto-switching that allows
you to select between “4:3” and “WIDE”.
4:3 mode “WIDE”
4:3 mode “4:3”
The “WSS” allows the TV to switch automatically
among the different picture size.
NOTE
Use
SCREEN SIZE
if an image does not switch to the
appropriate picture size. When the broadcast signal
contains no “WSS” information, the function will not work
even if enabled.
Selecting the WSS (Wide Screen
Signalling) picture size manually
•
Selecting the picture size
Selecting the WSS (Wide Screen
Signalling) picture size automatically
4:3:
Normal range keeping 4:3 or 16:9 aspect ratio.
WIDE:
Wide image without side bars.
Selecting the picture size manually
You can select the picture size. Selectable picture size
varies with the type of signal received.
4:3:
Keeps the original aspect ratio in a full screen display.
CINEMA 14:9:
For 14:9 letterbox pictures. A thin side bar
appears on each side, and you may also see bars on
the top and bottom with some programmes.
WIDE:
In this mode, the picture is stretched toward each
side of the screen.
FULL:
For 16:9 squeeze pictures.
ZOOM:
For 16:9 letterbox pictures. Bars may appear on
the top and bottom with some programmes.
CINEMA:
For 14:9 letterbox pictures. Bars may appear
on the top and bottom with some programmes.
FULL:
Displays with an Overscan image. Crops all sides
of screen.
Underscan:
Displays with an Underscan image only
when receiving a 720p signal. Displays with the High-
Definition image adjusted optimally. Noise may appear
on the edge of the screen with some programmes.
Dot by Dot:
Displays an image with the same number
of pixels on the screen when receiving 1080i/1080p
signals only.
NOTE
Some items do not appear depending on the type of
received signal.
Press
SCREEN SIZE
.
The
SCREEN SIZE
menu displays.
The menu lists the
SCREEN SIZE
options selectable
for the type of video signal currently received.
Press
SCREEN SIZE
or
a
/
b
while the
SCREEN SIZE
menu displays on the screen.
As you toggle the options, each is immediately
reflected on the screen. There is no need to press
ENTER
.
Basically, if you set “WSS” to “On” in the “Setup”
menu, the optimum
SCREEN SIZE
is automatically
chosen for every broadcast, VCR or DVD player/
recorder.
NOTE
Even if you select your desired
SCREEN SIZE
manually,
the TV may automatically switch to the optimum
SCREEN
SIZE
depending on the signal received when “WSS” is set
to “On”.
•
1
•
•
2
•
•
35
Item
Item (for SD [Standard-Definition] signals)
Item (for HD [High-Definition] signals)
KRL3237V_GB.indd 35
KRL3237V_GB.indd 35
2008/06/13 14:50:28
2008/06/13 14:50:28
You can use this menu to set the appropriate picture
size for viewing a 16:9 format TV programme on a 4:3
TV.
REC Picture Size
Digital Setup
Setting to “4:3 TV”
Setting to “16:9 TV”
This function allows you to automatically change to the
appropriate picture size when viewing an HDMI signal
using the INPUT4, 5 and 6 terminals.
Other picture and audio settings
Adjusting image position
HDMI Auto View
Setup
NOTE
This function must be set before recording.
Selecting the HDMI picture size
automatically
•
Position
Setup
For adjusting a picture’s horizontal and vertical
position.
NOTE
Adjustments are stored separately for each input source.
Depending on the input signal type or
SCREEN SIZE
setting, a position setting may not be available.
•
•
DNR
Option
“DNR” (Digital Noise Reduction) produces a clearer
image (“Off”, “High”, “Low”).
Automatic volume adjustment
Auto Volume
Option
Different sound sources sometimes do not have the
same volume level, such as a programme and its
commercial breaks. The Automatic Volume Control
(Auto Volume) reduces this problem by equalizing
levels.
Emphasising dialogue
Clear Voice
Option
This function emphasises speech against background
noise for greater clarity. It is not recommended for
music sources.
Outputting audio only
Audio Only
Option
When listening to music from a music programme, you
can set the TV off and enjoy audio only.
Useful Viewing functions
Selecting the recording picture
size manually
H-Pos.:
Centres the image by moving it to the left or
right.
V-Pos.:
Centres the image by moving it up or down.
Reducing noise on the screen
Off:
Both screen images and audio are output.
On:
Audio is output without a screen image.
36
Item
Item
KRL3237V_GB.indd 36
KRL3237V_GB.indd 36
2008/06/13 14:50:29
2008/06/13 14:50:29
Useful Viewing functions
Time Display
Option
Time Format
You can select the time format (either “24HR” or “AM/
PM”) for the clock time.
Game Play Time
Option
This function allows you to display the elapsed time on
the screen when
AV SELECTION
is set to “GAME”.
Programme Title Display
Option
This function allows you to display programme
information such as the title and airtime by tuning a
channel.
NOTE
This function is available only when the DTV mode is
selected.
•
Time Display
This function allows you to display the clock time in the
lower-right corner of the screen.
Four digit numbers (e.g. 0001) are displayed after
selecting the five Nordic countries in the country
setting.
Time display in channel information
You can display the time information included in DTV
and teletext broadcasts.
NOTE
Skip step 1 if receiving DTV broadcasts.
Select a TV channel (The time information is
automatically captured).
Press
p
. The channel display will appear on
the TV.
Press
p
again within the several seconds
that the channel display is on the screen. Time
information will be shown in the lower-right
corner of the screen for several seconds.
Even when you change the TV channel, you can
display the time information with steps 2 and 3
above.
NOTE
If acquired successfully, the time information will appear in
the upper-right corner of the screen by pressing
h
.
*
E
•
1
2
3
4
•
Subtitle ENG
1/3
:
New Information
Audio (ENG)
STEREO
:
Video
1080i
:
DTV
001
BBC2
Subtitle
Teletext Off
:
New Information
PAL
I
NICAM
STEREO
ATV
01
BBC1
DTV Mode
ATV Mode
Display Settings
Channel display
You can display the channel information by pressing
p
on the remote control unit.
Time and Title display
On:
Displays the clock time.
On (half-hourly):
Displays the clock time in 30-minute
increments.
Off:
Hides the clock time.
On:
Under connecting a game console to the TV, the
elapsed time is displayed in 30-minute increments
in the lower-left corner of the screen after
AV
SELECTION
is set to “GAME”.
Off:
Hides the time.
37
Item
Item
KRL3237V_GB.indd 37
KRL3237V_GB.indd 37
2008/06/13 14:50:29
2008/06/13 14:50:29


