Karcher MV 4: instruction
Class: Household, kitchen appliances, electronics and equipment
Type: Vacuum Cleaner
Manual for Karcher MV 4

MV 4
MV 4 Premium
www.kaercher.com/register-and-win
59653160 03/14
Δϳ
214
ΒήόϠ
Deutsch 5
English 11
Français 17
Italiano 24
Nederlands 30
Español 36
Português 42
Dansk 48
Norsk 54
Svenska 60
Suomi 66
Ελληνικά 72
Türkçe 79
Русский 85
Magyar 93
Čeština 99
Slovenščina 105
Polski 111
Româneşte 118
Slovenčina 124
Hrvatski 130
Srpski 136
Български 142
Eesti 149
Latviešu 155
Lietuviškai 161
Українська 167
Қазақша 175

4
3
2
5
6
7
8
1
1
9
10
11
12
13
14
15
16
2

3

4

Inhaltsverzeichnis
Umweltschutz
Die Verpackungsmaterialien sind re-
Allgemeine Hinweise . . . . . . . . DE . . .5
cyclebar. Bitte werfen Sie die Verpa-
Sicherheitshinweise . . . . . . . . . DE . . .6
ckungen nicht in den Hausmüll, son-
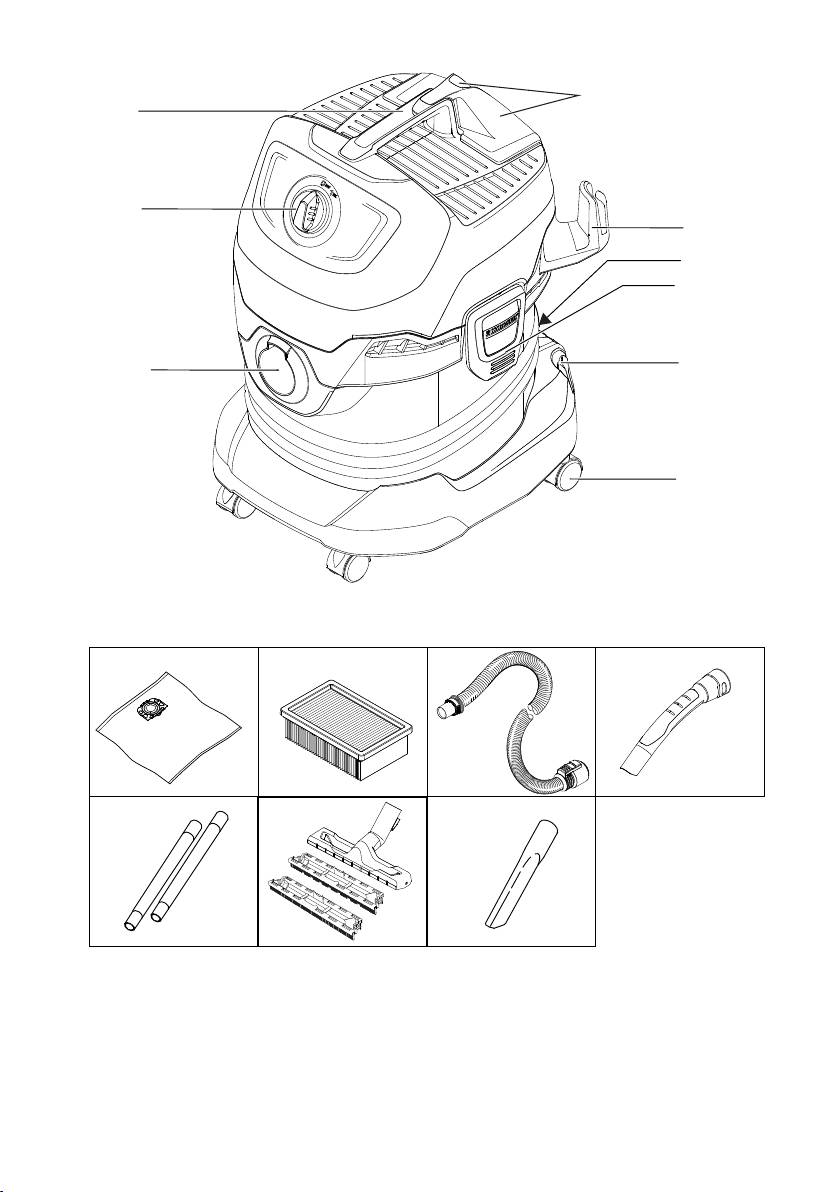
Gerätebeschreibung. . . . . . . . . DE . . .7
dern führen Sie diese einer Wieder-
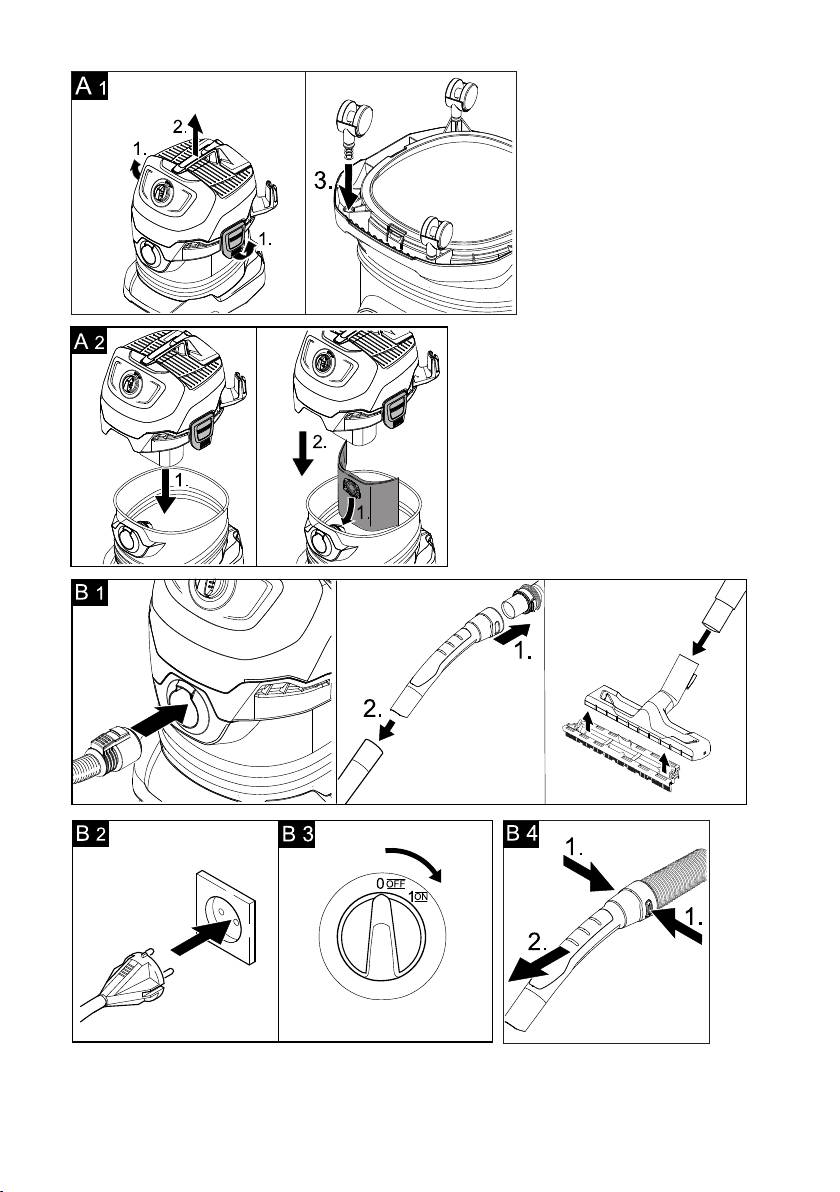
Bedienung . . . . . . . . . . . . . . . . DE . . .9
verwertung zu.
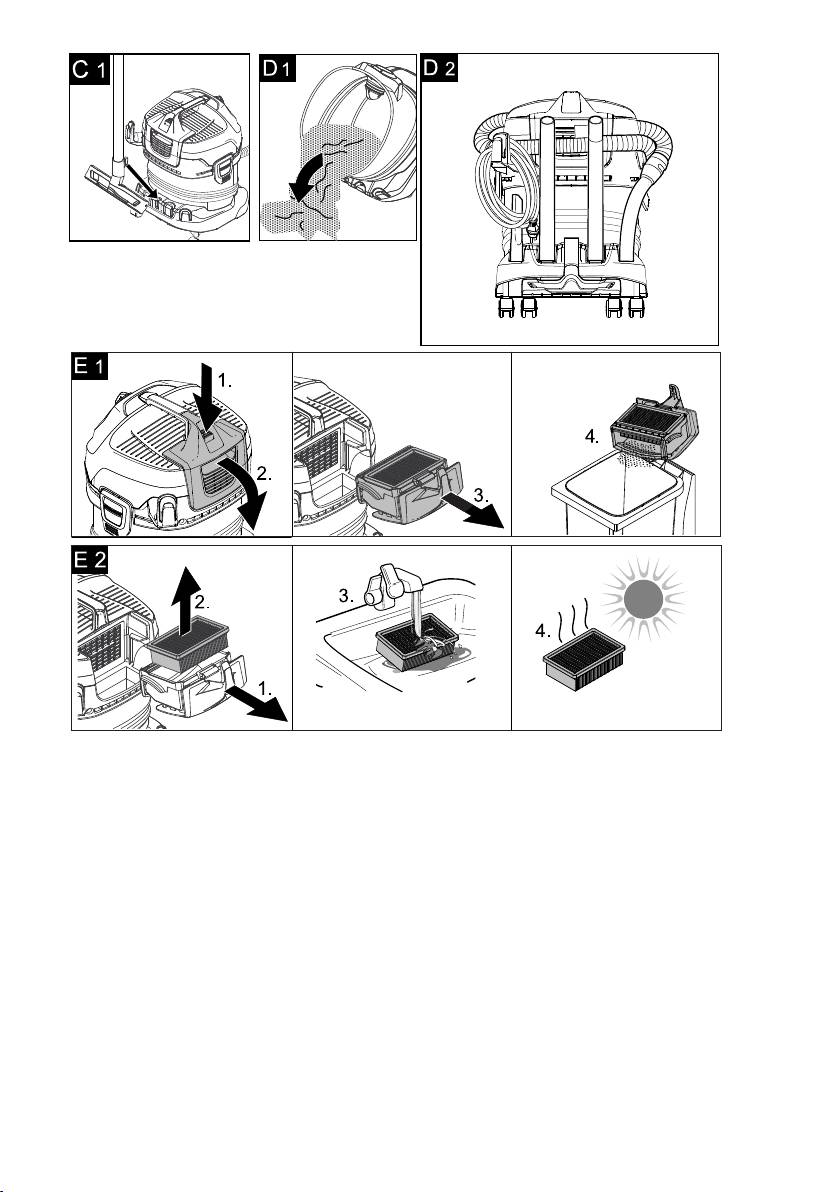
Pflege und Wartung . . . . . . . . . DE . .10
Altgeräte enthalten wertvolle recyc-
Hilfe bei Störungen. . . . . . . . . . DE . .10
lingfähige Materialien, die einer Ver-
Technische Daten. . . . . . . . . . . DE . .10
wertung zugeführt werden sollten.
Bitte entsorgen Sie Altgeräte deshalb
über geeignete Sammelsysteme.
Allgemeine Hinweise
Entsorgung von Filter und
Sehr geehrter Kunde,
Filterbeutel
Lesen Sie vor der ersten Benut-
Filter und Filterbeutel sind aus umweltver-
zung Ihres Gerätes diese Origi-
träglichen Materialien hergestellt.
nalbetriebsanleitung, handeln Sie danach
Sofern sie keine eingesaugten Substanzen
und bewahren Sie diese für späteren Ge-
enthalten, die für den Hausmüll verboten
brauch oder für Nachbesitzer auf.
sind, können sie über den normalen Haus-
müll entsorgt werden.
Bestimmungsgemäße Verwendung
Hinweise zu Inhaltsstoffen (REACH)
Das Gerät ist gemäß der in dieser Betriebs-
Aktuelle Informationen zu Inhaltsstoffen fin-
anleitung aufgeführten Beschreibungen
den Sie unter:
und Sicherheitshinweise zur Verwendung
www.kaercher.de/REACH
als Mehrzwecksauger bestimmt.
Kundendienst
Dieses Gerät wurde für den privaten Ge-
brauch entwickelt und ist nicht für die Bean-
Bei Fragen oder Störungen hilft Ihnen unsere
spruchungen des gewerblichen Einsatzes
KÄRCHER-Niederlassung gerne weiter.
vorgesehen.
(Adresse siehe Rückseite)
– Das Gerät vor Regen schützen. Nicht
Bestellung von Ersatzteilen und
im Außenbereich lagern.
Sonderzubehör
– Asche und Ruß dürfen mit diesem Ge-
Eine Auswahl der am häufigsten benötig-
rät nicht gesaugt werden.
ten Ersatzteile finden Sie am Ende der Be-
Den Mehrzwecksauger nur benutzen mit:
triebsanleitung.
– Original-Filterbeutel.
Ersatzteile und Zubehör erhalten Sie bei ih-
– Original-Ersatzteilen, -Zubehör oder -
rem Händler oder bei ihrer KÄRCHER-Nie-
Sonderzubehör.
derlassung.
Der Hersteller haftet nicht für eventuelle
Schäden, die durch nicht bestimmungsge-
Garantie
mäßen Gebrauch oder falsche Bedienung
In jedem Land gelten die von unserer zu-
verursacht werden.
ständigen Vertriebsgesellschaft herausge-
gebenen Garantiebedingungen. Etwaige
Störungen an Ihrem Gerät beseitigen wir
innerhalb der Garantiefrist kostenlos, so-
fern ein Material- oder Herstellungsfehler
die Ursache sein sollte. Im Garantiefall
wenden Sie sich bitte mit Kaufbeleg an Ih-
ren Händler oder die nächste autorisierte
Kundendienststelle.
– 5
5DE

– Gerät nach jedem Gebrauch
Sicherheitshinweise
und vor jeder Reinigung/War-
– Dieses Gerät ist nicht dafür
tung ausschalten.
bestimmt, durch Personen
– Brandgefahr. Keine brennen-
mit eingeschränkten physi-
den oder glimmenden Ge-
schen, sensorischen oder
genstände aufsaugen.
geistigen Fähigkeiten oder
– Der Betrieb in explosionsge-
mangels Erfahrungen und/
fährdeten Bereichen ist unter-
oder mangels Wissen benutzt
sagt.
zu werden, es sei denn, sie
몇 Elektrischer Anschluss
werden durch eine für ihre Si-
Das Gerät nur an Wechselstrom
cherheit zuständige Person
anschließen. Die Spannung
beaufsichtigt oder erhielten
muss mit dem Typenschild des
von ihr Anweisungen, wie das
Gerätes übereinstimmen.
Gerät zu benutzen ist und ha-
Stromschlaggefahr
ben die daraus resultieren-
Netzstecker und Steckdose nie-
den Gefahren verstanden.
mals mit feuchten Händen an-
– Kinder dürfen das Gerät nur
fassen.
dann verwenden, wenn sie
Netzstecker nicht durch Ziehen
über 8 Jahre alt sind und
an der Anschlussleitung aus der
wenn sie durch eine für ihre
Steckdose ziehen.
Sicherheit zuständige Person
Anschlussleitung mit Netzste-
beaufsichtigt werden oder
cker vor jedem Betrieb auf
von ihr Anweisungen erhiel-
Schäden prüfen. Beschädigte
ten, wie das Gerät zu benut-
Anschlussleitung unverzüglich
zen ist und die daraus resul-
durch autorisierten Kunden-
tierenden Gefahren verstan-
dienst/Elektro-Fachkraft austau-
den haben.
schen lassen, um Gefährdun-
– Kinder dürfen mit dem Gerät
gen zu vermeiden.
nicht spielen.
Zur Vermeidung von Elektroun-
– Kinder beaufsichtigen, um si-
fällen empfehlen wir, Steckdo-
cherzustellen, dass sie nicht
sen mit vorgeschaltetem Fehler-
mit dem Gerät spielen.
strom-Schutzschalter (max.
– Die Reinigung und Anwen-
30 mA Nennauslöse-Stromstär-
derwartung dürfen von Kin-
ke) zu benutzen.
dern nicht ohne Aufsicht
durchgeführt werden.
– Verpackungsfolien von Kin-
dern fernhalten, es besteht
Erstickungsgefahr!
6 DE
– 6

Warnung
Gerätebeschreibung
Bestimmte Stoffe können durch
Abbildungen siehe Ausklapp-
die Verwirbelung mit der Saug-
seite!
luft explosive Dämpfe oder Ge-
mische bilden!
Diese Betriebsanleitung beschreibt die
auf dem vorderen Umschlag aufgeführ-
Nachfolgende Stoffe niemals
ten Mehrzwecksauger.
aufsaugen:
Die Abbildungen zeigen die maximale
– Explosive oder brennbare
Ausstattung, je nach Modell gibt es Un-
Gase, Flüssigkeiten und
terschiede in Ausstattung und mitgelie-
Stäube (reaktive Stäube)
fertem Zubehör.
– Reaktive Metall-Stäube (z.B.
Prüfen Sie beim Auspacken den Pa-
ckungsinhalt auf fehlendes Zubehör oder
Aluminium, Magnesium,
Beschädigungen. Benachrichtigen Sie bei
Zink) in Verbindung mit stark
Transportschäden bitte Ihren Händler.
alkalischen und sauren Reini-
gungsmitteln
Saugschlauchanschluss
– Unverdünnte starke Säuren
Abbildung
und Laugen
Zum Anschließen des Saugschlauches
– Organische Lösungsmittel
beim Saugen.
(z.B. Benzin, Farbverdünner,
Geräteschalter (EIN/AUS)
Aceton, Heizöl).
Zusätzlich können diese Stoffe
Abbildung
die am Gerät verwendeten Ma-
Stellung I: Gerät ist eingeschaltet.
terialien angreifen.
Stellung 0: Gerät ist ausgeschaltet.
Symbole in der Betriebsanleitung
Tragegriff
Gefahr
Zum Tragen des Gerätes oder zum Ab-
Für eine unmittelbar drohende
nehmen des Gerätekopfes nach dem
Gefahr, die zu schweren Körper-
Entriegeln.
verletzungen oder zum Tod
Filterkassette und Entriegelungs-
führt.
taste
몇 Warnung
Abbildung
Für eine möglicherweise gefähr-
Abbildung
liche Situation, die zu schweren
Zur Reinigung des Filters Entriege-
lungstaste drücken, Filterkassette her-
Körperverletzungen oder zum
ausklappen und entnehmen.
Tod führen könnte.
Vorsicht
Zubehöraufnahme Haken
Für eine möglicherweise gefähr-
Diese Zubehöraufnahme ermöglicht die
liche Situation, die zu leichten
Aufbewahrung von Saugdüsen und Netz-
Verletzungen oder zu Sach-
kabel.
schäden führen kann.
– 7
7DE

Zum Entnehmen Raste mit Daumen
Parkposition
drücken und Saugschlauch herauszie-
hen.
Abbildung
Hinweis: Zubehöre, wie z. B. Saugbürsten
Zum Abstellen der Bodendüse bei Ar-
(optional), können direkt auf das Verbin-
beitsunterbrechungen.
dungsstück aufgesteckt und somit mit dem
Saugschlauch verbunden werden.
Behälterverschluss
Für bequemes Arbeiten auch auf engen
Räumen.
Abbildung
Der abnehmbare Handgriff kann bei Bedarf
Zum Öffnen nach außen ziehen, zum
zwischen Zubehör und Saugschlauch an-
Verriegeln nach innen drücken.
gebracht werden.
Zubehöraufnahme Behälter
Siehe Position 13.
Empfehlung: Zum Bodensaugen Hand-
Abbildung
griff auf Saugschlauch stecken.
Diese Zubehöraufnahme ermöglicht die
Abnehmbarer Handgriff
Aufbewahrung von Saugrohren oder
sonstigem Zubehör.
Abbildung
Lenkrolle
Handgriff mit Saugschlauch verbinden,
bis er einrastet.
Abbildung
Abbildung
Behälter umdrehen, Lenkrollen in die
Zur Abnahme des Handgriffes von
Öffnungen am Behälterboden bis zum
Saugschlauch, Raste mit Daumen drü-
Anschlag eindrücken.
cken und Handgriff abziehen.
Hinweis: Durch die Abnahme des Hand-
Filterbeutel
griffes können Zubehöre auch direkt auf
den Saugschlauch gesteckt werden.
Hinweis: Zum Nasssaugen darf kein Filter-
Siehe Position 12.
beutel eingesetzt werden!
Empfehlung: Zum Bodensaugen Hand-
Abbildung
griff auf Saugschlauch stecken.
Empfehlung: Zum Saugen von Fein-
staub den Filterbeutel einsetzen.
Saugrohre 2 x 0,5 m
Flachfaltenfilter
Abbildung
(bereits im Gerät eingesetzt)
Beide Saugrohre zusammenstecken
Vorsicht
und mit Handgriff verbinden.
Immer mit eingesetztem Flach-
Bodendüse
faltenfilter arbeiten, sowohl beim
(mit Einsätzen)
Nass- als auch beim Trocken-
Zum Bodensaugen von trockenem
saugen!
Schmutz, Einsatz mit zwei Bürstenstrei-
fen in die Bodendüse einklipsen.
Saugschlauch mit Verbindungs-
Zum Bodensaugen von Wasser, Ein-
stück
satz mit zwei Gummilippen in die Bo-
Abbildung
dendüse einklipsen.
Saugschlauch in Anschluss am Gerät
eindrücken, er rastet ein.
8 DE
– 8

Vorsicht
Fugendüse
Saugen von kalter Asche nur mit
Für Kanten, Fugen, Heizkörper und
Vorabscheider.
schwer zugängige Bereiche.
Bestell-Nr. Basic-Ausführung: 2.863-139.0,
Premium-Ausführung: 2.863-161.0.
Bedienung
Nasssaugen
Vorsicht
Zum Aufsaugen von Feuchtigkeit bzw.
Immer mit eingesetztem Flach-
Nässe auf richtigen Bodendüsenein-
faltenfilter arbeiten, sowohl beim
satz achten und entsprechendes Zube-
Nass- als auch beim Trocken-
hör anschließen.
saugen!
몇 Warnung
Vor Inbetriebnahme
Bei Schaumbildung oder Flüs-
sigkeitsaustritt das Gerät sofort
Abbildung
Gerätekopf entriegeln und abnehmen.
ausschalten oder den Netzste-
Behälter umdrehen, Lenkrollen in die
cker ziehen!
Öffnungen am Behälterboden bis zum
Keinen Filterbeutel verwenden!
Anschlag eindrücken.
Hinweis: Ist der Behälter voll, schließt ein
Gerätekopf aufsetzen und verriegeln.
Schwimmer die Saugöffnung und das Ge-
rät läuft mit erhöhter Drehzahl. Gerät sofort
Inbetriebnahme
ausschalten und Behälter entleeren.
Abbildung
Betrieb unterbrechen
Zubehör anschließen.
Abbildung
Abbildung
Netzstecker einstecken.
Gerät ausschalten.
Abbildung
Abbildung
Gerät einschalten.
Bodendüse in die Parkposition einhän-
gen.
Trockensaugen
Betrieb beenden
Vorsicht
Gerät ausschalten und Netzstecker zie-
Nur mit trockenem Flachfalten-
hen.
filter arbeiten.
Behälter entleeren
Vor dem Einsatz den Filter auf
Abbildung
Beschädigungen prüfen und bei
Gerätekopf abnehmen, mit Nass- oder
Bedarf austauschen.
Trockenschmutz gefüllten Behälter ent-
Abbildung
leeren.
Empfehlung: Zum Saugen von Fein-
Gerät aufbewahren
staub den Filterbeutel einsetzen.
Abbildung
Hinweise Filterbeutel
Zubehör und Netzkabel am Gerät ver-
– Der Füllgrad des Filterbeutels ist abhän-
stauen und Gerät in trockenen Räumen
gig vom aufgesaugten Schmutz.
aufbewahren.
– Bei Feinstaub, Sand usw... sollte der Fil-
terbeutel häufiger ausgetauscht werden.
– Zugesetzte Filterbeutel können platzen,
deshalb den Filterbeutel rechtzeitig
wechseln!
– 9
9DE

Vor dem Gebrauch vollständig trocknen
Pflege und Wartung
lassen.
Zum Schluss den trockenen Flachfal-
Gefahr
tenfilter wieder in das Gerät einbauen.
Vor allen Pflege– und Wartungs-
Filterkassette in das Gerät einsetzen.
arbeiten das Gerät ausschalten
Hilfe bei Störungen
und den Netzstecker ziehen.
Reparaturarbeiten und Arbeiten
Nachlassende Saugleistung
an elektrischen Bauteilen dürfen
Lässt die Saugleistung des Gerätes nach,
nur vom autorisierten Kunden-
bitte folgende Punkte prüfen:
dienst durchgeführt werden.
Zubehör, Saugschlauch oder Saugroh-
몇 Warnung
re sind verstopft, Verstopfung mit einem
Stock entfernen.
Keine Scheuermittel, Glas- oder
Abbildung
Allzweckreiniger verwenden!
Filterbeutel ist voll: Neuen Filterbeutel
Gerät niemals in Wasser tau-
einsetzen.
chen.
Abbildung
Gerät und Zubehörteile aus Kunststoff
Flachfaltenfilter ist verschmutzt: Filter-
mit einem handelsüblichen Kunst-
kassette herausnehmen und Filter reini-
stoffreiniger pflegen.
gen (siehe Kapitel „Flachfaltenfilter rei-
Behälter und Zubehör bei Bedarf mit
nigen“).
Wasser ausspülen und vor der Weiter-
Beschädigten Flachfaltenfilter austau-
verwendung trocknen.
schen.
Flachfaltenfilter reinigen
Technische Daten
Empfehlung: Nach jeder Anwendung
Spannung
220 -
V
Filterkassette reinigen.
1~50/60 Hz
240
Abbildung
Leistung P
Filterkassette entriegeln, herausklap-
nenn
1000 W
pen und entnehmen, Schmutz aus der
Netzabsicherung (träge) 10 A
Filterkassette über einem Mülleimer
Behältervolumen 20 l
ausleeren.
Wasseraufnahme mit
12 l
Zur Reinigung des eingesetzten Flach-
Handgriff
faltenfilters, Filterkassette gegen den
Wasseraufnahme mit Bo-
10 l
Rand des Mülleimers klopfen. Flachfal-
dendüse
tenfilter muss dazu nicht aus der Filter-
Netzkabel H05VV-F
kassette ausgebaut werden.
2x0,75
Bei Bedarf Flachfaltenfilter separat rei-
nigen.
Schalldruckpegel
72 dB(A)
Abbildung
(EN 60704-2-1)
Filterkassette entriegeln, herausklap-
Gewicht (ohne Zubehör)
7,0 kg
pen und entnehmen.
MV 4
Abbildung
Gewicht (ohne Zubehör)
7,3 kg
Flachfaltenfilter aus der Filterkassette
MV 4 Premium
herausnehmen und ausklopfen.
Bei Bedarf nur unter fließendem Was-
Technische Änderungen vorbehalten!
ser reinigen, nicht abreiben oder ab-
bürsten.
10 DE
– 10

Contents
Environmental protection
The packaging material can be recy-
General notes. . . . . . . . . . . . . . EN . . .5
cled. Please do not place the packag-
Safety instructions . . . . . . . . . . EN . . .6
ing into the ordinary refuse for dispos-
Description of the Appliance. . . EN . . .7
al, but arrange for the proper recy-
Operation . . . . . . . . . . . . . . . . . EN . . .9
cling.
Maintenance and care . . . . . . . EN . .10
Old appliances contain valuable ma-
Troubleshooting . . . . . . . . . . . . EN . .10
terials that can be recycled. Please
Technical specifications . . . . . . EN . .10
arrange for the proper recycling of old
appliances. Please dispose your old
appliances using appropriate collec-
General notes
tion systems.
Dear Customer,
Disposing the filters and filter bags
Please read and comply with
Filters and filter bags are made from envi-
these original instructions prior
ronment-friendly materials.
to the initial operation of your appliance and
They can therefore be disposed off through
store them for later use or subsequent own-
the normal household garbage provided
ers.
you have not sucked in substances that are
Proper use
not permitted to be thrown into household
garbage.
In accordance with the descriptions and the
Notes about the ingredients (REACH)
safety information in these operating in-
You will find current information about the
structions the appliance is intended for use
ingredients at:
as a multi-purpose vacuum cleaner.
www.kaercher.com/REACH
This appliance has been designed for use
in private households and is not intended
Customer Service
for commercial use.
Our KÄRCHER branch will be pleased to
– Protect the unit from rain. Do not store
help you further in the case of questions or
outside.
faults.
– This device may not be used to suck in
(See address on the reverse)
ash and soot.
Use the multi-purpose vacuum cleaner only
Ordering spare parts and special
with:
attachments
– Original filter bag.
At the end of the operating instructions you
– Original spare parts, accessories and
will find a selected list of spare parts that
special accessories.
are often required.
The manufacturer is not responsible for any
You can procure the spare parts and the at-
damages that may occur on account of im-
tachments from your dealer or your
proper use or wrong operations.
KÄRCHER branch office.
– 5
11EN

by children without supervi-
Warranty
sion.
The terms of the guarantee applicable in
– Keep packaging film away
each country have been published by our
from children - risk of suffoca-
respective national distributors. We will re-
pair possible faults on your unit free of
tion!
charge within the warranty period, insofar
– Switch the appliance off after
as the faults are caused by material defects
every use and prior to every
or defective workmanship. Guarantee
cleaning/maintenance proce-
claims should be addressed to your dealer
dure.
or the nearest authorized customer service
centre, and supported by documentary evi-
– Risk of fire. Do not vacuum up
dence of purchase.
any burning or glowing ob-
jects.
Safety instructions
– The appliance may not be
– This appliance is not intended
used in areas where a risk of
for use by persons with limit-
explosion is present.
ed physical, sensory or men-
몇 Electrical connection
tal capacities or lacking expe-
The appliance may only be con-
rience and/or skills, unless
nected to alternating current.
such persons are accompa-
The voltage must correspond
nied and supervised by a per-
with the type plate on the appli-
son in charge of their safety
ance.
or they have received precise
Risk of electric shock
instructions on the use of this
Never touch the mains plug and
appliance and have under-
the socket with wet hands.
stood the resulting risks.
Do not pull the plug from the
– Children may only use this
socket by pulling on the con-
appliance if they are over the
necting cable.
age of 8 and supervised by a
Check the power cord with
person in charge of their safe-
mains plug for damage before
ty, or if they have received in-
every use. If the power cord is
structions on the use of this
damaged, please arrange im-
appliance and have under-
mediately for the exchange by
stood the resulting risks.
an authorized customer service
– Children must not play with
or a skilled electrician.
this appliance.
To avoid accidents due to elec-
– Supervise children to prevent
trical faults we recommend the
them from playing with the
use of sockets with a line-side
appliance.
current-limiting circuit breaker
– Cleaning and user mainte-
(max. 30 mA nominal tripping
nance must not be performed
current).
12 EN
– 6

Warning
Description of the Appliance
Certain materials may produce
Illustrations on fold-out page!
explosive vapours or mixtures
when agitated by the suction air!
These operating instructions describe
Never vacuum up the following
the multi-purpose vacuum cleaners list-
ed on the front cover.
materials:
The illustrations show the maximum
– Explosive or combustible
equipment; depending on the model,
gases, liquids and dust parti-
there are differences in equipment and
cles (reactive dust particles)
supplied accessories.
– Reactive metal dust particles
When unpacking the product, make sure
(such as aluminium, magne-
that no accessories are missing and that
none of the package contents have been
sium, zinc) in combination
damaged. If you detect any transport dam-
with highly alkaline or acidic
ages please contact your dealer.
detergents
– Undiluted, strong acids and
Suction hose connection
alkalies
Illustration
– Organic solvents (such as
To connect the suction hose during vac-
petrol, paint thinners, ace-
uuming.
tone, heating oil).
ON/OFF switch for appliance
In addition, these substances
may cause the appliance materi-
Illustration
als to corrode.
Position I: Appliance is switched on.
Position 0: Appliance is switched off
Symbols in the operating
instructions
Carrying handle
Danger
To carry the appliance or to remove the
Immediate danger that can
appliance head after unlocking.
cause severe injury or even
Filter box and release key
death.
몇 Warning
Illustration
Illustration
Possible hazardous situation
In order to clean the filter, press the re-
that could lead to severe injury
lease key, fold out and remove the filter
or even death.
box.
Caution
Accessory compartment, hook
Possible hazardous situation
that could lead to mild injury to
This accessory compartment allows the
persons or damage to property.
storage of suction nozzles and the power
cable.
– 7
13EN

Note: Accessories, such as suction brush-
Parking position
es (optional) can be directly attached to the
connecting piece and thus connected to the
Illustration
suction hose.
To rest the floor nozzle during work in-
For convenient working even in tight spac-
terruptions.
es.
The removable handle can be attached be-
Container closure
tween the accessories and the suction
hose if necessary.
Illustration
See position 13.
Pull out to open, push in to lock.
Recommendation: In order to vacuum the
Accessory storage container
floor, attach the handle to the suction hose.
Removable handle
Illustration
This accessory compartment allows the
Illustration
storage of the suction pipes or other ac-
Connect the handle with the suction
cessories.
hose until it snaps in place.
Illustration
Steering roller
To remove the handle from the suction
hose, press the notch using your thumb
Illustration
and pull off the handle.
Turn the container, press in the steering
Note: Due to removing the handle, acces-
roller in the openings at the base of the
sories can be directly attached to the suc-
container till the end-point.
tion hose.
Filter bag
See position 12.
Recommendation: In order to vacuum the
Note: Do not use a filter bag for wet vacu-
floor, attach the handle to the suction hose.
uming!
Illustration
suction pipes 2 x 0.5 m
Recommendation: To vacuum fine
dust, use the filter bag.
Illustration
Put both suction pipes together and
Flat fold filter
connect them with the handle.
(already installed in the appliance)
Floor nozzle
Caution
(with inserts)
Always work with an inserted flat
When vacuuming dry dirt off the floor,
fold filter - during wet as well as
clip an insert with two brush strips into
dry vacuum cleaning!
the floor nozzle.
When vacuuming water off the floor,
Suction hose with connecting
clip an insert with two rubber lips into
piece
the floor nozzle.
Illustration
Push the suction hose into the connec-
Crevice nozzle
tion on the appliance, it snaps in place.
In order to disconnect it, push down
For edges, joints, heaters and hard to
with your thumb and pull the suction
reach locations.
hose out.
14 EN
– 8

Caution
Operation
Vacuum cold ashes only when
Caution
using a pre-filter.
Always work with an inserted flat
Order no. basic design: 2.863-139.0, pre-
fold filter - during wet as well as
mium design: 2.863-161.0.
dry vacuum cleaning!
Wet vacuum cleaning
Before Startup
For vacuuming up moisture or wetness
pay attention to the correct floor nozzle
Illustration
insert and connect the corresponding
Release and remove the appliance
accessories.
head.
Turn the container, press in the steering
몇 Warning
roller in the openings at the base of the
Immediately switch the appli-
container till the end-point.
ance off or pull the power plug if
Insert and lock the appliance head.
foam forms or liquids escape!
Start up
Do not use a filter bag!
Illustration
Note: If the container is full, a float closes
Connect accessories.
the suction opening, and the appliance
Illustration
works at a higher speed. Switch off the ap-
Plug in the main plug.
pliance immediately, and empty the con-
Illustration
tainer.
Turn on the machine.
Interrupting operation
Dry vacuum cleaning
Illustration
Turn off the appliance.
Caution
Illustration
Work with a dry flat fold filter on-
Hook the floor nozzle into the parking
ly.
position.
Check the filter for damage prior
Finish operation
to installation and replace as
Turn off the appliance and disconnect
necessary.
the mains plug.
Illustration
Recommendation: To vacuum fine
Empty the container
dust, use the filter bag.
Illustration
Remove the appliance head and empty
Information filter bag
the reservoir filled with wet or dry dirt.
– The filling level of the filter bag depends
on the dirt that is sucked in.
Storing the appliance
– The filter bag needs to be replaced
Illustration
more frequently while sucking in fine
Store the accessories and the mains
dust, sand, etc.
cable on the appliance and store the
– Clogged filter bags can burst - therefore
appliance in dry rooms.
make sure to replace the filter bag in a
timely manner!
– 9
15EN

Maintenance and care
Troubleshooting
Danger
Decreasing cleaning power
Turn off the appliance and re-
If the suction power becomes less, check
move the mains plug prior to any
the following points:
care and maintenance work.
Accessories, suction hose or suction
Repair works may only be per-
pipes are clogged, please remove the
obstruction using a stick.
formed by the authorised cus-
Illustration
tomer service.
Filter bag is full: Insert new filter bag.
몇 Warning
Illustration
Do not use abrasives, glass or
Flat fold filter contaminated: Remove
the filter box and clean filter (see Chap-
universal cleaners! Never im-
ter "Cleaning the flat fold filter").
merse the appliance in water.
Replace damaged flat fold filter.
Clean the appliance and accessory
parts made of plastic with a commercial
Technical specifications
plastic cleaner.
If required, rinse the container and ac-
Voltage
220 -
V
cessories with water properly and dry
1~50/60 Hz
240
them before reuse.
Output P
nom
1000 W
Clean flat fold filter
Mains fuse (slow-blow) 10 A
Recommendation: Clean the filter box
Container capacity 20 l
after every use.
Illustration
Water intake with handle 12 l
Unlock, fold out and remove the filter
Water intake with floor
10 l
cartridge, empty dirt from the filter car-
nozzle
tridge over a waste bin.
Power cord H05VV-F
In order to clean the inserted flat fold fil-
2x0,75
ter, knock the filter box against the edge
of the waste bin. It is not necessary to
Sound pressure level
72 dB(A)
remove the flat fold filter from the filter
(EN 60704-2-1)
box.
Weight (without acces-
7,0 kg
If necessary, clean the flat fold filter sep-
sories)
arately.
MV 4
Illustration
Weight (without acces-
7,3 kg
Unlock, fold out and remove the filter
sories)
cartridge.
MV 4 Premium
Illustration
Remove the flat fold filter from the filter
Subject to technical modifications!
box and tab it out.
When necessary, clean under running
water only, do not wipe or brush down.
Allow to dry completely prior to use.
Finally, reinstall the dry flat fold filter into
the appliance. Insert the filter cartridge
into the appliance.
16 EN
– 10

Les appareils usés contiennent des
Table des matières
matériaux précieux recyclables les-
quels doivent être apportés à un sys-
Consignes générales . . . . . . . . FR . . .5
tème de recyclage. Pour cette raison,
Consignes de sécurité . . . . . . . FR . . .6
utilisez des systèmes de collecte
Description de l’appareil. . . . . . FR . . .7
adéquats afin d'éliminer les appareils
Utilisation . . . . . . . . . . . . . . . . . FR . . .9
usés.
Entretien et maintenance . . . . . FR . .10
Elimination du filtre et du sac du
Assistance en cas de panne . . FR . .10
filtre
Caractéristiques techniques. . . FR . . 11
Le filtre et le sac du filtre sont fabriqués en
matériaux recyclables.
Consignes générales
S'ils ne contiennent aucune substance as-
pirée dont l'élimination est interdite dans
Cher client,
les déchets ménagers, vous pouvez les je-
Lire cette notice originale avant
ter dans les déchets ordinaires.
la première utilisation de votre
Instructions relatives aux ingrédients
appareil, se comporter selon ce qu'elle re-
(REACH)
quièrt et la conserver pour une utilisation ul-
Les informations actuelles relatives aux in-
térieure ou pour le propriétaire futur.
grédients se trouvent sous :
Utilisation conforme
www.kaercher.com/REACH
L'appareil est conçu pour une aspiration
Service après-vente
multi-usages, conformément aux descrip-
®
Notre succursale Kärcher
se tient à votre
tions et consignes de sécurité stipulées
entière disposition pour d'éventuelles ques-
dans ce manuel d'utilisation.
tions ou problèmes.
Cet appareil ne doit être utilisé que pour un
(Adresse au dos)
usage domestique.
– Protéger l'appareil de la pluie. Ne pas
Commande de pièces détachées et
l'entreposer à extérieur.
d'accessoires spécifiques
– Il est interdit d'aspirer des cendres et de
Une sélection des pièces de rechange utili-
la suie avec cet appareil.
sées le plus se trouve à la fin du mode
N'utiliser l'aspirateur qu'en association
d'emploi.
avec :
Vous obtiendrez des pièces détachées et
– le sac de filtrage original.
des accessoires chez votre revendeur ou
– des pièces de rechange, accessoires
®
auprès d'une filiale Kärcher
.
ou accessoires spéciaux originaux.
Le fabricant décline toute responsabilité en
Garantie
cas de dommages dus à une utilisation non
Dans chaque pays, les conditions de ga-
conforme ou incorrecte de l'appareil.
rantie en vigueur sont celles publiées par
Protection de l’environnement
notre société de distribution responsable.
Nous éliminons gratuitement d’éventuelles
Les matériaux constitutifs de l’embal-
pannes sur l’appareil au cours de la durée
lage sont recyclables. Ne pas jeter
de la garantie, dans la mesure où une er-
les emballages dans les ordures mé-
reur de matériau ou de fabrication en sont
nagères, mais les remettre à un sys-
la cause. En cas de recours en garantie, il
tème de recyclage.
faut s'adresser avec le bon d’achat au re-
vendeur respectif ou au prochain service
après-vente.
– 5
17FR

– Risque d'incendie. N’aspirer
Consignes de sécurité
aucun objet enflammé ou in-
– Cet appareil n'est pas destiné
candescent.
à être utilisé par des per-
– Il est interdit d’utiliser l’appa-
sonnes ayant des capacités
reil dans des zones présen-
physiques, sensorielles ou
tant des risques d’explosion.
mentales réduites ou man-
몇 Raccordement électrique
quant d'expérience et/ou de
L'appareil doit être raccordé uni-
connaissances, sauf si ces
quement au courant alternatif.
mêmes personnes sont sous
La tension doit être identique
la supervision d'une per-
avec celle indiquée sur la plaque
sonne responsable de leur
signalétique de l’appareil.
sécurité ou ont été formées à
Risque de choc électrique
l'utilisation de l'appareil.
Ne jamais saisir la fiche secteur
– Des enfants ne peuvent utili-
ni la prise de courant avec des
ser l'appareil que s'ils ont plus
mains humides.
de 8 ans et s'ils sont sous la
Ne pas debrancher la fiche secteur
surveillance d'une personne
en tirant le câble d'alimentation.
compétence ou s'ils ont reçu
Vérifier avant chaque utilisation
de sa part des instructions
que le câble et la fiche secteur
d'utilisation de l'appareil et
ne sont pas endommagés. Un
s'ils ont compris les dangers
câble d’alimentation endomma-
qui peuvent en résulter.
gé doit immédiatement être rem-
– Les enfants ne doivent pas
placé par le service après-vente
jouer avec l'appareil.
ou un électricien agréé.
– Surveiller les enfants pour
Pour éviter des accidents élec-
s'assurer qu'ils ne jouent pas
triques nous recommandons
avec l'appareil.
d’utiliser des prises de courant
– Le nettoyage et la mainte-
avec un interrupteur de protec-
nance par l'utilisateur ne
tion contre les courants de fuite
doivent pas être effectués par
placé en amont (courant de dé-
des enfants sans surveil-
clenchement nominal maximal
lance.
de 30 mA).
– Tenir les films plastiques
Avertissement
d'emballages hors de portée
Des substances déterminées
des enfants, risque d'étouffe-
peuvent provoquer la formation
ment !
de vapeurs ou de mélanges ex-
– Mettre l'appareil hors service
plosifs par tourbillonnement
après chaque utilisation et
avec l’air aspiré.
avant chaque nettoyage/en-
Ne jamais aspirer les subs-
tretien.
tances suivantes:
18 FR
– 6

– Des gazes, liquides et pous-
Description de l’appareil
sières (poussières réactives)
Illustrations, cf. côté escamo-
explosifs ou inflammables
table !
– Poussières réactives de mé-
tal (p.ex. aluminium, magné-
Ces instructions de service décrivent
sium, zinc) en rapport avec
l'aspirateur multi-usage décrit sur la
page de garde.
des détergents alcalins et
Les illustrations montrant l'équipement
acides
complet, il peut y avoir des différences
– Acides forts et lessives non
au niveau de l'équipement et des ac-
diluées
cessoires livrés, suivant le modèle.
– Solvants organiques (p.ex.
Contrôler le matériel lors du déballage pour
constater des accessoires manquants ou
essence, dilutif de couleur,
des dommages. Si des dégâts dus au
acétone, fuel).
transport sont constatés, il faut en informer
Par ailleurs, elles peuvent s’avé-
le revendeur.
rer agressives pour les maté-
Raccord du tuyau d'aspiration
riaux utilisés sur l’appareil.
Symboles utilisés dans le mode
Illustration
d'emploi
Pour le raccord du tuyau d'aspiration
lors de l'aspiration.
Danger
Pour un danger immédiat qui
Interrupteur MARCHE/ARRET
peut avoir pour conséquence la
Illustration
mort ou des blessures corpo-
Position I : appareil en circuit
relles graves.
Position 0: appareil hors circuit.
몇 Avertissement
Poignée de transport
Pour une situation potentielle-
ment dangereuse qui peut avoir
Pour porter l'appareil ou pour retirer la
pour conséquence des bles-
tête de l'appareil après le déverrouil-
sures corporelles graves ou la
lage.
mort.
cassette filtrante et touche de dé-
Attention
verrouillage
Pour une situation potentielle-
Illustration
ment dangereuse qui peut avoir
Illustration
pour conséquence des bles-
Pour nettoyer le filtre, appuyer sur la
touche de déverrouillage, ouvrir la cas-
sures légères ou des dom-
sette filtrante et l'enlever.
mages matériels.
Crochet de logement d'acces-
soires
Ce logement d'accessoires permet le ran-
gement des buses d'aspiration et du câble
d'alimentation.
– 7
19FR

Position de stationnement
tuyau d'aspiration avec raccord
Illustration
Illustration
Pour déposer la buse de sol pendant
Enfoncer le flexible d'aspiration dans le
les interruptions de travail.
raccord sur l'appareil, jusqu'à ce qu'il
s'enclenche.
Dispositif de verrouillage de la
Pour le retirer, presser le cran d'arrêt du
cuve
pouce et retirer le flexible d'aspiration.
Illustration
Remarque : Les accessoires, comme par
Le tirer vers l'extérieur pour l'ouvrir et le
ex. les brosses d'aspiration (en o) peuvent
presser vers l'intérieur pour le verrouil-
être branchées sur le raccord et être ainsi
ler.
raccordées au tuyau d'aspiration.
Pour un confort de travail dans des es-
Réservoir de logement d'acces-
paces réduits.
soires
En cas de besoin, la poignée amovible peut
Illustration
être posée entre l'accessoire et le tuyau
Ce logement d'accessoires permet le
d'aspiration.
rangement de tuyaux d'aspiration et
Voir position 13.
d'autres accessoires.
Recommandation: Pour une aspiration au
sol, enficher la poignée sur le tuyau d'aspi-
Roues directionnelles
ration.
Illustration
Poignée amovible
Vider la cuve, presser les roulettes pi-
votants dans l'ouverture au fond de la
Illustration
cuve jusqu'à la butée.
Raccorder la poignée au tuyau d'aspi-
ration jusqu'à ce qu'il s'enclenche.
Sac filtrant
Illustration
Pour retirer la poignée du tuyau d'aspi-
Remarque : pour l'aspiration humide, le
ration, appuyer sur le cran avec les
sac filtrant ne doit pas être mise en place !
pousses et retirer la poignée.
Illustration
Remarque : Grâce au retrait de la poignée,
Recommandation : Mettre le sac fil-
des accessoires peuvent également être
trant en place pour aspirer les pous-
enfichés directement sur le tuyau d'aspira-
sières fines.
tion.
Voir position 12.
Filtre plat de plis
Recommandation: Pour une aspiration au
(déjà mise en place dans l'appareil)
sol, enficher la poignée sur le tuyau d'aspi-
Attention
ration.
Toujours travailler avec le filtre
Tubes d'aspiration 2 x 0,5 m
plat plissé mis en place, aussi
bien pendant l'aspiration humide
Illustration
que pendant l'aspiration à sec !
Assembler les deux tubes d'aspiration
et les relier à la poignée.
20 FR
– 8