Alexika A 11 basic: instruction
Class: Equipment
Type:
Manual for Alexika A 11 basic
29 819 00 c
Betriebsanleitung DE 4
®
Ursprungssprache
IKA
A 11 basic
Operating instructions EN 13
Mode d’emploi FR 22
Руководство пользователя RU 31
Indicationes de seguridad ES 40
Veiligheidsinstructies NL 40
Norme di sicurezza IT 41
Säkerhetsanvisningar SV 42
Sikkerhedshenvisninger DA 43
Sikkerhetsinformasjon NO 44
Turvallisuusohjeet FI 45
Instruções de segurança PT 46
Υποδείξεις ασφαλείας EL 46
Wskazówki bezpieczeństwa PL 47
Bezpečnostní upozornění CS 48
Biztonsági utasitások HU 49
Varnostna navodila SL 50
Bezpečnostné pokyny SK 51
Ohutusjuhised ET 52
Drošības norādes LV 52
Saugos nurodymai LT 53
Инструкции за безопасност BG 54
Indicaţii de siguranţă RO 55
092014
Reg.-No. 4343-01
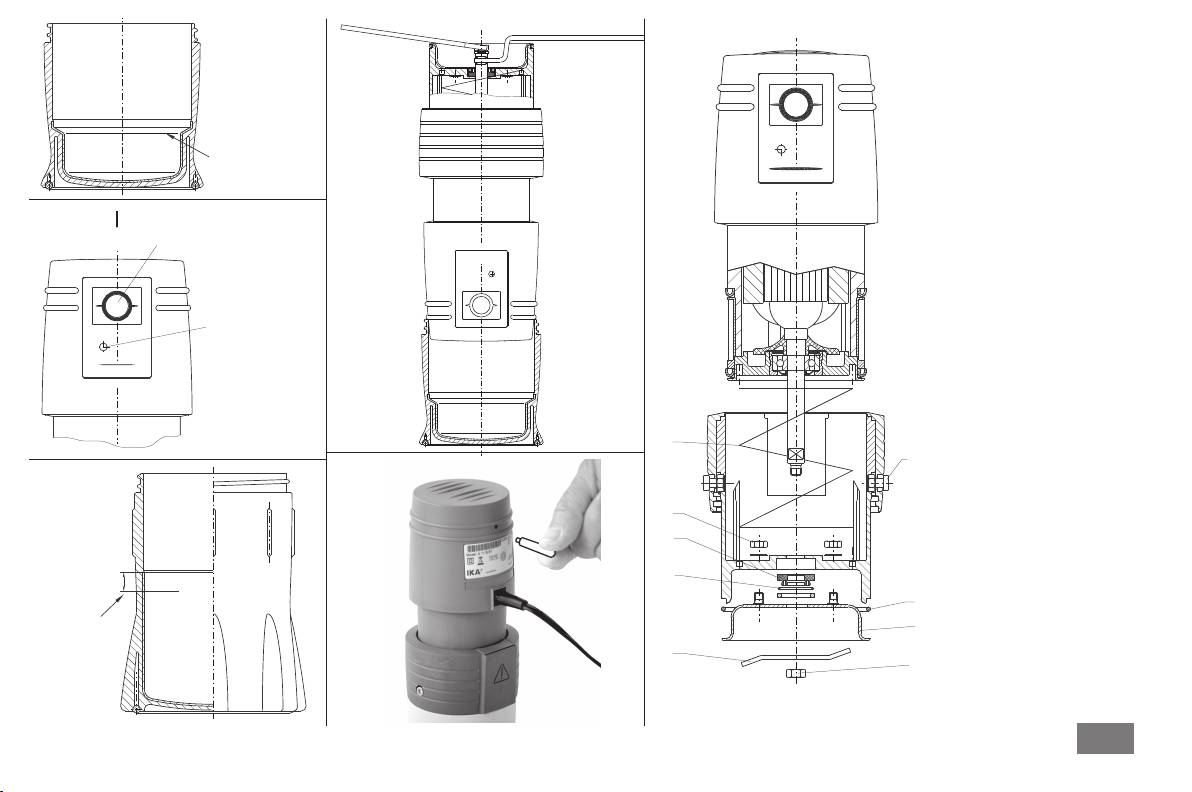
Fig. 1
Pos. Bezeichung
8 Schutzring
9 O-Ring
On/Off
11 Schläger
13 Sechskantmutter
14 Druckfeder
19 O-Ring
Maximale Füllhöhe
Maximum filling height
IKA
®
20 Dichtung
A11 basic
22 Führungsschraube
24 Sechskantmutter
Druckrichtung
Pressing direction
On/Off-Taster
Item Designation
On/Off-switch
Fig. 3
A11 basic
®
IKA
8 Guard ring
9 O-Ring
11 Beater
On/Off
On/Off
13 Hexagonal nut
Störungsanzeige
14 Pressure spring
Malfunction display
19 O-Ring
20 Seal
IKA
®
A11 basic
22 Guide screw
24 Hexagonal nut
Pos. Désignation
Fig. 2
14
8 Anneau de garde
22
9 Joint torique
Fig. 5
11 Battoir
13 Ecrou hexagonal
13
14 Ressort de compression
19 Joint torique
20
20 Joint
22 Vis de guidage
19
20
24 Ecrou hexagonal
Maximale
9
Füllhöhe
Maximum
8
filling height
11
24
Fig. 6
2
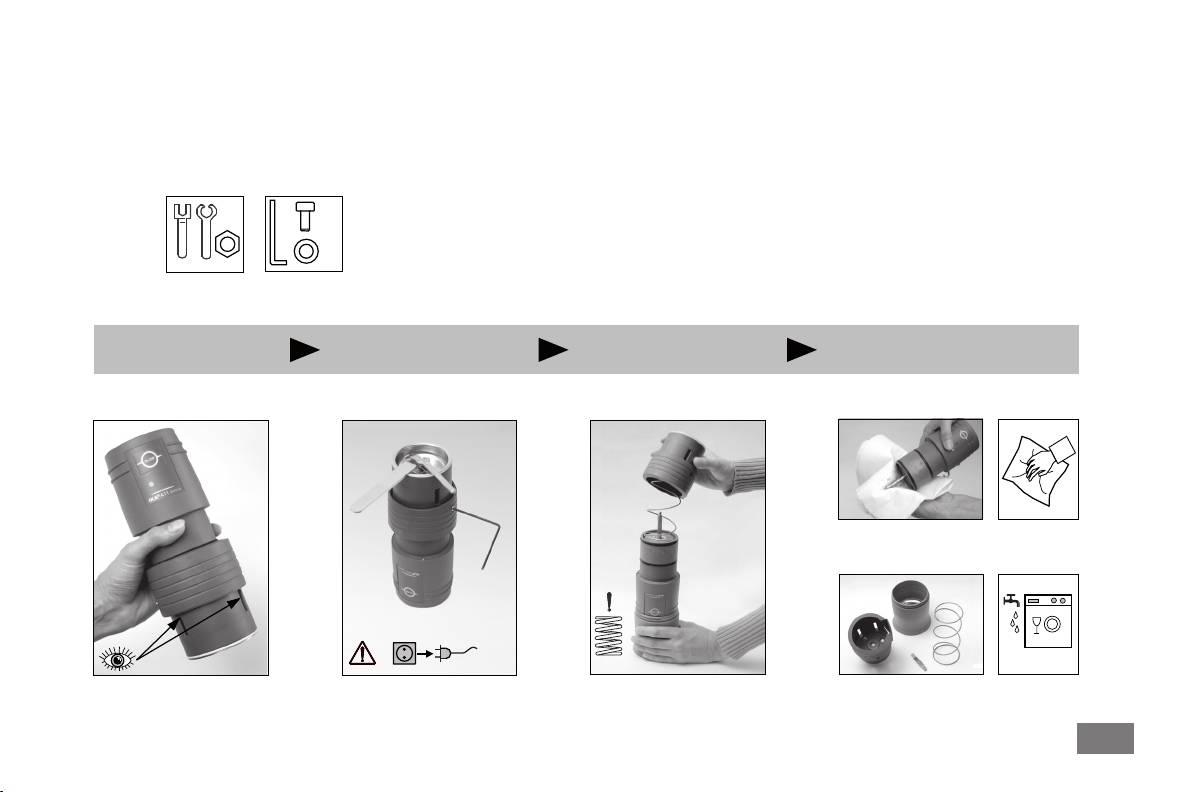
Cleaning information IKA A 11 basic
Note: Prevent damage - keep clean!
Tools
1x
2x
2x
STEP 1 Check
STEP 2 Unscrew
STEP 3 Remove
STEP 4 Clean
DRY
WET
3

Diese Betriebsanleitung gilt für alle IKA S - Varianten
Sicherheitshinweise
(z.B. A 11 basic S 001).
Ursprungssprache
Der einwandfreie und gefahrlose Betrieb des Gerätes setzt voraus, dass
jeder Anwender die Betriebsanleitung gelesen hat und die enthaltenen
Inhaltsverzeichnis
DE
Sicherheitshinweise beachtet werden. Bewahren Sie diese Betriebsan-
leitung sorgfältig und für jedermann zugänglich auf.
Seite
Der Umgang mit diesem Gerät sollte nur durch entsprechend geschultes Personal
EG-Konformitätserklärung 4
erfolgen, welches das Gerät kennt und berechtigt ist, Arbeiten in diesem Bereich
Sicherheitshinweise 4
durchzuführen.
Bestimmungsgemäßer Gebrauch 5
Das Gerät darf auch im Reparaturfall nur von einer Fachkraft geöffnet werden.
Auspacken 5
Vor dem Öffnen ist der Netzstecker zu ziehen. Spannungsführende Teile im Innern
Wissenswertes 5
des Gerätes können auch längere Zeit nach Ziehen des Netzsteckers noch unter
Inbetriebnahme 7
Spannung stehen.
Störung und Störungsbeseitigung 8
Eine Trennung vom Stromversorgungsnetz erfolgt bei dem Gerät nur über das
Wartung und Reinigung 10
Ziehen des Netz - bzw. Gerätesteckers. Die Steckdose für die Netzanschlussleitung
Zubehör 11
muss leicht erreichbar und zugänglich sein.
Gewährleistung 12
Beachten Sie die einschlägigen Sicherheitshinweise und Richtlinien, sowie Arbeits-
Technische Daten 12
schutz- und Unfallverhütungsvorschriften für den Einsatz im Labor und tragen Sie
Ersatzteilliste A 11 basic 56
Ihre persönliche Schutzausrüstung. Bei defekter oder unangemessener Schutzaus-
Ersatzteilbild A 11 basic 57
rüstung kann der Anwender durch Spritzen gefährdet werden.
Achten Sie darauf, dass die Mühle im Betrieb eben und sicher steht und mit beiden
Händen festgehalten wird.
Achten Sie darauf, dass sich keine Körperteile zwischen den zusammenfahrenden
Gehäusteilen befinden.
EG-Konformitätserklärung
Achtung: Vor dem Abnehmen des Mahlbechers ist die Mühle auszuschalten und
Wir erklären in alleiniger Verantwortung, dass dieses Produkt den Bestimmungen
zu warten, bis der Motor stillsteht. Gefahr durch nachlaufende Zerkleinerungs-
der Richtlinien 89/336/EG, 73/23/EG und 98/37/EG entspricht und mit den
werkzeuge (Schläger oder Messer).
folgenden Normen und normativen Dokumenten übereinstimmt: DIN EN IEC 61
Reinigungs - und Austauscharbeiten dürfen nur im ausgeschalteten Zustand und
010-1, DIN EN IEC 61 326-1, DIN EN ISO 12100-1,-2 und EN 60 204-1.
mit gezogenem Netzstecker durchgeführt werden.
Achtung: Nach längeren Mahlzyklen können der Mahlbecher, die Zerkleinerungs-
werkzeuge und die Rotorwelle heiß sein. Lassen Sie die Mühle vor dem Reinigen
oder vor einem Austausch der Zerkleinerungswerkzeuge abkühlen.
Achtung: Achten Sie beim Austauschen der Zerkleinerungswerkzeuge und beim
Reinigen besonders auf das scharfkantige Messer. Tragen Sie Ihre persönliche
Schutzausrüstung (Schutzhandschuhe, ...).
4

Beachten Sie, dass eventuell Abrieb vom Gerät oder von rotierenden Zubehörteilen
bestimmt die Mahldauer, die Mahlmenge und die Beschaffenheit des Mahlgutes
in das zu bearbeitende Medium gelangen kann. Bei Fragen wenden Sie sich bitte
die erreichbare Endfeinheit. Durch Schneidbeanspruchung wird weniger Energie
an IKA.
in das Mahlgut eingebracht, was zu einer geringeren Erwärmung führt. Der Mahl-
Die Analysenmühle A 11 basic darf nicht für den Betrieb in explosionsgefähr-
gutverlust ist auch hier aufgrund der geschlossenen Bauweise praktisch gleich null.
lichen Atmosphären und für den Betrieb unter Wasser eingesetzt werden.
Zerkleinern Sie keine explosiven, giftigen oder gesundheitsgefährdende Stoffe.
Auspacken
Beachten Sie einschlägigen Sicherheitshinweise und Richtlinien zum Thema Staub-
explosionen. Bei Versprödung des Mahlgutes mit Kühlmitteln (flüssiger Stickstoff
Bitte packen Sie das Gerät vorsichtig aus, und achten Sie auf Beschädigungen.
oder Trockeneis) ist die geeignete Schutzausrüstung zu tragen (siehe Laborricht-
Es ist wichtig, dass eventuelle Transportschäden schon beim Auspacken erkannt
linien und Unfallverhütungsvorschriften für den Einsatz im Labor).
werden. Gegebenenfalls ist eine sofortige Tatbestandsaufnahme erforderlich (Post,
Achten Sie darauf, dass sich im Mahlraum kein Druck aufbaut (insbesondere bei
Bahn oder Spedition).
Verwendung von Kühlmitteln).
Zum Lieferumfang des Gerätes gehören:
Achtung: Bei Verwendung von flüssigem Stickstoff darf der Mahlbecher erst auf-
Eine Analysenmühle A 11 basic mit Mahlbecher A 11.5 (Nutzvolumen 80 ml), ein
geschraubt und mit dem Mahlvorgang begonnen werden, wenn der flüssige
Schläger A 11.1 aus Edelstahl (1.4034), ein Werkzeugsatz und eine Betriebsan-
Stickstoff vollständig verdampft ist.
leitung.
Achtung: Geräteteile können noch längere Zeit nach dem Kühlen mit flüssigem
Stickstoff sehr kalt sein, und dürfen nur mit angelegter Schutzausrüstung gehand-
Wissenswertes
habt werden.
Das Anwendungsgebiet der Analysenmühle ist sehr umfangreich. Die zuvor aufge-
führten mahlbaren Materialien sind nicht vollständig. Durch Mahlversuche mit
Bestimmungsgemäßer Gebrauch
jeweiligen Mahlverfahren und Probenvorbereitungen, z.B. Kühlen, kann das
Die Analysenmühle A 11 basic ist eine Chargenmühle bei der zwei verschiedene
Anwendungsspektrum noch vergrößert werden.
Mahlverfahren möglich sind.
Prallmahlen:
Der Mahlbecher schließt luftdicht ab, wodurch der Mahlgutverlust praktisch gleich
null ist.
Die A 11 basic mit Schläger zerkleinert weiche, mittelharte und spröde Material-
ien bis ca. Mohshärte 6 (Feldspat: 6 Mohs; Quarz: 7 Mohs). Bei höheren Härten
Prallmahlen:
ist der Verschleiß am Zerkleinerungswerkzeug sehr hoch und das Mahlen deshalb
Anwendung für harte, spröde Mahlgüter, bzw. getrocknete oder durch Kälte ver-
unwirtschaftlich. Wird die A 11 basic für Mahlgüter mit Härten über 4 Mohs ein-
sprödete Mahlgüter (z.B. Getreide, Kaffee, ...).
gesetzt, muss der verschleißfestere Schläger A 11.3 eingesetzt werden, damit die
Hier wird das Mahlgut mittels des Schlagrotors zerkleinert. Das Mahlgut wird
Probe nicht durch den Abrieb des Mahlwerkzeuges verunreinigt wird.
gebrochen. Die Endfeinheit wird durch die Mahldauer und die Füllhöhe, sowie von
Es lässt sich alles mahlen, was bricht, trocken und nicht stark fetthaltig ist. Nachfol-
der Beschaffenheit des Aufgabegutes bestimmt.
gend eine Auswahl an Substanzen die sich trocken mahlen lassen:
Schneidmahlen:
Getreide, Gerste, Mais, Malz, Pektin, gebrannter Kaffee, Rinde, Wurzeln, Nuss-
schalen, Knochen, Mutterkorn, Pressstoffe, Torf, Zellulose, Drogen, Kunstdünger,
Anwendung für weiche, faserige Mahlgüter (z.B. Heu, Papier, ...).
Futtermittel, Gewürze, Harz, Kali, Kerne, Salze, Schlacken.
Hier wird das Mahlgut mittels eines rotierenden Messers geschnitten. Auch hier
5

Zähes Mahlgut muss gekühlt werden, z.B. durch Zugabe von zerstoßenem Trocken-
Trockeneis - Kühlung (CO2): ca. –78 °C
eis in den Mahlbecher.
Zunächst wird das Aufgabegut in den Mahlbecher gegeben, anschließend wird zer-
Das Mahlgut muss auf Brocken von 10 mm Durchmesser vorzerkleinert werden (Auf-
stoßenes Trockeneis dazugegeben. Das Trockeneis sollte mit dem Mahlgut durch-
gabekorngröße 10 mm, günstig ist die Größe eines Maiskornes).
gemischt werden. Der Antrieb ist erst aufzusetzen, wenn das Trockeneis vollständig
verdampft ist, da sich sonst ein hoher Druck im Mahlraum aufbauen kann.
Schneidmahlen:
Beachten Sie, dass sich das Mahlgut durch die Zerkleinerung wieder recht schnell
Die A 11 basic mit Schneidmesser A 11.2 zerkleinert sperrige, elastische, faserige,
erwärmt (das Mahlgut kann nach einer Mahldauer von ca. 10 Sekunden wieder
cellulosehaltige und weiche Materialien. Mischgut wie Abfälle müssen frei von Eisen
Raumtemperatur haben).
und Nichteisenmetallen sein. Das Aufgabegut darf nicht zu feucht und fettig sein, da
Falls das Zerkleinerungsergebnis bei einmaliger Kühlung nicht ausreicht, muss der
es sonst zu einem Ankleben am Mahlbecher kommt.
Vorgang gegebenenfalls mehrmals wiederholt werden.
Nachfolgend einige Stoffe, die zerkleinert werden können:
Flüssigstickstoff - Kühlung (N2): ca. –196 °C
Blätter, Fasern, Gewürze, Getreide, Hopfen, Pappe, Papier, Heu, Kunststoffe, Tabak,
Beachten Sie insbesondere bei Flüssigstickstoff - Kühlung die Sicherheitshinweise
Torf, Futtermittel, Teigwaren, Wurzeln.
und legen Sie Ihre persönliche Schutzausrüstung (Schutzbrille, Schutzhandschuhe,
Die Aufgabekorngröße sollte nicht grösser als 10 mm sein.
...) an.
Bei feuchtem und klebrigen Aufgabegut (z.B. Fisch, Fleisch) ist auch ein Zerkleinern
mittels Zugabe von Wasser möglich. Dadurch klebt das Mahlgut nicht an den Mahl-
Mit Flüssigstickstoff versprödetes Mahlgut sollte mit einem Schläger (A 11.1 oder
becherwänden an und wird immer vom Messer erfasst.
A 11.3) zerkleinert werden. Der Einsatz des Messers (A 11.2) ist nicht ratsam (wird
schnell stumpf).
Hinweis: Die Füllhöhe darf bei Zugabe von Wasser höchstens 50% der maximalen
Der Mahlbecher A 11.5 (im Lieferumfang enthalten) ist aus dem Fluorkunststoff
Füllhöhe betragen. Die Mühle darf in diesem Fall nur stehend verwendet werden
(ETFE) mit Edelstahleinlage.
(nicht schütteln oder auf den Kopf drehen).
Achtung: Oben nicht aufgeführte Stoffe, insbesondere bei Unsicherheiten über
Zunächst wird das Aufgabegut in den Mahlbecher eingefüllt. Mittels einem geeigne-
deren Explosionsgefahr (Staubexplosion infolge elektrostatischer Aufladung) und
ten Dewar - Gefäßes wird flüssiger Stickstoff in den Mahlbecher eingefüllt, so dass
Härte, dürfen nur nach Rücksprache mit IKA in der A 11 basic zerkleinert werden.
die Probe vollständig bedeckt ist, bzw. im flüssigen Stickstoff schwimmt. Der Antrieb
ist erst aufzusetzen, wenn der Stickstoff vollständig verdampft ist, da sich sonst ein
Arbeiten mit Kühlmitteln
hoher Druck im Mahlraum aufbauen kann.
Beachten Sie die Sicherheitshinweise.
Beachten Sie, dass sich das Mahlgut durch die Zerkleinerung wieder recht schnell
Infolge der Zerkleinerung kommt es zu einer Erwärmung des Mahlgutes. Dies kann
erwärmt (das Mahlgut kann nach einer Mahldauer von ca. 20 Sekunden wieder
im Einzelfall unerwünscht sein, da sich das Mahlgut durch die Erwärmung verändern
Raumtemperatur haben).
kann (z.B. erhöhte Oxidationen, Verlust an Feuchtigkeit, Verdampfen von flüchtigen
Bei Aufgabegut mit Feinanteil, bzw. bei mehrmaligem Kühlen der gleichen Probe,
Bestandteilen, ...).
sollte man den Einfülltrichter A 11.7 (IKA Zubehör) verwenden. Der Trichter wird vor
Mahlgüter, die zäh sind oder einen hohem Fettanteil haben, lassen sich unter Um-
der Befüllung auf den Mahlbecher aufgesteckt und verhindert, dass beim Einfüllen
ständen nur durch eine Versprödung mittels Kühlmitteln zerkleinern.
des Flüssigstickstoffs und dessen Verdampfen Feinanteile des Mahlgutes aus dem
Mahlbecher herausgespült werden. Das engmaschige Edelstahldrahtgewebe (Ma-
In der A 11 basic sind zwei Kühlverfahren möglich:
schenweite 0,063 mm) des Trichters hält den Feinanteil der Probe zurück, außerdem
läßt sich der Stickstoff einfacher einfüllen.
6

Achtung: Mahlbecher und Einfülltrichter können auch am Außenrand sehr kalt
hinaus eingefüllt werden. Jedoch maximal bis ca. 20 mm unter die Mahlbecher-
werden und dürfen nur mit der persönlichen Schutzausrüstung gehandhabt werden.
oberkante. Durch das Aufstecken des Antriebes wird das lockere Mahlgut in die
Achtung: Flüssigstickstoff darf nur in den Mahlbecher gefüllt werden! Alle anderen
Mahlzone geschoben.
Teile dürfen nicht mit Flüssigstickstoff in Berührung kommen!
Der gefüllte Mahlbecher wird bis zum Anschlag auf den Antrieb geschraubt (kurz vor
Beachten Sie, dass insbesondere bei mehrmaligem Kühlen der Mahlbecher „verei-
dem Anschlag ist ein leises „Klicken“ hörbar).
sen“ kann. Dadurch kann das Aufschrauben erschwert, bzw. nicht mehr möglich
Ist die Spannungsversorgung hergestellt, kann mit dem Mahlvorgang begonnen
sein. In diesem Fall muss der Mahlbecher „gereinigt“ werden, z.B. auftauen lassen
werden. Die Haube wird mit einer Hand umfasst, mit dem Daumen wird der On/Off
oder in einer Spülmaschine waschen. In jedem Fall ist der Mahlbecher vor dem er-
- Taster (Bild 2) gedrückt und die Mühle gestartet. Durch leichtes und langsames He-
neuten Einsatz zu trocken.
runterdrücken des Antriebes in axialer Druckrichtung, wird das Zerkleinerungswerk-
Achtung: Eine Kühlung im Mahlbecher A 11.4 (250 ml Becher aus Polycarbonat)
zeug in das Mahlgut geführt (bei einseitigem Drücken, kann der Antrieb verkanten,
ist eine Flüssigstickstoff - Kühlung nicht erlaubt. Der Becher würde beim Kühlen
was einen vorzeitigen Verschleiß der Wellendichtung zur Folge hätte).
brechen.
Erfasst das Zerkleinerungswekzeug das Mahlgut, sinkt die Drehzahl. Dies ist durch
einen Drehzahlabfall hörbar. Ist der Drehzahlabfall sehr stark, ist ein Hochfahren
des Antriebes nötig, um erneut mit Nenndrehzahl in das Mahlgut eintauchen zu
Inbetriebnahme
können. Dies muss je nach Mahlgut eventuell mehrmals wiederholt werden. Bleibt
Überprüfen Sie, ob die auf dem Typenschild angegebene Spannung mit der verfüg-
die Drehzahl während dem Herunterfahren und Hochfahren relativ konstant, ist der
baren Netzspannung übereinstimmt. Wenn diese Bedingung erfüllt ist, ist das Gerät
Mahlvorgang beendet.
nach Einstecken des Netzsteckers betriebsbereit. Andernfalls ist sicherer Betrieb nicht
Eine Mahldauer von 30 Sekunden sollte nicht überschritten werden, da die Zerklei-
gewährleistet oder das Gerät kann beschädigt werden.
nerung des Mahlgutes nicht mehr verbessert wird, die Erwärmung jedoch erheblich
Beachten Sie die in den “Technischen Daten” angegebenen Umgebungsbedingun-
zunimmt.
gen (Temperatur, Feuchte).
Das Gerät ist für Kurzzeitbetrieb (KB) ausgelegt. Maximale Einschaltdauer 1 min,
minimale Ausschaltdauer 10 min. Sollte die Einschaltdauer verlängert, bzw. die Aus-
Der Mahlbecher (Bild 1) wird durch Drehen in Uhrzeigerrichtung abgeschraubt und
schaltzeit verkürzt werden, kann dies zu einer vorzeitigen Überhitzung des Motors
abgezogen. Das Antriebsteil kann auf dem Schutzring (Pos. 8) abgestellt werden.
und damit zum Abschalten des Gerätes führen (siehe Störung und Störungsbeseiti-
Der Mahlbecher wird mit geeignetem Mahlgut gefüllt. Dabei ist die maximale Füll-
gung). Das Gerät ist so abgesichert, dass ein Nichtbeachten des KB - Betriebes keine
höhe (bis zur unteren Kante im Mahlbecher (siehe Bild 1) unbedingt einzuhalten.
Zerstörung des Gerätes bewirkt.
Eine höhere Füllmenge führt zu einer Störung im Betrieb, die Mühle wird überlastet.
Vor dem Beenden des Mahlvorganges sollte der Antrieb ganz nach oben gefahren
Die Füllmenge kann bis zur „Einkornanalyse“ verkleinert werden, d.h. auch Kleinst-
werden, und erst dann ist der On/Off - Taster loszulassen. Dies hat den Vorteil, dass
mengen sind möglich.
das Zerkleinerungswerkzeug sich selbst reinigt.
Hinweis: Kleinere Füllmengen (z.B. nur 50 - 80% der maximalen Füllmenge) sind
Schrauben Sie den Mahlbecher erst nach Stillstand des Motors ab. Eventuell am
schneller zerkleinert, die Endfeinheit ist höher, das Korngrößenspektrum kleiner und
Schutzring anhaftendes Mahlgut kann mit einem Reinigungspinsel oder einer Bürste
die Erwärmung des Mahlgutes geringer. Eine größere Mahlgutmenge sollte besser
(keine Drahtbürste) vom Schutzring in den Mahlbecher gewischt werden. Falls Mahl-
in zwei oder drei Portionen zerkleinert werden. Die effektive Zerkleinerungszeit ist
staub in den Zwischenraum gelangt ist, muss dieser vor erneuter Inbetriebnahme
kaum länger, die Mahlergebnisse jedoch erheblich besser.
entfernt werden (siehe Kapitel “Wartung und Reinigung”).
Sperriges Mahlgut (z.B. Heu, ...) kann auch über die untere Kante im Mahlbecher
Achtung: Die Mahlwerkzeuge, der Mahlbecher und die Rotorwelle können heiß
7

sein. Beachten Sie die Sicherheitshinweise.
Der Motorschutzschalter schaltet selbstständig zurück, wenn die Temperatur der
Mühle wieder im zulässigen Bereich liegt, und der On/Off - Taster nicht gedrückt
Wechsel der Zerkleinerungswerkzeuge:
ist. Dies kann bei kurzzeitiger Überlast schon nach wenigen Sekunden der Fall sein.
Achtung: Das Messer ist scharfkantig. Es darf nur mit Schutzhandschuhen ge-
Wenn die Mühle bei längerer Betriebsdauer stark überhitzt wird, kann die Abküh-
handhabt werden. Beachten Sie die Sicherheitshinweise. Beachten Sie, dass beim
lung auch bis zu 30 Minuten dauern.
Wechsel direkt nach einem Mahlvorgang die Zerkleinerungswerkzeuge heiß sind.
Der On/Off - Taster darf während der Abkühlphase nicht dauernd gedrückt werden,
Die Mühle muss zunächst abkühlen.
da der Motorschutzschalter mit einer Selbsthaltung ausgestattet ist, welche verhin-
Ziehen Sie vor dem Wechseln der Zerkleinerungswerkzeuge den Netzstecker.
dert, dass die Mühle bei ununterbrochenem Drücken des On/Off - Tasters wieder
Drehen Sie den Mühlenantrieb auf den Kopf und stecken Sie ihn mit der Haube nach
anläuft. Um zu erkennen, wann die Mühle wieder betriebsbereit ist, sollten Sie den
unten in den Mahlbecher (Bild 3).
On/Off - Taster im Abstand von 5 bis 10 Minuten betätigen. Leuchtet die Störungs-
Halten Sie mit dem abgewinkelten Einmaulschlüssel die Rotorwelle am abgeflachten
anzeige bei aufgeschraubtem Mahlbecher auf, ist die Temperatur immer noch zu
Teil unterhalb des Zerkleinerungswerkzeuges fest. Lösen und entfernen Sie mit dem
hoch (maximale Abkühldauer: 30 Minuten bei ca. 25 °C Umgebungstemperatur).
zweiten Einmaulschlüssel die Sechskantmutter (Pos. 24) und nehmen Sie das Messer,
Die 100-115V Version der A11 basic ist zusätzlich mit einem Sicherungsautomaten
bzw. den Schläger ab.
ausgestattet. Dieser schaltet die Mühle bei plötzlicher Überlast (Motor blockiert) aus.
Achten Sie vor der Montage eines neuen oder anderen Zerkleinerungswerkzeuges
Wenn die Ursache der Störung beseitigt ist ( z.B. zu große Aufgabekorngröße oder
darauf, dass alle Teile sauber sind. Die Einbaurichtung von Schläger und Messer ist
zu viel Mahlgut im Mahlbecher), kann der Sicherungsautomat wieder, ohne War-
beliebig. Die beiden Zerkleinerungswerkzeuge haben durch die beidseitige Verwen-
tezeit mit dem im Lieferumfang enthaltenen Rücksetzstift, eingeschaltet werden.
dungsmöglichkeit eine doppelte Standzeit. Ist eine Seite stumpf oder verschlissen
Dazu wird das dünne Ende des Stifts in die Bohrung auf der Rückseite der A11 basic
kann durch Umdrehen des Schlägers oder Messers die andere Seite benutzt werden.
(oberhalb des Netzkabels) bis zum Anschlag eingesteckt. (siehe Fig. 6)
Ziehen Sie nach dem Aufstecken des Zerkleinerungswerkzeuges die Sechskantmut-
ter „handfest“ an. Benutzen Sie dazu die Werkzeuge wie in Bild 3 dargestellt.
Störungsbeseitigung:
Die Mühle läuft nicht an:
Störung und Störungsbeseitigung
Ursachen:
- Netzstecker nicht richtig in die Steckdose eigesteckt.
Störungsanzeige
- On/Off - Taster nicht tief genug eingedrückt.
Die Störungsanzeige leuchtet, wenn der Mahlbecher nicht bis zum Anschlag aufge-
- Mahlbecher ist nicht bis zum Anschlag eingeschraubt (beim Drücken des
schraubt ist und der On/Off - Taster betätigt wird.
On/Off - Tasters leuchtet die Störungsanzeige).
Die Störungsanzeige leuchtet auch, wenn der Motorschutzschalter ausgelöst hat
- Mühle vom vorhergehenden Mahlvorgang überhitzt (beim Drücken des
und der On/Off - Taster betätigt wird. Anhand der Störungsanzeige ist nicht erkenn-
On/Off - Tasters leuchtet die Störungsanzeige).
bar, welche der beiden möglichen Störungen eingetreten ist. Beim Ansprechen des
- Nach Demontage des Zwischenteils (z.B. zur Reinigung) ist der Schalterblock nicht
Motorschutzschalters ist in der Regel eine erhöhte Temperatur am Mühlengehäuse
vollständig eingerastet.
feststellbar.
- Sicherungsautomat ausgelöst (nur 100-115V Version)
Temperatur- und Überstromschutzschalter
Beseitigung:
Die Mühle A 11 basic wird mit einem kombinierten Temperatur- und Überstrom-
- Gegebenenfalls die Spannungsversorgung und den Netzstecker überprüfen.
schutzschalter vor Überlast, bzw. Überhitzung geschützt.
- On/Off - Taster bis zu einem hörbaren „Klicken“ drücken.
8

- Sicherungsautomaten zurücksetzen (nur 100-115V Version)
Beseitigung: (Blockieren)
Lassen Sie den On/Off - Taster los und nehmen Sie den Mahlbecher ab. Falls sich
Leuchtet beim Drücken des On / Off- Tasters die Störungsanzeige:
Mahlgutbrocken zwischen dem Mahlwerkzeug und dem Schutzring verklemmt ha-
- Mahlbecher bis zum Anschlag einschrauben (leises „Klicken“ hörbar),
ben, entfernen Sie diese erst nachdem Sie den Netzstecker gezogen haben.
gegebenenfalls Verschmutzung am Gewinde entfernen.
- Einrasten des Schalterblocks überprüfen.
Achtung: Die Welle des Mahlbechers und die Zerkleinerungswerkzeuge
- Bei Überhitzung Mühle einige Minuten abkühlen lassen.
können heiß sein, lassen Sie die Mühle gegebenenfalls abkühlen.
Der Motor blockiert nachdem der On/Off - Taster gedrückt wird, bzw. die
- Füllen Sie nur ausreichend vorzerkleinertes Mahlgut ein.
Mühle schaltet kurz nach dem Start ab:
- Überschreiten Sie keinesfalls die maximale Füllhöhe.
Ursachen:
- Reduzieren Sie bei hartem oder zähem Mahlgut die maximale Füllhöhe um 50%.
- Zuviel Mahlgut im Mahlbecher (Füllhöhe überschritten).
- Wird im Blockierfall der On/Off - Taster nicht losgelassen, spricht der Motorschutz
- Aufgabegutkorngröße zu groß.
schalter bzw. der Sicherungsautomat (bei 100-115V) an und schaltet die Mühle ab.
- Motorschutzschalter löst wegen dem Blockieren (Überlastung) aus.
- Vor Inbetriebnahme müssen Sie die Mühle abkühlen lassen bzw. den Sicherungs-
automat zurücksetzen.
Beseitigung:
- Lassen Sie den On/Off - Taster los und nehmen Sie den Mahlbecher ab. Falls sich
Plötzlicher Ausfall des Antriebes während dem Mahlvorgang:
Mahlgutbrocken zwischen dem Mahlwerkzeug und dem Schutzring verklemmt
Ursachen:
haben, entfernen Sie diese erst nachdem Sie den Netztstecker gezogen haben.
- Überhitzen des Antriebs (Störungsanzeige leuchtet beim Drücken des
- Füllen Sie nur ausreichend vorzerkleinertes Mahlgut ein.
On/Off- Tasters, die Gehäuseteile sind warm).
- Überschreiten Sie keinesfalls die maximale Füllhöhe.
- Der Mahlbecher hat sich losgedreht und den Sicherheitsschalter ausgelöst
- Reduzieren Sie bei hartem oder zähem Mahlgut die maximale Füllhöhe um 50%.
(Störungsanzeige leuchtet beim Drücken des On/Off - Tasters).
- Bei ausgelöstem Motorschutzschalter müssen Sie warten bis dieser zurückschaltet.
- Spannungsversorgung unterbrochen.
- Bei ausgelöstem Sicherungsautomaten (100-115V Version) kann dieser wie zuvor
beschrieben ohne Wartezeit zurückgesetzt werden.
Beseitigung:
- Bei Überhitzung die Mühle einige Minuten abkühlen lassen.
Die Drehzahl sinkt stark ab, oder die Mühle blockiert während dem Betrieb:
- Mahlbecher bis zum Anschlag einschrauben.
Ursachen:
- Spannungsversorgung überprüfen.
- Aufgabegutkorngröße zu groß ≥ 10 mm.
Die Hubbewegung blockiert:
- Zuviel Aufgabegut im Mahlbecher.
Ursachen:
- Zu zähes Mahlgut.
- Verschmutzung des Zwischenraumes.
- Zu schnelles Herabfahren des Zerkleinerungswerkzeuges in das Mahlgut
Beseitigung:
Beseitigung: (Drehzahlabfall)
- Reinigung des Zwischenraumes (siehe Kapitel „Wartung und Reinigung“).
Die Drehzahl kann konstant gehalten werden, wenn das Mahlwerkzeug langsam in
das Mahlgut gefahren wird. Sinkt die Drehzahl ab, sollten Sie nicht weiter herunter-
Kommt dies öfters vor, sollte die Dichtung (Pos. 20) überprüft werden (gegebenen-
fahren, sondern gegebenenfalls wieder hochfahren um erneut mit Nenndrehzahl
falls ist die Dichtung wie im Kapitel „Wartung und Reinigung“ beschrieben zu er-
des Motors langsam in das Mahlgut abzutauchen.
neuern).
9

Achtung: Der Schalterblock muss im montierten Zustand bündig im Zwischenteil
Wartung und Reinigung
einrasten. Dies ist in jedem Fall zu kontrollieren und gegebenenfalls zu korrigieren.
Zum Schluss wird das gewünschte Zerkleinerungswerkzeug montiert.
Reinigung:
Wartung:
Ziehen Sie vor allen Reinigungsarbeiten den Netzstecker.
Sollten sich im Laufe der Zeit, besonders bei stetigem Mahlen sehr harter Substan-
Die verschmutzten Teile im Zerkleinerungsraum können mit einem Reinigungspinsel
zen Schläger oder Messer abgenutzt haben, so dass ein schnelles Arbeiten mit ent-
oder einer Bürste gereinigt werden (keine Drahtbürste). Bei starker Verschmutzung
sprechender Qualität nicht mehr möglich ist, müssen Sie die abgenutzten Teile ersetzen.
kann der Mahlbecher in einer Spülmaschine gewaschen werden.
Messer können mit handelsüblichen Messerschärfern nachgezogen d.h. geschärft
Sollte Mahlstaub im Zwischenraum (Raum in dem sich die Druck-feder befindet)
werden.
sein, kann dieser mit Druckluft durch die Öffnungen ausgeblasen werden.
Bei starker Verschmutzung des Schutzringes und des Zwischen-raumes kann das
Achtung: Werden die Messer mit einer Schleifmaschine geschärft, (nur Nass -
Zwischenteil folgendermaßen abgebaut werden (siehe Bild 4).
Schliff zulässig) ist darauf zu achten, dass allseitig gleichviel Material abgetragen
wird, da ansonsten Unwuchten entstehen.
Zunächst muss das Zerkleinerungswerkzeug abgebaut werden (siehe „Wechseln
Falls sich im Laufe der Zeit vermehrt Mahlstaub im Zwischenraum absetzt muss die
der Zerkleinerungswerkzeuge“).
Dichtung (Pos. 20) ausgetauscht werden.
Anschließend ist die Mühle auf den Schutzring (Pos. 8) zu stellen und die beiden
Hierzu ist folgende Vorgehensweise notwendig (siehe Bild 4):
Führungsschrauben (Pos. 22) mit einem Innensechskantschlüssel zu öffnen.
• Bauen Sie das Zwischenteil ab wie unter „Reinigung“ beschrieben.
Achtung:
Die Mühle muss während dem Öffnen am Antriebsteil festgehalten wer-
• Lösen Sie mit einem Steckschlüssel die drei Muttern (Pos. 13).
den, da infolge der Druckfeder das Zwischenteil und das Antriebsteil unter Druck-
• Ziehen Sie den Schutzring (Pos. 8) ab und entnehmen Sie die Dichtung aus dem
spannung stehen. Sind beide Schrauben geöffnet, kann das Antriebsteil vom Zwischen-
Kunststoffteil.
teil abgezogen werden. Der Schalterblock (Pos. 15) verbleibt am Antriebsteil.
HINWEIS: Achten Sie vor dem Einbau der neuen Dichtung darauf, dass der Dich-
Das Zwischenteil und gegebenfalls die Druckfeder können in einer Spülmaschine
tungssitz sauber und staubfrei ist.
gereinigt werden.
Stellen Sie für den Zusammenbau das Zwischenteil auf den Kopf.
Das Antriebsteil darf lediglich mit einem feuchten Tuch abgerieben werden, es darf
• Legen Sie die Dichtung ein, und achten Sie hierbei auf die richtige Einbau-
keinenfalls in Wasser oder in einer Spülmaschine gereinigt werden.
richtung.
Zusammenbau:
• Legen Sie nun den O-Ring (Pos. 19) ein (immer einen neuen O-Ring verwenden).
Die Druckfeder wird in das Zwischenteil so eingelegt, dass sie in der Führungsnut
• Anschliessend legen Sie den O-Ring (Pos. 9) ein, stecken den Schutzring auf und
gehalten wird. Die Führungsschrauben werden so weit eingedreht, dass sie gerade
schrauben diesen fest.
nicht in den Innendurchmesser des Zwischenteils vorstehen.
Bei Ersatzteilbestellungen geben Sie bitte die auf dem Typenschild ange-
Nun wird das Antriebsteil so aufgesteckt, dass zunächst die Feder in der Führungs-
gebene Fabrikationsnummer, den Gerätetyp sowie die Positionsnummer
nut gehalten wird und der Schalterblock in die passende Öffnung im Zwischenteil
und die Bezeichnung des Ersatzteiles an.
einschnappt.
Bitte senden Sie nur Geräte zur Reparatur ein, die gereinigt und frei von gesund-
Damit der Schalterblock vollständig einrastet, wird das Antriebsteil bis zum unte-
heitsgefährdenden Stoffen sind. Wenn Sie mit gesundheitsgefährdenden oder ge-
ren Anschlag in das Zwischenteil eingeschoben.
fährlichen Stoffen gearbeitet haben, informieren Sie uns bitte darüber.
Während das Antriebsteil bis ungefähr zur Hälfte im Zwischenteil eingefahren ist,
werden die Führungsschrauben angezogen.
10

Reinigen Sie IKA - Geräte nur mit von IKA freigegebenen Reinigungsmittel.
Antriebswelle wird mit einem Einmaulschlüssel SW7 festgehalten. Mit einem zwei-
ten Einmaulschlüssel SW7, der am Zweikant der Doppelschlägerwelle angesetzt
Verwenden Sie zum Reinigen von:
wird, wird der Doppelschläger handfest angezogen.
Farbstoffen Isopropanol
Achten Sie darauf, dass die Abtriebswelle im Gewindebereich frei von Staub und
Baustoffen Tensidhaltiges Wasser / Isopropanol
Mahlgutablagerungen ist.
Kosmetika Tensidhaltiges Wasser / Isopropanol
Nahrungsmittel Tensidhaltiges Wasser
Füllhöhe:
Brennstoffen Tensidhaltiges Wasser
Die maximale Füllhöhe, dargestellt im Bild 5, darf nicht überschritten werden (ca.
Bei nicht genannten Stoffen fragen Sie bitte bei IKA nach. Tragen Sie zum Reinigen
20 mm unterhalb der Edelstahloberkante), da es sonst zur Überlastung des Antrie-
der Geräte Schutzhandschuhe.
bes kommen kann. Ausserdem sind keine guten Mahlergebnisse zu erwarten
Elektrische Geräte dürfen zu Reinigungszwecken nicht in das Reinigungsmittel
(grosses Korngrössenspektrum). Es gilt auch hier, kleinere Füllmengen (z.B. nur 50
gelegt werden.
- 80% der maximalen Füllmenge) sind schneller zerkleinert, die Endfeinheit ist hö-
Bevor eine andere als die vom Hersteller empfohlene Reinigungs- oder Dekontami-
her, das Korngrössenspektrum kleiner und die Erwärmung des Mahlgutes geringer.
nierungsmethode angewandt wird, hat sich der Benutzer beim Hersteller zu verge-
Mahlvorgang:
wissern, dass die vorgesehene Methode das Gerät nicht zerstört.
Da der Doppelschläger schon während dem Aufschrauben des Mahlbechers in das
Senden Sie im Servicefall das Gerät in der Originalverpackung zurück. Lagerver-
Mahlgut eintaucht, ist es wichtig, dass die Probe gut vorzerkleinert ist (maximale
packungen sind für den Rückversand nicht ausreichend. Verwenden Sie zusätzlich
Korngrösse ø 7 mm), damit der Mahlbecher einwandfrei aufzuschrauben ist.
eine geeignete Transportverpackung.
Das Aufgabegut darf eine maximale Härte von 3 Mohs (mittelhart, z.B. Kalkspat)
nicht überschreiten, da ansonsten der Schläger zu stark belastet wird, und außer-
Zubehör
dem schnell verschleißt.
Nach dem Einschalten am On/Off - Taster wird der Antrieb langsam nach unten
A 11.1 Schläger (1.4034) A 11.5 Mahlbecher 80 ml
gedrückt (siehe Kapitel Inbetriebnahme). Wenn der Mahlvorgang beendet ist (in
A 11.2 Schneidmesser (1.4112) A 11.6 Doppelschläger
der Regel nach ca. 30 Sekunden), fahren Sie den Antrieb nach oben und schalten
A 11.3 Schläger (1.4112) A 11.7 Einfülltrichter
das Gerät am On /Off - Taster aus.
A 11.4 Mahlbecher 250 ml
Achtung: Warten Sie bis der Motor stillsteht, bevor Sie den Mahlbecher ab-
Hinweis zum Mahlbecher A 11.5:
schrauben.
Mahlbecher aus Tefzel (ETFE). Dieser Fluorkunststoff (ähnlich Teflon) hat eine hervor-
Achtung: Zur Kühlung der Probe darf im Mahlbecher A 11.4 kein flüssiger Stick-
ragende Chemikalienbeständigkeit und ist temperaturbeständig von -200 °C bis
stoff verwendet werden. Eine Trockeneiskühlung ist zulässig, wobei darauf zu
+150 °C (ideal zum direkten Kühlen mit Flüssigstickstoff).
achten ist, dass das Mahlgut durch die Kühlung nicht zu einem Klumpen wird (die
Farb - und Strukturstörungen an der Becheraußenseite sind herstellungsbedingt
Gefahr besteht vor allem bei feuchtem Mahlgut).
und haben keinen Einfluss auf die Qualität des Bechers.
Achtung: Bei Nicht - Beachtung der maximalen Füllhöhe und maximalen Mahlgut-
Folgende Hinweise sind bei der Benutzung des grossen Mahlbechers
härte, kann sich durch das hohe Anlaufdrehmoment der Mahlbecher um maximal
A 11.4 zu beachten:
eine halbe Umdrehung öffnen und die Analysenmühle schaltet automatisch ab.
Für die Zerkleinerung im Mahlbecher A 11.4 ist der Doppelschläger A 11.6 zu ver-
wenden. Hierzu wird der Doppelschläger auf die Antriebswelle aufgeschraubt. Die
11

Sicherheit Sicherheitsschalter am Mahlbecher,
Gewährleistung
Temperaturbegrenzer im Motor
Sie haben ein Original IKA - Laborgerät erworben, das in Technik und Qualität
Sicherung auf Netzplatine
höchsten Ansprüchen gerecht wird.
220 - 230 V A 8 T Id.-Nr. 31 406 00
100 - 115 V A 5A Sicherungsautomat
Entsprechend den IKA - Verkaufs- und Lieferbedingungen beträgt die Gewähr-
Störungsanzeige orangerote Glimmleuchte, Anzeige von
leistungszeit 24 Monate. Im Gewährleistungsfall wenden Sie sich bitte an Ihren
Über temperatur und nicht geschlossenem
Fachhändler. Sie können aber auch das Gerät unter Beifügung der Lieferrechnung
Mahlraum
und Nennung der Reklamationsgründe direkt an unser Werk senden. Frachtkosten
Antrieb Universalmotor
gehen zu Ihren Lasten.
Die Gewährleistung erstreckt sich nicht auf Verschleißteile und gilt nicht für Fehler,
Produktberührende Teile
die auf unsachgemäße Handhabung und unzureichende Pflege und Wartung,
Mahlbecher A 11.5 (80 ml) Edelstahl 1.4571
entgegen den Anweisungen in dieser Betriebsanleitung, zurückzuführen sind.
(Außenmantel Fluorkunststoff ETFE)
Mahlbecher A 11.4 (250 ml) Edelstahl 1.4571
(Außenmantel Polycarbonat PC)
Rotorwelle Edelstahl 1.4571
Schläger A 11.1 Edelstahl 1.4034 (Härte ca. 52 HRC)
Messer A 11.2 Edelstahl 1.4112 (Härte ca. 55 HRC)
Schläger A 11.3 Edelstahl 1.4112, Wolframcarbid besch.
Technische Daten
(Kernhärte ca. 58 HRC, Oberflächenhärte
ca. 1500 HV)
Bemessungsspannung VAC 220 - 230±10%
Doppelschläger A 11.6 Titan (plasmanitriert, Oberflächenhärte
oder VAC 100 - 115±10%
1200 HV)
Frequenz Hz 50/60
Einfülltrichter A 11.7 Edelstahl 1.4571/PTFE
Aufnahmeleistung W 160
Zul. Umgebungstemperatur °C +5 bis +40
Abgabeleistung W 85
Zul. relative Feuchte % 80
Drehzahl Leerlauf rpm 28 000
Schutzart nach DIN EN 60529 IP 43
Nenndrehzahl rpm 25 000
Schutzklasse II
Umfangsgeschwindigkeit
Überspannungskategorie II
Leerlauf m/s 76
Verschmutzungsgrad 2
bei Normaldrehzahl m/s 68
Arbeitsgeräusch (Schalldruck) dBA max. 85
Nutzvolumen
Geräteeinsatz über NN m max. 2000
Mahlbecher A11.5 ml 80
Abmessungen (B x T x H) mm 85 x 85 x 240
Mahlbecher A11.4 ml 250
Gewicht kg 1,5
Einschaltdauer
Kurzzeitbetrieb (KB) min 1 / 10
Technische Änderung vorbehalten!
1 min. EIN / 10 min AUS
12
These operating instructions apply to all IKA- S versions
Safety instructions
(e.g. A 11 basic S 001).
In order to be able to use the appliance properly and safely, every user
must first read the operating instructions and observe the safety instruc-
Contents
EN
tions contained therein. Take care of these operating instructions and
keep them in a place where they can be accessed by everyone.
Page
Only staff who have been trained accordingly, know the appliance and are
CE-Declaration of conformity 13
authorised to carry out work in this field should use this appliance.
Safety instructions 13
The machine may only be openend by trained specialists - even during repairs. The
Correct use 14
machine is to be unplugged from the mains before opening. Live parts inside the
Unpacking 14
machine may still be live for some time after unplugging from the mains.
Useful facts 14
The appliance can only be disconnected from the mains supply by pulling out the
Commissioning 16
mains plug or the connector plug. The socket for the mains cord must be easily
Malfunctions and eliminating malfunctions 17
accessible.
Maintenance and cleaning 19
Please follow the relevant safety instructions and guidelines, and occupational
Accessories 20
health and safety regulations for use in the laboratory. When working with the mill,
Warranty 21
the user must wear his personal protective equipment. Defective or inappropriate
Technical data 21
protective equipment can expose the user to the risk of spurting substances.
List of spare parts A 11 basic 56
Please make certain that the mill is not tilted when it is in operation and hold it in
Spare parts diagram A 11 basic 57
place with both hands.
Please ensure that there are no parts of the body between the casing parts that
move together.
Caution: Before removing the grinding beaker, switch off the mill and wait until
the motor stops. Risk posed by trailing crushing elements (beaters or cutters).
CE-Declaration of conformity
Always switch off the appliance and disconnect the plug before cleaning or
We declare under our sole responsibility that this product corrosponds to the
replacing parts.
regulations 89/336/EC, 73/23/EC and 98/37/EC and conforms with the standards
Caution: The grinding beaker, crushing elements and rotor shaft may be hot
or standardized documents DIN EN IEC 61 010-1, DIN EN IEC 61 326-1,
after long grinding cycles. Allow the mill to cool down before cleaning or before
DIN EN ISO 12100-1,-2 and EN 60 204-1.
changing crushing elements.
Caution: Beware of the sharp - edged cutter in particular when changing crushing
elements and when cleaning. Always wear your personal protective equipment
(protective gloves, etc.).
Please note that wear debris from the appliance or rotating accessories can end up
in the medium to be processed. Please contact IKA should you have any questions
in this respect.
13

The analytical mill A 11 basic may not been used in explosive atmospheres or
well, because of the closed design, the loss of ground material is equivalent to
under water. Do not crush explosive, toxic or noxious substances. Please observe
practically zero.
the relevant safety instructions and guidelines regarding dust explosions.
Always wear suitable protective equipment when embrittling the mill feed with
Unpacking
coolants (liquid nitrogen or dry ice), (see laboratory guidelines and accident
prevention regulations applicable to the laboratory).
Please unpack the equipment carefully and check for any damages. It is important
Ensure that pressure does not build up in the grinding chamber (particularly when
that any damages which may have arisen during transport are ascertained when
using coolants).
unpacking. If applicable a fact report must be set immediately (post, rail or
Caution: When using liquid nitrogen, you must only screw on the grinding beaker
forwarder).
and begin the grinding process when the liquid nitrogen is completely vaporized.
The delivery includes:
Caution: Appliance parts may still be extremely cold for some time after cooling
The analysis mill A 11 basic with the grinding container A 11.5 (effective volume
with liquid nitrogen and should only be handled whilst wearing protective
80 ml), a beater A 11.1 made of stainless steel (1.4034), a set of tools and and an
equipment.
operating instructions.
Correct use
Useful facts
The A 11 basic analysis mill is a batch mill that allows for two different grinding
The analysis mill can be used for a wide range of applications. The list of grinding
procedures.
materials given above is not complete. It is possible to expand the range of appli-
The grinding container closes airtight. This means that the loss of ground material
cations further by means of grinding experiments with corresponding grinding
is equivalent to practically zero.
procedures and sample preparations.
Impact milling:
Impact milling:
For useage with hard, brittle grinding material, dried material or material that is
The A 11 basic with a beater reduces soft, medium-hard and brittle materials with
brittle because of cold (for example grain, coffee, etc.).
a Mohs’ hardness of up to 6 (felsite: 6 Mohs; quartz: 7 Mohs). For greater levels
Here the grinding material is reduced by means of a beating rotor. The grinding
of hardness, the wear and tear on the pulverization tool is very high and grinding
material is thus broken up. The granularity of the final product is determined by the
therefore becomes uneconomical. If the A 11 basic is used for grinding materials
duration of the grinding, the level to which the container is filled and the physical
with hardnesses greater than 4 Mohs, the A 11.3 beater, which is more resistant to
properties of the material being processed.
wear and tear, must be used. This prevents the sample from being contaminated
by bits of the grinding tool broken off by wear and tear.
Cutting milling:
Everything that breaks, is dry, and does not have a high fat content can be ground.
For usage with soft, fibrous grinding material (for example hay, paper, etc.).
Following is a list of substances that can be ground dry:
Here the grinding material is cut by means of a rotating blade. In thise case as well,
Grain, barley, corn, malt, pectin, r roasted coffee, bark, roots, nutshells, bones,
the granularity of the final product is determined by the duration of the grinding,
ergot, compressed materials, peat, cellulose, pharmaceutical, artificial, fertilizers,
the level to which the container is filled and the physical properties of the material
feed materials, spices, resin, potash, seeds, salts, slag.
being processed. Using the cutting method makes it possible to introduce less
Tough grinding material must be cooled, for example by adding pulverized dry ice
energy into the grinding material, which results in less heating up. In this case as
to the grinding container.
14

The grinding material must be initially broken down into pieces with a diameter of
Please note that the mill feed heats up again extremely quickly during crushing (it
1cm (feed granularity 10 mm, the size of a grain of corn is ideal).
may reach room temperature again after approx. 10 seconds of grinding). You may
have to repeat the process several times if the product is not adequately crushed
Cutting milling:
after one cooling process.
The A 11 basic with the A 11.2 cutting blade reduces bulky, elastic fibrous and
soft materials with high cellulose content. Mixed goods such as trash must be
Liquid nitrogen cooling (N2): approx. –196 °C
free of iron and non-iron metals. the feed material must not be too moist or fatty.
Please follow the safety instructions for liquid nitrogen cooling in particular and
Otherwise the material may adhere to the sides of the grinding container.
always wear your personal protective equipment (safety goggles, protective gloves,
Following is a list of some materials that can be reduced:
etc.).
Leaves, fibers, spices, grain, hops, cardboard, paper, hay, plastics, tobacco, peat,
Use a beater (A 11.1 or A 11.3) to crush mill feed embrittled with liquid nitrogen.
feed goods, dough and roots.
The cutter (A 11.2) is not recommended for this purpose (becomes blunt quickly).
The feed granularity should be no greater than 10 mm.
Grinding beaker A 11.5 (included in delivery) is made of fluoroplastic (ETFE) with a
For moist and sticky feed material (for example fish, meat), reduction is also
stainless steel insert.
possible by adding water. This prevents the grinding material from adhering to the
First pour the feed product into the grinding beaker Pour liquid nitrogen into the
walls of the grinding container, and the blades continue to engage the grinding
grinding beaker using a suitable Dewar vessel, ensuring that the sample is completely
material.
covered or swimming in liquid nitrogen.Only attach the drive once the nitrogen is
Note: If water is added, the grinding container should not be filled to more than
completely vaporized, otherwise high pressure can build up in the grinding chamber.
50% capacity. The mill must only be used in an upright position in this case (must
Please note that the mill feed heats up again extremely quickly during crushing (it
not be agitated or turned on its head).
may reach room temperature again after approx. 20 seconds of grinding).
Please note: Materials that are not listed above should only be reduced in the
If the feed product has a fine fraction or if the same sample is cooled several
A 11 basic after confirmation from IKA, especially if there is uncertainty about the
times, use filling funnel A 11.7 (IKA accessories). The funnel is attached to the
danger of explosion (dust explosion as a result of electrostatic charge).
grinding beaker before filling and prevents fines from the mill feed from swilling
Working with coolants
out of the grinding beaker when you are pouring in the liquid nitrogen and during
vaporization. The funnel’s close - meshed stainless steel wire cloth (mesh size 0.063
Please follow the safety instructions.
mm) retains the fine fraction of the sample and allows you to pour in the nitrogen
Crushing causes the mill feed to heat up. This may not always be desirable as the
more easily.
mill feed can change when heated (e.g. increased oxidation, loss of moisture,
Caution: The outer edge of the grinding beaker and filling funnel can also get very
evaporation of volatile components, etc.).
cold and must only be handled using personal protective equipment.
It may only be possible to crush mill feed which is viscous or has a high fat content
Caution:
Fill liquid nitrogen only into the grinding beaker! Avoid strictly any contact
by embrittling using coolants.
of liquid nitrogen with all other parts!
The A 11 basic offers two cooling processes:
Please note that the grinding beaker can ”ice up”, especially in the case of
Dry ice cooling (CO2): approx. –78 °C
repeated cooling. As a result, it may be dicult or even impossible to screw it on. If
First put the feed product into the grinding beaker and then add crushed dry ice.
so, you will need to ”clean” the grinding beaker, i.e. let it thaw out or wash it in a
Thoroughly mix the dry ice with the mill feed. Only attach the drive once the dry ice
dishwasher. Always dry the grinding beaker before using it again.
is completely vaporized, otherwise high pressure can build up in the grinding chamber.
15

Caution: Liquid nitrogen cooling is not permitted in grinding beaker A 11.4 (250
thumb (figure 2), and the mill starts. Pressing the drive down softly and slowly in
ml beaker made of polycarbonate).The beaker would break during cooling.
the axial pressing direction forces the pulverization tool into the grinding material
(pressing on one side only can tilt the drive, which could result in premature wear
Commissioning
and tear on the shaft seal).
When the pulverization tool engages the grinding material, the speed of the motor
Check whether the voltage specified on the type plate matches the mains voltage
decreases. The reduction in rpms is audible. If the reduction in speed is very pronounced,
available. The power socket used must be earthed (protective earth conductor
the speed of the drive should be increased to be able to insert pulverization tool
contact). If these conditions are met, the device is ready to operate after plugging
into the grinding material at nominal speed. Depending on the grinding material,
in the mains plug. If these procedures are not followed, safe operation cannot be
it may be necessary to repeat this procedure serval times. If the speed remains
guaranteed and / or the equipment may be damaged.
relatively constant while the pulverization tool is being lowered and raised back up,
Observe the ambient conditions (temperature, humidity, etc.) listed under “Technical
the grinding procedure is complete.
Data”.
The grinding time should not exceed 30 seconds. Further grinding will not improve
The grinding container in figure 1 can be unscrewed and removed by rotating it
the pulverization of the grinding material, but heating up will increase considerably.
counterclockwise. The drive section can be turned off on the guard ring (item 8).
The appliance is designed for short-time operation. Maximum on-time 1 min,
The grinding container is filled with a suitable material. It is essential at this point
minimum off-time 10 mins. Increasing the on-time or reducing the off-time can
not to fill the container higher than the maximum filling height (up to the lower
cause the motor to overheat prematurely, which will in turn cause the appliance to
edge in the grinding container, see figur 1). Filling the container to a higher level
switch off (see Faults and Troubleshooting). The appliance is fused to protect it in
will result in interfering with the operation, which will overload the mill. The filling
the case of over-use.
quantity can be reduced down to the „uniform grain size“ (in other words minimum
Before the grinding procedure is complete, the drive should be raised completely.
quantities are also possible).
Only then should the On/Off - switch be turned off. The advantage of this method
is that the pulverization tool cleans itself. Do not unsrew the grinding container
Note: Smaller filling quantities (for example only about 50 - 80% of the maximum
until the motor has come to a standstill. Any grinding material that adheres to the
filling quantity) can be pulverized more quickly, the final granularity is finer, the
guard ring can be swept off on the guard ring into the grinding container with a
range of granularity is smaller and there is less heating up of the grinding materials.
cleaning brush (no wire brushes!).
It is better to reduce a large quantity of grinding materials in two or three
Always remove any grinding scrap which gets into the interstice before using the
portions. The actual grinding time is only barely longer, but the grinding results are
appliance again (see ”Maintenance and Cleaning” section).
considerably better.
Please note: The grinding tools, the grinding container and the rotor shaft may
Bulky grinding material (for example hay, etc.) can also be filled up higher then the
be hot. Observe the safety instructions.
lower edge, but no more than about 20 mm below the upper edge of the grinding
container. The loose grinding material is forced into the grinding zone when the
Exchanging the pulverization tools:
drive is pushed in.
Please note: The edges of the blade are sharp. It should only be handled with
protective gloves. Please observe the safety instructions. Note that when changing
The filling grinding container is screwed in onto the drive up to the stop (you can
the tool directly after a grinding procedure, the pulverization tools are hot. The mill
hear a soft click just before reaching the stop).
must first be allowed to cool off.
When electrical power has been connected, you can begin with the grinding
Before exchanging the pulverization tools, unplug the power cord.
procedure. Grasp the hood with one hand, press the on/off - switch with your
Rotate the mill drive onto its head and push it into the grinding container with the
16

head down (see figure 3).
To determine whether the mill is ready to start up again, you should press the On/
Hold the rotor shaft securely in place with the curved single - head wrench by the
Off - switch at intervals of from 5 to 10 minutes. If the malfunction display lights
flattened section underneath the pulverization tool. Loosen and remove the
up again while the grinding container is screwed on, the temperature is still too
hexagonal nut (item 24) with the second single - head wrench and remove the
hot (maximum cooling - off time 30 minutes at an ambient temperature of about
blade or the beater.
25 °C).
Before assembling a new or another pulverization tool, make certain that all parts
The 100-115V version of the A11 basic is additionally equipped with a circuit
are clean. It does not matter which direction beaters and blades are installed in.
breaker. This turns the mill in case of sudden overload (motor blocks) from. If the
Due to their double - sided operation, the two pulverization tools have a service
cause of the fault has been eliminated (eg too large feed size or too much material
life that is twice as long. If one side is dull or worn, you can use the other side by
to be ground in the grinding bowl), the circuit breaker can again be without a
turning the beather or blade around.
waiting period with the supplied reset pin is turned on. For this purpose, the thin
After you have set the pulverization tool in place, tighten the hexagonal nut to
end of the pin is inserted into the hole on the back of the A11 basic (above the
finger thightness. To do this, use the tools as shown in figure 3.
power cord) to the stop. (see figure 6)
Eliminating malfunctions:
Malfunction and eleminating malfunctions
The mill does not start up:
Malfunction display
Causes:
The malfunction display lights up if the grinding container has not been screwed in
- Power cord is not plugged into the socket correctly.
to the stop and the On/Off - switch has been pressed.
- You did not push the On/Off - switch down far enough.
The malfunction display also lights up if the motor circuit breaker has been
- The grinding container is not screwed in up to the stop (when you press the
triggered and the On/Off - switch is pressed. The malfunction display alone does
On/Off - switch the malfunction display lights up).
not indicate which of the two possible errors has occurred. As a rule, if the motor
-
The mill has been heated up by the previous grinding procedure (the malfunction
circuit breaker has been engaged, an elevated temperature has been detected on
display lights up when you press the On/Off - switch).
the mill housing.
- After disassembling the middle section (for example to clean it) the switch block
is not completely engaged.
Temperature and over-current protection
- Circuit breaker tripped (only 100-115V version).
The A 11 basic mill is protected from overload and / or overheating by a
Remedy:
combined temperature and overcurrent switch.
- If necessary, check the power supply and the power cord.
The motor circuit breaker turns itself back off automatically when the temperature
- Push the On/Off - switch down until a „click“ is audible.
of the mill is again in an acceptable range and the On/Off -switch has not been
- Reset circuit breaker (only 100-115V version).
pressed. This may be after only a few seconds in the case of a short-term overload.
If the malfunction display lights up when you push the On/Off - switch:
If the mill has heated up a great deal after an extended period of operation, it may
- Screw the grinding container up to the stop (a soft „Click“ is audible) and if
take up to 30 minutes to cool off.
necessary remove any dirt from the threading.
You should not press the On/Off - switch repeatedly during the cooling off - phase,
- Check to make sure the switch block is engaged in place.
because the motor circuit breaker is equipped with an auto - hold function that
- If the mill has overheated, wait a few minutes for it to cool down.
prevents the mill from starting up again if the On/Off - switch is pressed repeatedly.
17

The motor is locked after the On/Off - switch has been pressed, or the
ring, do not remove them until after you have disconnected the power cord.
mill switches off shortly after it has started.
Caution: The shaft of the grinding container and the pulverization
Causes:
tools may not be hot. If necessary, allow the mill to cool off.
- Too much grinding material in the grinding container (filling hight exceeded).
- The feed granularity is too coarse.
- Fill the grinding container with a sucient amount of pre-reduced grinding
- Motor circuit breaker is tripped because of lock (overload).
material.
Remedy:
- Do not exceed the maximum filling hight in any case.
- Release the On/Off - switch and remove the grinding container. If fragments of
- In the case of hard or tough grinding material, reduce the maximum filling
the grinding material have become stuck between the grinding tool and the guard
height by 50%.
ring, do not remove them until after you have disconnected the power cord.
- If you do not release the On/Off - switch and the motor is locked, the motor
- Fill the grinding container with a sucient amount of pre-reduced grinding
circuit breaker or the circuit breaker (at 100-115V) will be tripped.
material.
- Before continuing with operation allow the mill to cool off or reset the circuit
- Do not exceed the maximum filling hight in any case.
breaker.
- In the case of hard or tough grinding material, reduce the maximum filling hight
The drive suddenly cuts out during the grinding procedure:
by 50%.
Causes:
- If the motor circuit breaker has been tripped, you must wait until it switches
- Overheating of the drive (malfunction display lights up when the On/Off - switch
back off.
is pressed, parts of the housing are warm).
- Wherein the triggered circuit breaker (100-115V version) this will be as described
- The grinding container has rotated itself loose and has triggered the circuit
above with no waiting time is reset.
breaker (malfunktion display lights up when you push the On/Off - switch).
The motor speed falls sharply or the mill is locked during operation:
- The power supply has been interrupted.
Causes:
Remedy:
- The feed granularity is too coarse, ≥ 10 mm.
- If the mill has overheated, wait a few minutes.
- There is too much feed material in the grinding container.
- Screw in the grinding container up to the stop.
- The grinding material is too tough.
- Check the power supply.
- The pulverization tool is being lowerded down into the grinding material too
quickly.
The lifting motion is blocked:
Remedy (motor speed falls):
Causes:
- The speed can be kept at a constant level if the grinding tool is moved slowly
- The middle section is dirty.
into the grinding material. If the speed drops off, you should not lower the tool
Remedy:
any further. Instead you should raise it again and try to move the tool slowly into
- Clean the middle section (see the section entitled „Maintenance and cleaning“).
the grinding material at the nominal motor speed.
If this occurs quite often, you should check the seal (item 20), (if necessary, replace
Remedy (locking):
the seal as described in the section „Maintenance and cleaning“).
- Release the On/Off - switch and remove the grinding container. If fragments of
the grinding material have become stuck between the grinding tool and the guard
18

assembled state. This should always be checked and if necessary corrected.
Maitenance and cleaning
Finally the desired pulverization tool is assembled.
Cleaning:
Maintenance:
Unplug the power cord before all cleaning tasks!
If beaters or blades wear out over the course of time, especially as a result of
constant grinding of very hard materials, so that rapid grinding with the appropriate
Dirty parts in the pulverization area can be cleaned with a cleaning brush. If there
quality is no longer possible, you need to replace the worn - out parts. Blades can
is a heavy accumulation of dirt, the grinding container can be cleaned in a dish-
be resharpened with standard commercially available sharpeners.
washer. If grinding dust is found in the middle section (the area where presure
spring is located) it can be blown out through the opening with compressed air.
Caution: If blades are sharpened with a grinding machine (wet grinding only is
If there is a heavy accumulation of dirt on the guard ring and the middle section
permissible). you should make certain that the same amount of material is removed
can be disassembled as follows (see figure 4).
on all sides. Otherwise the blades will become unbalanced.
If more grinding dust settles into the middle section over the course of time, the
First, the pulverization tool must be disassembled. (See „Exchanging the pulveriza-
seal (item 20) must be replaced.
tion tools“). Then the mill should be placed on the guard ring (item 8) and the two
To do this, you must follow this procedure (see figure 4):
guide screws (item 22) should be opened with a hexagonal socket head wrench.
• Disassemble the middle section as described under „Cleaning and maintenance”
Caution: The mill must be held in place by the drive section during the opening
• Loosen the three nuts (item 13) with a socket wrench.
process, since the middle section and the drive section are under spring tension as
• Take out the guard ring (item 8) and remove the seal from the plastic section.
a result of the pressure spring. When both screws have been openend, the drive
NOTE: Before installing the new seal, make certain, that the seal seat is clean and
section can be pulled away from the middle section. the switch block (item 15)
free of dust.
remains on the drive section.
To perform the assembly, place the middle section on its head.
The middle section and if necessary the pressure spring can be cleaned in a
• Insert the seal. Make certain as you do this that you install it in the correct
dishwasher.
direction
The drive section should simply be wiped clean with a moist cloth. Never clean in
• Now set the o-ring (item 19) in place. Always use a new o-ring
water or in a dishwasher.
• Then place the o-ring (item 9) in place, set the guard ring in place and screw it
Assembly:
until it is tight.
The pressure spring should be inserted into the middle section so that it is held into
When ordering spare parts, please give the manufacturing number shown
the guide groove. The guide screws should be screwed in until just after they no
on the type plate, the machine type and the name of the spare part and
longer protrude into the internal diameter of the middle section.
its item.
Now the drivesection should be set in place so that at first the spring is held in the
guide groove and the switch block snaps into the matching opening in the middle
Please send in the equipment for repair only after it has been cleaned and is free
section.
from any materials which may constitute a health hazard. Please tell us if you have
For the switch block to engage completely in place, the drive section must be pushed-
used any materials which are dangerous or which may constitute a health hazard.
into the middle section up to the lower stop. While the drive sections is inserted
about half way into the middle section, the guide screws should be tightened.
Caution: The switch block must engage flush in the middle section in the
19

Use only cleansing agents which have been approved by IKA to clean IKA devices.
using a single head wrench a/f 7. Using another single head wrench a/f 7, which is
To remove use:
attached to the two flats of the double beater shaft, screw the double beater until
Dyes isopropyl alcohol
it is hand - tight.
Construction materials water containing tenside / isopropyl alcohol
Please ensure that the off - drive shaft in the thread area is free from dust and mill
Cosmetics water containing tenside / isopropyl alcohol
feed deposits.
Foodstuffs water containing tenside
Filling height:
Fuels water containing tenside
The maximum filling height, shown in figure 5, must not be exceeded (about 20 mm
For materials which are not listed, please request information from IKA. Wear the
below the stainles steel upper edge). Otherwise the drive may overheat.
proper protective gloves during cleaning of the devices.
Furthermore, good grinding results connot be expected (a wide range of granula-
Electrical devices may not be placed in the cleansing agent for the purpose of
rity). What has been said before also applies here: (for example, only 50 - 80% of
cleaning.
the normaly filling quantity) are reduced more quickly, the granularity of the final
Before using another than the recommended method for cleaning or decontami-
product is finer, the range of granularity is smaller and the heating up of the grinding
nation, the user must ascertain with the manufacturer that this method does not
material is reduced.
destroy the instrument.
Grinding process:
Please return the appliance in its original packaging. Storage packaging is not
As the double beater is already immersed in the mill feed when the grinding beaker
sucient for returns. Please also use suitable packaging for transportation.
is being screwed on, it is important that the sample is well shredded (maximum
particle size ø 7 mm) so that the grinding beaker can be screwed on properly.
Accessories
The hardness of the feed product must not exceed 3 Mohs (medium hardness, e.g.
calcite), otherwise this will put too much strain on the beater, causing it to wear
A 11.1 Beater 1.4034) A 11.5 Grinding container 80 ml
out quickly.
A 11.2 Cutting blade (1.4112) A 11.6 Double beater
When you switch on the appliance at the On/Off button, the drive will be pushed
A 11.3 Beater (1.4112) A 11.7 Filling funnel
down slowly (see section on starting up). Once the grinding process is complete
A 11.4 Grinding container 250 ml
(usually after approx. 30 seconds), raise the drive and switch off the appliance at
Note on grinding beaker A 11.5:
the On/Off button.
Grinding cup made of Tefzel (ETFE). This fluorine plastic (similar to Teflon) possesses
Caution: Wait until the motor stops before unscrewing the grinding beaker.
excellent resistance to chemicals and is temperature-resistant from -200°C to +150°C
Caution: Do not use liquid nitrogen to cool the sample in grinding beaker A 11.4.
(ideal for direct cooling with liquid nitrogen).
You can use dry ice for cooling purposes, however, please ensure that the cooled
Color and structure flaws on the outside of the beaker are due to manufacturing
mill feed does not clump together (this is likely to happen with moist mill feed in
and do not affect the quality of the beaker.
particular).
The following instructions must be observed when using the large grinding
Caution: If you do not adhere to the maximum fill level and maximum mill feed
container A 11.4 (effective volume 250 ml):
hardness, the high starting torque of the grinding beaker may cause the grinding
Use double beater A 11.6 for crushing in grinding beaker A 11.4.
beaker to open by up to half a revolution and the analytical mill will switch off
The double beater is screwed onto the drive shaft. Hold the drive shaft in place
automatically.
20
